 MortarDesk
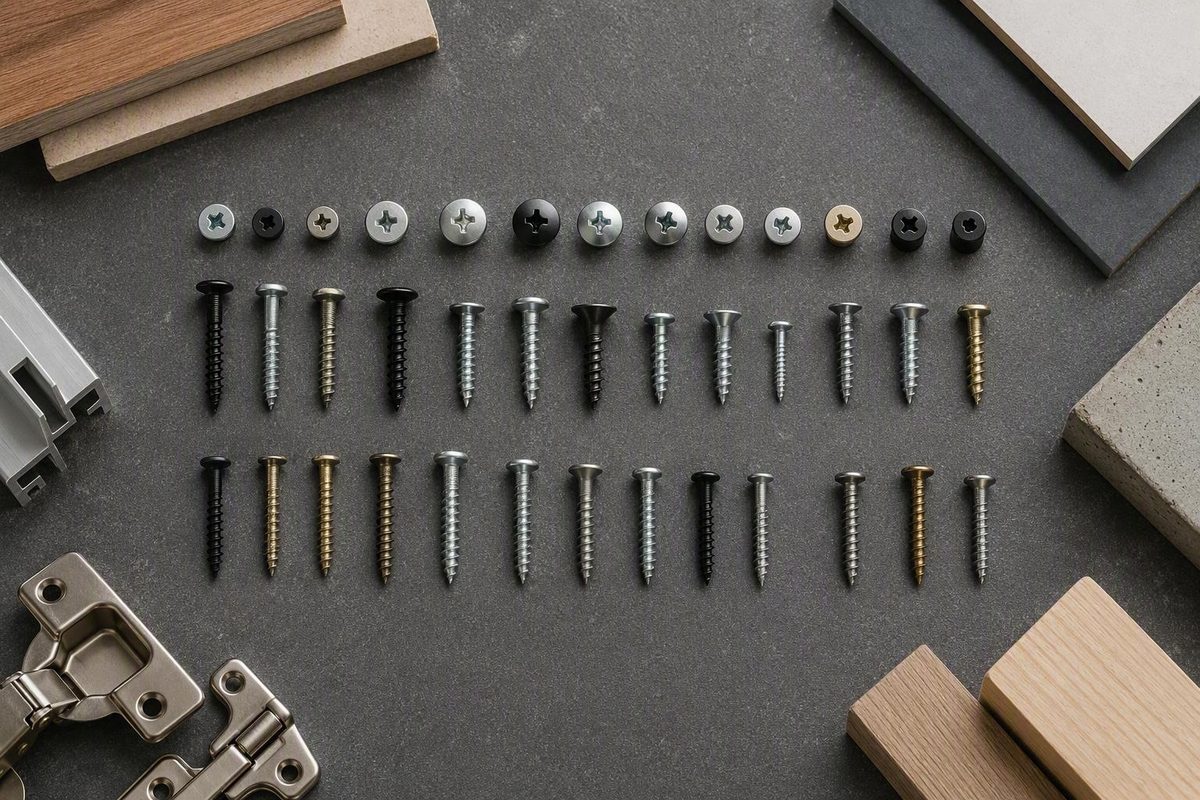
Cabinet mounting screws should be selected as part of a fastening system—not by length alone or by the words “cabinet screw” on a retail shelf. The cabinet’s designated mounting point, wall substrate, intervening layers, and installation instructions all affect the choice.
This guide explains fastener terminology, compares representative retail specifications, and provides a qualified example for mounting through structural cabinet rails into wood studs. It does not prescribe complete systems for metal studs, masonry, or drywall without backing. Those conditions require documentation specific to the cabinet and wall assembly.
For a conventional wood-stud wall, common candidates are purpose-made cabinet screws with broad washer, wafer, or pancake heads, driven through a structural rail, cleat, bracket, or other designated point into verified framing. Common market options include #8 and #10 diameters, but neither diameter—and no single length—is a universal specification.
The short answer for a typical wood-stud wall
Start with a purpose-made cabinet installation screw or documented construction screw intended for fastening cabinets to wood framing. Washer, wafer, pancake, and similar broad heads bear against more of the mounting rail than a small trim-style head, distributing clamping pressure across a larger area. That geometry does not establish the connection’s load capacity or compensate for a weak cabinet component.
Manufacturer and retailer listings commonly show #8 and #10 cabinet screws, with mounting-oriented products available in lengths including 2-1/2, 3, and 3-1/8 inches. SPAX identifies #8 and #10 as common cabinet-screw diameters and recommends cabinet or wafer-head screws for mounting to wood studs. This is manufacturer guidance, not a universal engineering specification. See SPAX’s cabinet-screw guidance.
A bounded installation example comes from Home Depot’s wall-cabinet guide. Its method calls for pilot holes through the cabinet mounting rails, centered over the studs, followed by 2-1/2-inch washer-head cabinet screws driven through the rails and into the studs. The guide also states that heavy cabinets should not be supported solely by drywall. Review the complete retailer method.
Do not turn that example into a rule that every cabinet needs a 2-1/2-inch screw. Before the fastener reaches framing, some of its length may be consumed by:
- The cabinet’s structural rail, cleat, bracket, or other mounting component
- Drywall or plaster
- Tile and its setting material
- Furring
- A cabinet-to-wall gap
- Shims at the fastening point
- Other components required by the cabinet system
A broad head cannot rescue a screw that misses the stud. It also cannot make an unsupported thin back panel structural, establish adequate framing engagement, or validate an undocumented installation pattern.
Before buying fasteners, locate the cabinet manufacturer’s installation instructions. Identify the designated rails, cleats, brackets, or mounting holes and check for requirements covering fastener type, diameter, length, number, spacing, or backing.
Selection boundary: The market examples in this guide establish common product descriptions and available sizes. They do not establish an allowable cabinet load, universal screw count, spacing pattern, framing engagement, or complete fastening system for every wall.
First confirm that it is actually a wall-mounting screw
“Cabinet screw” is a broad retail category. It can describe a screw used to build a cabinet, join adjacent cabinets, attach hardware, install a knob, or fasten a completed cabinet to a wall. Those jobs are not interchangeable.
Define a mounting screw by its stated application and documented specifications—not simply by its retail category.
| Application | What the screw does | Selection distinction |
|---|---|---|
| Primary wall mounting | Connects a structural rail, cleat, bracket, or designated mounting point to wall structure | Look for a documented cabinet-installation or construction screw with a head compatible with the mounting component |
| Joining adjacent cabinets | Connects aligned face frames, sides, fillers, fascia, or legs | Often uses shorter assembly or trim-head screws selected for the cabinet material and joint |
| Building cabinet boxes | Connects cabinet components during construction | May use construction, assembly, funnel-head, confirmat, or other material-specific screws |
| Pocket joinery | Joins frames, fillers, braces, or similar parts through pocket holes | Must match the material, pocket geometry, and jig system |
| Attaching hinges or slides | Secures hardware to cabinet parts or system holes | Often uses Euro screws or other hardware-specific fasteners |
| Installing knobs or pulls | Passes through a door or drawer front into the hardware | Commonly a machine screw rather than a wood-framing fastener |
Short assembly and trim-head screws can be appropriate for joining face frames, fillers, fascia, legs, or cabinet sides. Their suitability for those connections does not make them substitutes for primary wall fasteners. A trim head prioritizes a small, less visible hole, while primary mounting commonly calls for a larger bearing profile at the structural rail.
Confirmat screws are associated with cabinet construction in materials such as melamine and particleboard. Their large shanks and broad threads serve a different role from a default wall-mounting fastener. See the vendor’s comparison of cabinetry screw types.
Euro screws are commonly associated with hinge plates and drawer slides in 32 mm system holes. Quickscrews separates that hardware application from its wall-installation product, which it lists as a #10 x 2-1/2-inch washer-head screw with a Type 17 point and square drive. Compare the vendor’s listed cabinet applications.
Knob screws demonstrate why the category name is insufficient. One retailer’s cabinet-screw category includes a #8-32 x 2-inch truss-head machine screw intended for a cabinet knob. The machine-thread designation and stated purpose distinguish it from a screw intended to mount a cabinet to wood framing. See the retailer category and its product filters.
Use this package-label test before purchasing:
- Intended use: Does the manufacturer identify cabinet installation or the exact connection being made?
- Diameter: Does the gauge match the cabinet instructions and fastener documentation?
- Overall length: Will it span the complete path to the structural substrate?
- Head: Can it seat correctly on the rail, cleat, bracket, or mounting hole?
- Drive: Do you have the exact, unworn bit?
- Thread: Is it intended for the connected materials?
- Point: Is the point style documented for the proposed installation?
- Material and coating: Are they documented for the intended exposure and connected materials?
- Substrate: Does the product identify wood, metal, masonry, or another base material?
- Technical information: Are installation limits, approvals, or load data available if the connection requires them?
If the package does not clearly distinguish wall mounting from assembly or hardware attachment, verify the exact product number in the manufacturer’s technical literature.
How diameter, head, drive, thread, and point affect the choice
Length is only one part of a cabinet mounting screw. Diameter, head geometry, drive recess, thread, point, material, coating, and intended substrate all affect whether the fastener fits the assembly.
Diameter
The familiar #8 and #10 labels are screw gauges, not load ratings. Both commonly appear in mounting-oriented listings, but neither is universally sufficient. The cabinet instructions, mounting component, framing, installation pattern, and fastener documentation must be considered together.
Retail categories also contain #6, #14, 1/4-inch, and other diameters because they include multiple cabinet-related applications. A diameter offered within the category may belong to a hardware, panel, assembly, or construction product rather than a primary wall fastener.
Do not assume that the larger of two diameters automatically creates the correct connection. A larger screw still requires a compatible rail or bracket, appropriate placement, suitable pilot hole where specified, sound framing, and a head that seats correctly.
Head type
The head transfers clamping pressure to the cabinet’s mounting component.
- Washer head: A broad head with substantial exposed bearing area.
- Wafer head: A wide, low-profile head used where a conventional countersunk head is not wanted.
- Pancake head: Another broad, low-profile form found among mounting-oriented products.
- Button head: A rounded broad-head term sometimes used for cabinet screws.
- Oval washer head: A washer-like bearing profile with a more rounded top.
- Pan head: Has a relatively flat bearing surface beneath the head, but the shape alone does not prove that a particular screw is suitable for primary cabinet mounting.
- Flat head: Designed to enter a countersink and sit flush or below the surface; it does not provide the same exposed bearing profile as a washer or wafer head.
- Trim head: Uses a small head to leave a less visible hole, making it useful for some finish and cabinet-joining work rather than a universal primary mounting choice.
A broad head spreads pressure across more of a structural rail than a small trim head. It does not prove that the rail is structural or establish allowable load.
Drive recess
Cabinet-related drives include star or Torx, square, Phillips, Pozidriv, and Phillips/slotted combination recesses. That is an installation preference, not evidence of greater structural capacity.
Cam-out occurs when the driver slips from the recess. Repeated cam-out can damage or strip the head, making the screw difficult to tighten, inspect, or remove. Woodworker’s Hardware recommends using a drill or driver clutch to control torque and identifies damaged heads, stripped threads, split material, and overdriving as potential problems. Review its screw terminology and torque guidance.
Choose a drive for which you have the exact bit.
Thread and point
Many cabinet-screw listings describe coarse-thread steel products intended for wood-to-wood fastening. That description is consistent with an ordinary cabinet-to-wood-stud application, but “coarse thread” alone does not verify compatibility with a particular cabinet rail, engineered framing product, metal stud, or masonry substrate.
Point descriptions can include:
- Type 17
- Sharp
- Gimlet
- Self-drilling
- Standard
- Drill point
- Proprietary cutting-point terms
Treat these as product characteristics, not performance guarantees. A point marketed for easier starting does not establish that pilot holes are unnecessary in every cabinet material or framing species.
Representative market comparison
The following examples show how mounting-oriented listings vary. They are not rankings or prescriptions.
| Representative listing | Diameter and length | Head | Drive or point information | Evidence boundary |
|---|---|---|---|---|
| Quickscrews installation screw | #10 x 2-1/2 inches | Washer | Square drive; Type 17 point | Vendor-listed wall-installation product |
| Menards-listed cabinet screws | Examples include #10 x 2-1/2 and #10 x 3 inches | Wafer or pancake, depending on product | Star-drive examples; category also includes other drives and points | Retail availability, not a universal specification |
| GRK low-profile cabinet range | #8 products in multiple lengths, extending to 3-1/8 inches | Washer | Full drive and approval details must be checked on the exact product | Retail range, not a load recommendation |
Menards’ category also includes star, Phillips, Pozidriv, square, and combination drives, along with flat, pan, pancake, trim, truss, wafer, and other head styles. Compare the listed dimensions and attributes.
GRK retailer listings show #8 washer-head cabinet screws in several lengths, including products extending to 3-1/8 inches. View the listed GRK cabinet-screw range.
Choose screw length from the complete assembly, not a rule of thumb
A screw’s nominal overall length is not the same as its engagement in framing. The fastener passes through cabinet and wall materials before reaching the stud or structural blocking.
Use the following as an accounting worksheet, not as a self-contained sizing formula:
Mounting-point thickness + wall-finish thickness + gap or shim thickness + documented framing engagement = minimum functional path
The worksheet cannot produce a valid fastener choice until the required engagement is supplied by applicable cabinet instructions, fastener technical data, an approval, or another governing document. You must then confirm that an available screw—and its threaded portion—is compatible with the complete assembly.
Measure each part of the path
Mounting-point thickness is the actual thickness of the structural rail, cleat, bracket, or designated cabinet component through which the screw passes. Do not automatically substitute the thickness of the visible back panel. A thin plywood, MDF, hardboard, or particleboard back may be a closure panel rather than a structural mounting point.
Wall-finish thickness includes drywall, plaster, tile, setting material, paneling, or other layers between the cabinet and framing. Measure the actual assembly where possible. Nominal product names do not always equal actual dimensions, a broader measurement issue explained in Mortar Desk’s discussion of nominal versus actual sizes.
Gap or shim thickness includes the space created while plumbing the cabinet, compensating for an uneven wall, or spanning a deliberate installation gap. Shims placed at fastening points become part of the path the screw crosses before reaching framing.
Documented framing engagement is the engagement required by the applicable cabinet instructions, fastener technical information, approval, or local requirement. It should not be invented from a generic rule of thumb.
Why a common listed length may or may not work
A 2-1/2-inch screw can suit a documented assembly, and that length appears in both a retailer installation method and mounting-oriented product listings. But portions of the screw may sit within the rail, cross wall finishes, or span furring, gaps, and shims. Only the remaining compatible threaded length reaches the framing.
Longer 3- and 3-1/8-inch products are also available. They may fit a thicker documented assembly, but extra length is not automatically the right choice. Diameter, threaded length, head, material, intended substrate, and product limitations must still match the connection.
The supplied evidence does not establish a universal minimum framing engagement, cabinet load, screw count, or spacing pattern. Do not improvise those values. Consult:
- The cabinet manufacturer’s installation instructions
- The fastener manufacturer’s technical data
- Recognized reports or approvals where applicable
- Requirements for the specific cabinet and wall system
- Applicable local requirements
Before selecting length, record:
- Actual rail, cleat, bracket, or mounting-point thickness
- Drywall or other wall-finish thickness
- Tile, setting material, or plaster layers
- Furring thickness
- Cabinet-to-wall gap
- Shim thickness at each fastening point
- Verified stud or blocking locations
- Whether the available screw is fully or partially threaded
- Required fastening locations
- Any documented engagement requirement
- Any drilling-path uncertainty that must be resolved before work begins
If these measurements and documents do not produce a clearly defined fastening path, stop rather than substituting an arbitrarily longer screw.
Treat wood studs, metal studs, masonry, and drywall as different cases
“Wall” describes a location, not the material that must support the connection. A fastener selected for wood framing should not be carried unchanged into metal studs, masonry, or an unsupported drywall-only position.
| Wall substrate | Selection approach | Boundary |
|---|---|---|
| Wood studs or structural blocking | Fasten through the designated structural mounting component into verified framing with an appropriate cabinet-installation or documented construction screw | Confirm the complete path, required engagement, fastener pattern, and cabinet instructions |
| Cold-formed metal studs | Use a documented system designed for the actual stud and wall assembly | The supplied evidence does not establish a screw, load table, reinforcement requirement, or complete system |
| Solid concrete | Select a complete anchor or fastening system documented for the concrete and cabinet connection | Do not treat a wood-stud screw or unspecified lag as a concrete anchor |
| Brick or block | Identify the masonry condition and use a system documented for it | The supplied evidence does not establish one system for brick, mortar joints, solid block, and hollow block |
| Drywall without structural backing | Do not rely on drywall alone for a heavy cabinet | Add documented backing or use a complete system specified for the cabinet and wall |
Wood studs or blocking
The supported general method is to pass an appropriate cabinet-installation or documented construction screw through the cabinet’s structural rail, cleat, bracket, or designated point and into verified wood framing.
If the designated mounting location does not align with framing, do not move the fastener into a weak cabinet panel simply to reach a stud. Resolve the mismatch through cabinet-specific instructions, documented blocking, a compatible cleat system, or qualified project guidance.
Metal studs
The available evidence does not identify a validated cabinet-mounting screw, reinforcement requirement, load table, or complete fastening system for cold-formed metal studs. It therefore cannot support a product recommendation for that condition.
Use the cabinet instructions and a documented fastening system designed for the actual metal-stud wall assembly. A screw intended for wood framing should not be presumed suitable merely because it can penetrate metal.
Concrete, brick, or block
A manufacturer article discusses lag screws and predrilling for concrete or masonry, but it does not identify the required anchor or distinguish among solid concrete, brick, mortar joints, solid block, and hollow block. That is insufficient evidence for specifying a masonry connection.
Do not apply the wood-stud example to masonry. Select a complete anchoring system documented for the exact substrate, cabinet mounting point, and installation conditions.
Drywall without structural backing
Heavy cabinets should not rely solely on drywall. In the cited retailer method, toggles or a French cleat are discussed only as supplemental support where the cabinet is also secured to a stud; they are not presented as universal replacements for framing. See the guide’s stated drywall limitation.
Limited stud access, misaligned framing, hollow or uncertain masonry, and unknown wall construction require a documented fastening or reinforcement plan—not merely a longer screw. Pause when the framing cannot be verified, a designated mounting point misses structural support, required backing is absent, or the proposed drilling path cannot be assessed from the available project information.
These are selection boundaries, not substrate-specific engineering specifications. Mortar Desk publishes general building-material reference information rather than individual contracting or engineering advice; structural work and local requirements should be addressed accordingly. Read Mortar Desk’s scope and limitations.
A practical buying checklist for comparing products
Compare exact product specifications rather than brand reputation, package graphics, customer ratings, or category placement.
Use this checklist in order:
-
Stated application Look for cabinet installation, cabinet-to-wall fastening, or another description that directly matches the connection.
-
Substrate Confirm whether the product is intended for wood-to-wood work, metal-to-wood attachment, masonry anchoring, or another material combination.
-
Cabinet mounting point Verify compatibility with the rail, cleat, bracket, hanger, or designated hole. The head should seat correctly without passing through or interfering with hardware.
-
Diameter Compare the gauge with the cabinet instructions and fastener documentation. The common #8 and #10 market options summarized above are candidates, not universal answers.
-
Overall length Account for the complete path. Commonly listed mounting lengths such as 2-1/2, 3, and 3-1/8 inches establish availability, not suitability for a particular assembly.
-
Head type Identify whether the product has a washer, wafer, pancake, button, oval washer, pan, flat, trim, truss, or other head. Do not infer intended use from appearance alone.
-
Drive Verify star or Torx, square, Phillips, Pozidriv, combination, or another recess, along with the exact bit size.
-
Thread and point Check the thread form, threaded length, and point description. Confirm compatibility with the mounting component and substrate.
-
Material Determine whether the fastener is carbon steel, another steel, stainless steel, or a different specified material.
-
Coating Look for a named coating or plating rather than relying on color.
-
Exposure rating Use the exact product documentation. A general “interior and exterior” retail label does not establish suitability for every exposure.
-
Package quantity Count primary wall fasteners separately from cabinet-joining and hardware screws. Do not infer the required installation pattern from the number in the package.
-
Technical data Look for installation instructions, limitations, compatible-material information, approvals, and load data where required.
-
Required bit Confirm the drive type and size. Do not assume that a bit is included.
Retail filters illustrate the market’s breadth but can also mislead. A category may include washer, wafer, pancake, truss, trim, round, pan, and flat heads alongside star, Phillips, square, Pozidriv, and combination drives. A filter means that at least one product carries the attribute; it does not mean every item in the category shares it.
Likewise, a category dominated by steel, coarse-thread, wood-to-wood products may still contain machine screws, hardware fasteners, or products for different cabinet applications. Open the individual listing and verify the exact item.
Prices, rebates, inventory, and package formats change by time and location. Compare GRK, SPAX, Quickscrews, Grip Fast, Everbilt, and other products by documented attributes rather than unsupported claims that one brand is strongest, safest, or best.
Red flags include:
- No stated cabinet-mounting application
- No compatible-substrate information
- An ambiguous coating or exposure description
- No technical documentation where the connection requires it
- A small trim-style head presented as a universal mounting solution
- A knob machine screw appearing in a cabinet-screw category
- Performance claims without stated conditions or limitations
- Missing diameter, length, material, or drive information
Wood-stud installation sequence and torque control
The following is a general workflow for the bounded wood-stud example. It remains subordinate to the cabinet manufacturer’s instructions and does not establish a universal screw count, spacing pattern, or framing-engagement requirement.
-
Identify the structural mounting locations. Find the cabinet’s mounting rails, cleat, brackets, or designated holes. Do not assume that a thin plywood, MDF, hardboard, or particleboard back is structural.
-
Read the cabinet instructions. Confirm the required hardware, fastening locations, installation order, clearances, and backing requirements before drilling.
-
Map the assembly. Record the wall finish, verified stud or blocking locations, gaps, shims, and other layers included in the screw path.
-
Resolve drilling-path uncertainty. If the planned path cannot be assessed from the available project information, stop. This guide does not provide a procedure for locating concealed services.
-
Mark the verified framing. Transfer the relevant centerlines to positions that remain visible while the cabinet is being placed. Confirm that they correspond with designated mounting locations.
-
Provide temporary support. The cited retailer method uses a temporary ledger for upper cabinets and recommends a helper because wall-cabinet installation is an advanced project.
-
Position the cabinet. Rest it on the temporary support and check its relationship to the layout and neighboring cabinets.
-
Shim at structural fastening points where necessary. Include the actual shim thickness in the length calculation. Position shims so tightening does not pull the cabinet out of alignment.
-
Check level and plumb. Correct the position before final tightening and recheck it as the cabinet is secured.
-
Drill pilot holes where the method or materials require them. The retailer method includes pilot holes through the mounting rails. Pilot-hole size and depth depend on the fastener, cabinet material, framing, and applicable instructions; no universal diameter is established here.
-
Drive the primary mounting screws. Pass them through the designated structural mounting points and into verified studs or blocking. The retailer guide uses two holes in each rail for its described method, but that numeric pattern is not a universal requirement.
-
Control installation torque. Stop when the broad head is firmly seated. Do not bury the head, crush the rail, strip the threads, or continue after repeated cam-out.
-
Join adjacent cabinets with separate fasteners. Align and clamp face frames or cabinet sides, then use appropriate shorter joining screws after any required clearance and pilot holes. Review the forum discussion in that context.
-
Inspect the completed installation. Confirm that each primary fastener reached its intended support. Look for split or crushed rails, tilted or incompletely seated heads, stripped recesses, displaced shims, and cabinet distortion. Recheck level, plumb, and alignment.
If a head continues turning without seating, a rail cracks, or a screw misses its intended support, stop and inspect. More torque or an unplanned extra screw does not diagnose the underlying problem.
Common selection and installation mistakes
Choosing by length alone. A longer screw is not automatically more appropriate. Diameter, head, intended application, threaded length, mounting point, substrate, coating, and documentation also matter.
Treating every cabinet screw as a mounting screw. Retail categories can mix installation screws with knob machine screws, Euro hardware screws, confirmat screws, pocket screws, box-construction screws, and trim-head joining screws.
Fastening a heavy cabinet only to drywall. The cited installation guidance requires structural attachment and does not treat drywall alone as adequate support.
Driving through an unsupported back panel. Use the rail, cleat, bracket, or location designated by the cabinet manufacturer. A visible back panel is not necessarily a structural mounting point.
Substituting a joining screw for a wall fastener. A short trim-head screw may suit an aligned face-frame joint but performs a different role from a broad-head primary mounting screw.
Using generic drywall screws as the default choice. SPAX discourages generic drywall screws for heavy cabinet mounting, while woodworking forum participants also commonly favor purpose-made cabinet screws. Neither source supplies independent comparative test data, so this is a conservative product-selection boundary rather than a quantified strength claim.
Assuming a broad head fixes a missed stud. Head area changes how pressure bears against the cabinet component; it does not create support behind the wall.
Using extra length to cure uncertainty. A longer screw does not resolve unknown framing, absent backing, a weak rail, or an undocumented metal-stud or masonry connection.
Overdriving. A buried or tilted head, crushed rail, split material, stripped thread, or damaged recess is a reason to stop and inspect.
Assuming a point style eliminates predrilling. Type 17, self-drilling, sharp, and gimlet describe product geometry. Pilot-hole requirements depend on the documented installation and actual materials.
Inferring exposure suitability from a general label. Verify the exact material, coating, exposure rating, and compatibility rather than relying on a broad retail category.
Ranking brands without comparable data. Retail reviews and reputation do not establish connection capacity. Compare like-for-like technical specifications, approvals, load data, and documented installation conditions where available.
No supplied source establishes a universal cabinet load, screw count, spacing pattern, framing engagement, or brand ranking. The evidence also does not provide a complete fastening specification for metal studs or masonry.
Are #8 or #10 cabinet mounting screws better?
Neither is universally better. Both are common mounting-oriented diameters, but the appropriate choice depends on the cabinet instructions, structural mounting point, fastener documentation, framing, and complete installation pattern. SPAX lists both diameters among its cabinet and wafer-head options. See the manufacturer’s stated size range.
A larger diameter does not correct inadequate length, a missed stud, unsuitable placement, or the wrong substrate.
Are 2-1/2-inch screws long enough to hang wall cabinets?
They can be when the documented assembly leaves the required framing engagement after the screw crosses the mounting point, wall finish, gap, and shims.
The 2-1/2-inch size appears in a retailer’s wood-stud installation method and in mounting-oriented product listings, but it is not a default for every cabinet. Longer products may fit thicker assemblies, subject to measurements, compatible threaded length, and the applicable documentation.
Why do cabinet mounting screws have washer, wafer, or pancake heads?
These broad head styles provide more exposed bearing area against a cabinet’s structural mounting component than a small trim-style head.
That geometry does not establish allowable load or compensate for a nonstructural rail, inadequate framing engagement, or an unsuitable fastener pattern.
Can cabinets be mounted with drywall screws or drywall anchors?
Generic drywall screws are not the conservative default for heavy wall-cabinet mounting; available manufacturer guidance favors purpose-made cabinet screws or other construction screws documented for the connection. The supplied evidence does not provide independent comparative strength testing.
Heavy cabinets should not rely solely on drywall. If the designated mounting points do not align with framing, use documented backing, reinforcement, a compatible cleat, or another complete method specified for the cabinet and wall assembly.
Can the same screws mount cabinets to wood studs, metal studs, and masonry?
No single screw should be presumed suitable for all three substrates.
A broad-head cabinet screw documented for wood-to-wood fastening may be a candidate for verified wood studs or blocking. The supplied evidence does not establish a complete system for metal studs or masonry, so those conditions require substrate-specific documentation.
Use a specification-first decision rule: identify the cabinet’s structural mounting point and wall substrate, account for every intervening layer, and then compare purpose-made fasteners by documented diameter, length, head, drive, thread, material, coating, and technical data. For an ordinary wood-stud wall, #8 and #10 washer-, wafer-, or pancake-head cabinet screws are common candidates. If the wall is masonry, metal-stud construction, drywall without backing, or otherwise uncertain, do not apply the wood-stud example—obtain a documented fastening method for that assembly.