 MortarDesk
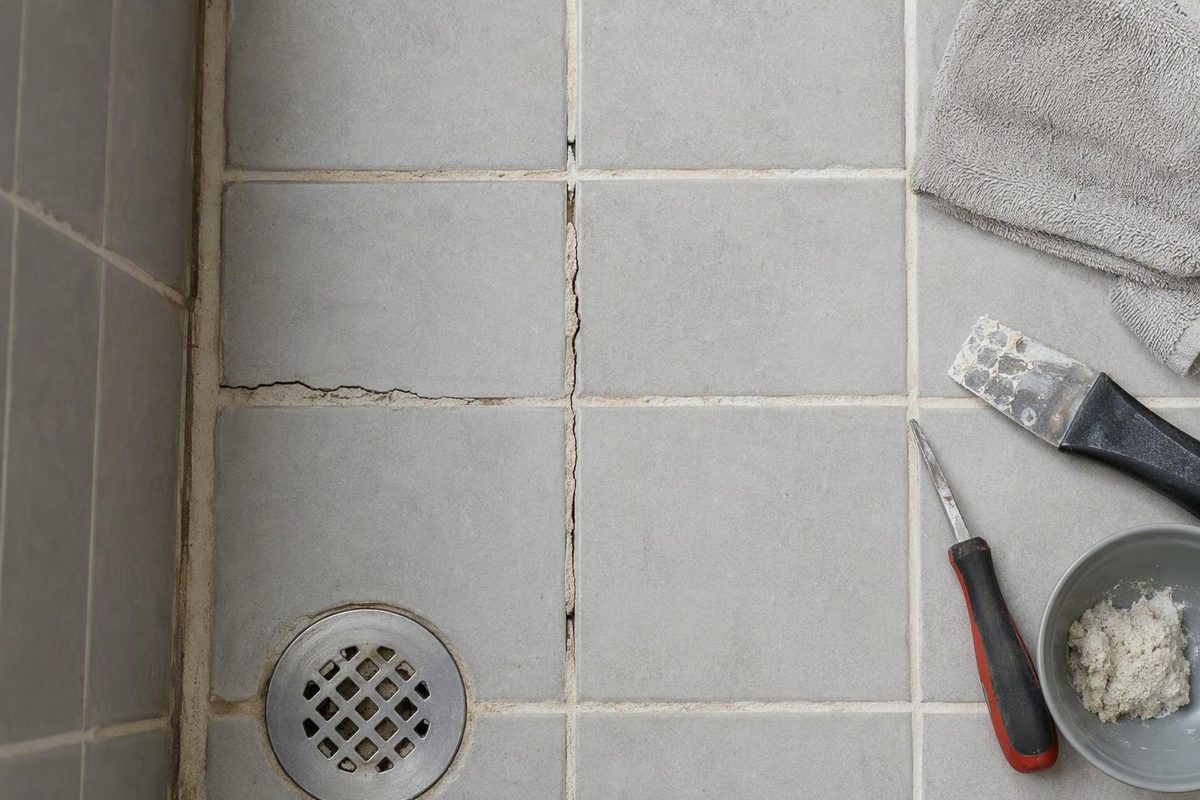
Grout cracking in a shower is not a single diagnosis. A split in the middle of a flat tiled wall belongs to a different category from a failed joint where the wall meets the floor, and both differ from a crack that continues through a tile.
Start with the joint’s location, then determine whether the failed material is rigid grout or flexible sealant. In general, grout is used between tiles on the same stable plane, while compatible flexible wet-area sealant is used at corners and other movement-prone transitions. Replacing cracked grout with more rigid grout at a joint that continues to move may simply reproduce the failure.
The visible crack is only a surface clue. Tile and grout are finishes, not the shower’s entire water-management system, so one crack does not prove that the pan or membrane has failed. The opposite assumption is also unsafe: an underlying membrane is not a reason to ignore recurring cracks, loose tile, persistent moisture, mold beneath failed sealant, or water reaching finishes outside the enclosure.
The guidance below is a cautious diagnostic framework, not a substitute for the current instructions governing a particular grout, sealant, membrane, pan, drain, tile, stone, tub, or enclosure. The available supporting material consists largely of commercial guidance and unverified community discussions rather than a complete set of primary installation standards. Product selection, joint design, compatibility, preparation, and cure requirements must therefore be confirmed from the documentation for the actual shower assembly.
Start Here: Locate the Crack and Identify the Failed Material
Before buying grout or caulk, map the failure. A location-first assessment reduces the risk of choosing a repair product solely because its color or texture resembles the original material.
Use this preliminary decision tree:
-
Is the crack between tiles on one flat plane? Treat it as a field-joint problem. Possible categories include weak or poorly installed grout, inadequate joint preparation, unstable tile, substrate movement, or deflection.
-
Is it in an inside corner or where a wall meets the floor? Treat it first as a movement-joint problem. Adjoining planes can move differently, making another rigid-grout repair questionable.
-
Is it at a curb, threshold, pan, tub, niche, fixture, enclosure, or material transition? Identify the components meeting at the joint. Their manufacturers’ instructions should determine whether the joint is sealed and which products are compatible.
-
Does the crack run through a tile instead of following the joint? Stop treating it as simple grout maintenance. Impact, inadequate support, or movement within the tile assembly may be involved.
-
Is water appearing outside the enclosure? Open a separate diagnostic branch. Door alignment, glass seals, the curb, threshold, plumbing, drainage, and waterproofing may require evaluation independently of the visible crack.
Identify what actually failed
Do not assume that every line between tiles is grout. If inspection can be performed without causing damage, examine the material gently in an inconspicuous area.
- Grout is generally hard and cement-like.
- Silicone or another elastomeric sealant is generally flexible or rubbery.
Appearance alone is not conclusive. A previous installer may have applied sealant over grout, used different products along one transition, or made a repair that now obscures the original joint.
For a recently completed shower, ask the installer for product names, receipts, leftover containers, installation photographs, and applicable technical instructions.
Record the pattern before disturbing it
Photograph the crack when the shower is dry and again after normal use. Include a close view and a wider photograph showing the joint’s position in the enclosure. Record:
- whether the failure is isolated or widespread;
- whether it is a hairline split, open gap, chip, or powdery joint;
- whether it is stable or widening;
- when it first appeared;
- whether it followed an earlier repair;
- how quickly a previous repair failed;
- whether the area stays dark after surrounding joints lighten.
Make only limited, non-destructive checks:
-
Press gently on adjacent tiles and note visible movement.
-
Look for cracked tile, widespread crumbling, peeling sealant, or gaps around components.
- If failed sealant is already being removed, note visible mold or moisture behind it.
- Inspect nearby trim, baseboards, drywall, ceilings, flooring, and door frames for dampness, swelling, staining, or peeling finishes.
Do not pry up tile merely to investigate a surface crack.
These observations generally lead to one of three preliminary outcomes:
- Likely routine movement-joint maintenance: An isolated failed corner or transition joint, with stable adjacent tile and no broader moisture symptoms.
- Possible same-plane grout or substrate trouble: A field joint with crumbling material, recurrence, tile movement, or connected cracking.
- Possible enclosure, drainage, plumbing, or waterproofing investigation: Persistent subsurface moisture, mold beneath failed material, multiple failures, or water outside the shower.
Location and appearance can narrow the possibilities. They cannot establish the exact construction defect without examining the assembly.
Why Shower Grout Cracks
Cement-based grout cures into a hard, rigid joint filler. That behavior is useful between stable tiles on the same plane, but it provides little accommodation for differential movement.
At a corner, adjoining walls can respond differently to temperature, moisture, loading, settling, or movement elsewhere in the building. The same principle applies where tile meets a shower floor, curb, pan, tub, ceiling, fixture, or different material. These are plausible stresses, not proof that “ordinary house movement” caused a particular crack.
Repeatedly packing grout into a movement-prone corner may therefore produce only a temporary cosmetic repair. The replacement has the same rigid behavior as the material that failed.
Same-plane cracking has a wider range of possible causes
A crack between tiles in the middle of a flat wall or floor belongs to a different diagnostic category. Possible contributors include:
- an unsuitable grout mix;
- inadequate packing of the joint;
- debris or residue left before grouting;
- poor curing conditions;
- contamination or incompatible surface treatments;
- a thin repair applied over old material;
- movement of a loose tile;
- substrate or framing movement;
- excessive deflection;
- backer or underlayment problems;
- stress transferred from a joint or crack below the tile.
A visual pattern cannot identify which explanation applies. Powdery grout may be consistent with weak material or installation trouble, but it does not reveal the original mixing, preparation, or curing conditions. A recurring crack shows that the first repair did not resolve the cause, but it does not show whether movement originates in the tile, setting material, backer, framing, or another component.
Read the crack pattern cautiously
Different patterns justify different responses:
- A short, clean hairline split: Document and monitor it, particularly if it is isolated and the adjacent tile appears stable.
- Powdery, soft, or missing grout: Determine how far the deterioration extends before attempting a localized repair.
- Several connected cracks: Consider movement within the tile field or its support rather than repairing each line independently.
- A crack continuing through tile: Investigate the tile and support. Regrouting alone cannot repair stress that has fractured the tile.
- A crack returning in the same place: Reassess the material, preparation, joint configuration, and potential movement before repeating the repair.
- Cracking in a new shower: Photograph it and request installer review rather than accepting an unsupported explanation that it is normal.
Commercial tile guidance likewise distinguishes isolated hairline cracks from crumbling, recurring, or widespread failure and recommends removing damaged material instead of simply covering it with new grout (TileBar’s grout-crack overview).
Cause-and-clue table
| Joint location and symptoms | Plausible explanations | Cautious next action |
|---|---|---|
| Inside corner with a clean split | Rigid grout in a moving joint; failed or poorly bonded sealant; differential movement | Identify the material and check the applicable system instructions |
| Wall-to-floor joint cracking repeatedly | Wrong material, poor adhesion, obstructed joint, unsuitable configuration, or continued movement | Remove failed material carefully and inspect the exposed joint before repairing it |
| Short field-joint crack with stable tile | Local grout weakness, preparation problem, curing issue, or limited movement | Document, monitor, and consider localized regrouting if no other symptoms appear |
| Powdery grout in several joints | Weak grout, mixing or curing trouble, contamination, or broader installation trouble | Determine the extent and request installer review if widespread |
| Field crack beside a loose or hollow-sounding tile | Inadequate support, bond trouble, substrate movement, or deflection | Stop localized repair and obtain a tile assessment |
| Crack through grout and tile | Impact or stress within the tile assembly | Investigate the tile and its support |
| Cracking soon after remodeling | Product selection, preparation, workmanship, or assembly movement | Preserve records and request installer review |
| Crack accompanied by exterior water | Enclosure, curb, threshold, plumbing, drainage, or waterproofing issue | Treat the leakage as a separate and more urgent investigation |
Grout sealer does not make a rigid joint flexible. When recommended for the particular grout, it may reduce absorption or staining, but it cannot prevent cracks caused by movement or structural stress.
What Grout Does—and What Actually Manages Water
Tile and grout form the visible shower finish. Grout fills joints and supports the finished surface, but it should not be treated as the shower’s sole waterproofing layer.
A tiled shower normally depends on an underlying water-management assembly. Depending on the design, that may involve a pan, liner, bonded membrane, waterproof backer system, integrated drain components, or another manufacturer-defined arrangement. The intended assembly must protect vulnerable construction and direct water appropriately even if some moisture passes beyond the tile surface.
This leads to two important conclusions:
- One visible grout crack does not, by itself, prove that the pan or membrane has failed.
- The presence of an underlying membrane does not make recurring cracks, loose tile, retained moisture, or exterior leakage safe to ignore.
A homeowner forum discussion illustrates this distinction between the tile-and-grout finish and the underlying pan or membrane, but the diagnoses offered there were unverified and should not be treated as installation specifications (DIY Home Improvement Forum discussion).
Separate surface wetting from persistent moisture
Three observations are commonly confused:
Surface water on grout: Grout gets wet during shower use. This fact alone does not identify a defect.
Temporary darkening: Record whether the change is uniform and how long it lasts, but do not diagnose pan failure from color alone.
Persistent moisture beneath tile or outside the enclosure: Water repeatedly emerging from a joint, continuing seepage after use, or moisture reaching adjacent finishes calls for a broader investigation.
Neither observation independently proves concealed mold, blocked drain weep paths, a missing pre-slope, a saturated mortar bed, or a failed pan.
Traditional mortar-bed showers require particular caution because the intended route for water depends on the actual receptor and drainage design. The supplied evidence does not establish a universal visual or time-based threshold separating acceptable moisture from defective retained water. Assembly-specific documentation and on-site findings are necessary.
A useful shower-assembly illustration should label:
- tile;
- grout or flexible sealant;
- setting material or mortar bed;
- substrate or backer;
- waterproofing layer or pan;
- drain connection;
- curb or threshold;
- enclosure or door.
The purpose of the illustration is conceptual, not prescriptive. It should not add unsupported dimensions, slopes, joint ratios, or construction details. It should show why replacing a surface joint may restore the finish without correcting an enclosure, drainage, or waterproofing problem below or beside it.
Grout or Flexible Sealant? Match the Material to the Joint
The general location rule is:
- Grout belongs between tiles on the same stable plane.
- Compatible flexible wet-area sealant belongs at appropriate movement-prone transitions and changes of plane.
Typical change-of-plane locations include inside corners, wall-to-floor joints, tile-to-tub or tile-to-pan transitions, curb and threshold transitions, and some niche, fixture, and enclosure perimeters. Component instructions remain controlling because proprietary shower parts are not all detailed in the same way. General bathroom guidance also distinguishes rigid grout in tile fields from flexible material at corners and transitions (Mr. Handyman’s grout-and-caulk comparison).
Adding more grout to a corner that repeatedly cracks does not change the mismatch between a rigid filler and a joint experiencing differential movement. It may conceal the opening temporarily, but it does not remove the stress.
Silicone versus acrylic-containing sealants
“Caulk” is a broad category, not a sufficient performance specification.
100% silicone is commonly recommended in the supplied shower guidance for wet movement joints because it remains flexible and products are available for shower exposure. Even so, the exact silicone must be compatible with the adjoining surfaces and installed according to its instructions.
Those conveniences do not establish suitability for a shower. The selected product must explicitly permit the expected exposure and be compatible with the adjoining tile, stone, pan, tub, membrane, glass, or metal.
A grout-matched color or sanded texture is an aesthetic property, not proof of wet-area performance. If a product’s label excludes the intended water exposure, resemblance to grout does not make it appropriate.
Before selecting any sealant, check:
- its label and current technical data;
- permitted exposure;
- tile and natural-stone limitations;
- pan or tub instructions;
- membrane and waterproofing-system documentation;
- drain, niche, curb, fixture, and enclosure requirements;
- primer or surface-treatment compatibility.
Silicone is flexible, but it is not permanent or failure-proof. Residue, moisture, unsuitable bonding surfaces, inadequate preparation, joint configuration, product mismatch, and movement beyond the installed joint’s capacity can all contribute to failure.
Joint width, depth, backing, and tooling requirements vary. Do not assume that one depth ratio applies to every sealant or that backer rod is always required. Use the selected product’s instructions together with the shower-system documentation.
Material choice by location
| Joint location | Generally appropriate material category | Conditions that should halt a DIY repair |
|---|---|---|
| Between tiles on one flat wall or floor | Compatible grout | Loose tile, connected cracks, visible movement, persistent moisture, or widespread crumbling |
| Inside vertical corner | Compatible flexible wet-area sealant | Widening gap, loose tile, inaccessible contamination, or repeated failure |
| Wall-to-floor transition | Compatible flexible wet-area sealant | Water emerging from beneath tile, broad perimeter failure, or uncertain membrane location |
| Tile-to-tub or tile-to-pan joint | Manufacturer-approved flexible sealant | Movement of the tub or pan, active leakage, or unknown compatibility |
| Curb or threshold transition | Assembly-compatible flexible treatment | Exterior water, damaged curb, loose tile, or uncertain waterproofing details |
| Niche, fixture, or enclosure perimeter | Product- and system-specified detail | Loose component, water entry, or unclear manufacturer requirements |
| Crack running through tile | Not a grout-only repair | Any sign of impact, movement, or inadequate support |
A Cautious Repair Workflow for a Localized Failed Joint
Use this workflow only for an isolated failed joint where adjacent tiles appear stable and there is no widespread grout failure, persistent subsurface water, inaccessible mold, or water reaching nearby finishes.
1. Document before removing anything
Photograph the crack and surrounding area. Record whether the shower is dry, recently used, or showing persistent darkening. Use photographs to track whether a hairline crack grows.
Classify the location as a field joint, corner, wall-to-floor transition, curb, threshold, fixture perimeter, enclosure joint, or tile crack. Identify the existing material as accurately as possible.
2. Obtain the governing instructions
Select a proposed replacement product before removing material and obtain its current instructions. Confirm:
- intended exposure;
- compatible surfaces;
- required preparation;
- whether a primer is required;
- application limitations;
- joint-design requirements;
- cure conditions;
- return-to-service requirements.
Also consult instructions for the pan, tub, membrane, tile, stone, drain, or enclosure where relevant. If these components cannot be identified, take a more conservative approach and stop before removal that could expose or damage them.
3. Remove failed material rather than coating it
A thin layer over cracked grout or peeling sealant leaves the new material attached to a failing surface. It may also preserve contamination, inadequate bonding area, or unsuitable joint geometry.
For a localized field-joint repair, remove damaged and loose grout sufficiently to create a sound repair area in accordance with the replacement grout’s directions.
At a suitable change of plane, remove failed grout or sealant so the replacement can bond to appropriate joint surfaces rather than to a brittle or peeling layer.
4. Protect waterproofing and adjacent components
Removal can turn a minor surface repair into an assembly problem. Use controlled, shallow methods. Do not drive a knife, grout-removal blade, or oscillating accessory blindly into the joint.
This is especially important when a surface-applied membrane may be directly behind the tile. Participants discussing membrane-lined showers warn that deep cutting can damage the waterproofing, although the safe method and depth cannot be determined without knowing the construction (Houzz discussion of cracking in a new shower).
Stop if:
- safe removal depth is uncertain;
- a membrane or proprietary component becomes visible;
- tile chips, loosens, or moves;
- the joint opens into an unknown cavity;
- persistent water is exposed;
- the work would require cutting into the pan, drain, curb, tub, or enclosure.
5. Clear, clean, and dry the joint
Remove loose debris without unnecessarily enlarging the joint. Use only a cleaning method permitted by the replacement product and all surrounding surfaces.
Do not assume that a generic cleaner or solvent is suitable for every tile, stone, pan, metal, coating, membrane, or sealant. Where first-party compatibility documentation is unavailable, avoid prescribing a particular chemical and follow the relevant component instructions.
Allow the joint to dry as required by the selected material. There is no universal drying period because conditions vary with the product, joint, environment, and moisture within the assembly.
6. Install the location-appropriate material
For a suitable same-plane field joint:
- verify that adjacent tile does not move;
- confirm that no broader moisture symptoms are present;
- prepare the grout as directed;
- pack it into a properly prepared joint;
- finish and clean it according to the product instructions.
For a suitable change-of-plane joint:
- use a compatible flexible wet-area sealant;
- follow the documented joint-design requirements;
- apply a continuous bead to suitable bonding surfaces;
- tool it as directed rather than leaving a thin surface film.
Do not improvise backing, depth, or drainage details from generic online advice. Those details depend on the selected sealant and shower assembly.
7. Observe the complete cure requirement
Keep the shower unused for the manufacturer-specified cure period. Do not substitute a generic overnight wait, and do not assume that a dry-feeling surface means the full joint is ready for water.
The exact label controls return to service.
8. Monitor the repair
Photograph the finished joint. After the shower returns to service, watch for:
- another split in the same location;
- peeling or edge separation;
- renewed crumbling;
- adjacent cracks;
- persistent darkening;
- tile movement;
- water outside the enclosure.
Recurrence is diagnostic evidence. It is a reason to reassess the joint and surrounding assembly rather than apply another surface layer automatically.
Why Regrouting or Recaulking Can Fail Again
Recurring failure generally falls into four categories: the wrong material, inadequate preparation or adhesion, unsuitable joint configuration, or continued movement and assembly trouble.
1. The wrong material was used
New grout may crack again when it replaces grout in a movement-prone corner. A repair can be neatly installed and fully cured yet remain incapable of accommodating differential movement.
The opposite mismatch is also possible. Flexible sealant should not automatically replace every cracked field joint. If a same-plane crack is associated with loose tile or a moving substrate, caulk may conceal the symptom without correcting the cause.
2. Preparation or adhesion was inadequate
Sealant requires suitable bonding surfaces. Potential contributors to failure include application over:
- old caulk;
- loose or cracked grout;
- dust;
- soap or mineral residue;
- cleaning-product residue;
- moisture contrary to the product instructions;
- incompatible surface treatments;
- other contaminated material.
The original material and any unsuitable configuration remain underneath.
3. The joint configuration was unsuitable
Sealant performance depends on the joint’s shape and condition as well as product chemistry. Possible problems include:
- inadequate or excessive fill;
- a thin surface smear instead of a properly formed joint;
- mortar or grout obstructing the intended space;
- poor contact with the joint sides;
- voids or discontinuities;
- restraint inconsistent with the product’s requirements;
- movement beyond what the installed joint can accommodate.
These are possibilities, not diagnoses that can be confirmed from a photograph. Any backing material and depth requirement must come from the relevant product or system documentation.
4. The assembly is still moving or managing water improperly
Flexible sealant cannot stabilize loose tile, stiffen a deflecting substrate, correct backer installation, repair membrane damage, or resolve an enclosure or drainage defect. If the underlying condition continues, the surface joint may fail again.
A crack returning in the same place should prompt one question: What remained unchanged during the previous repair?
Troubleshooting recurring failures
| Repeat symptom | Plausible categories | Next inspection step |
|---|---|---|
| Grout cracks again in the same corner | Rigid material in a movement joint; continued movement | Confirm the intended joint detail before replacing the material |
| Same-plane grout crack returns | Loose tile, substrate movement, poor preparation, or weak repair | Check tile stability and determine how far the cracking extends |
| Silicone peels from one edge | Contamination, moisture, incompatibility, poor adhesion, or movement | Remove failed material and inspect the exposed bonding surfaces |
| Silicone splits through the middle | Excess movement, unsuitable product, or configuration problem | Compare the installed joint with current product requirements |
| Tile cracks with the joint | Impact, inadequate support, or assembly stress | Obtain a tile and substrate assessment |
| Several perimeter joints fail | Broad movement, detailing trouble, moisture, or product mismatch | Review the perimeter and overall shower assembly |
| Multiple field joints crumble | Grout, mixing, curing, preparation, or substrate problem | Determine the affected area and request installer or tile-professional review |
| Repair coincides with exterior water | Enclosure, curb, plumbing, drainage, or waterproofing issue | Isolate the leakage source instead of relying on another surface bead |
Moisture, Mold, and Water Outside the Shower
Water escaping near a curb, threshold, glass panel, or door frame should not automatically be blamed on the closest grout crack.
Possible paths requiring evaluation include:
- failed or missing enclosure seals;
- a misaligned door;
- water deflecting from a sweep or glass channel;
- curb or threshold details;
- wall profiles or hardware penetrations;
- supply or drain plumbing;
- drainage trouble;
- the waterproofing assembly.
Filling the nearest crack may have no effect if water is crossing the threshold, escaping through an enclosure joint, or reaching the exit point by another path. An anecdotal remodeling case involving water at exterior wood trim was similarly treated as a separate enclosure, drainage, or waterproofing concern rather than a problem that regrouting alone could solve (Home Improvement Stack Exchange discussion).
Moisture clues that raise concern without proving a cause
Escalate the investigation when a crack occurs with:
- mold beneath removed sealant;
- widespread perimeter failure;
- loose or cracked tile;
- water emerging from beneath tile;
- seepage continuing after the shower is no longer running;
- prolonged, localized darkening;
- dampness in adjacent walls, ceilings, flooring, trim, or door frames.
These symptoms cannot identify the exact defect remotely. Mold behind sealant could be associated with a failed surface bond, retained moisture, or another water-management problem. Water beneath tile could involve the intended behavior of a particular assembly, impaired drainage, damaged waterproofing, or another condition.
Do not diagnose blocked weep paths, a missing pre-slope, a saturated mortar bed, or pan failure solely from dark grout or cloudy sealant. The available discussions contain conflicting opinions about moisture in traditional mortar-bed showers and do not provide a reliable universal threshold.
Do not drill surface weep holes, cut drainage channels, modify the drain, or leave deliberate openings based on generic advice. A workaround suggested for one reported installation may bypass or damage another system.
Document leakage before destructive work
Record:
- when water first appears;
- whether it appears only while the shower is running;
- whether it continues after use;
- the exact exit point;
- which fixture, spray direction, wall, or door was involved;
- how long dark areas remain;
- whether non-shower plumbing use affects the symptom;
- whether nearby finishes become damp.
A qualified enclosure, plumbing, tile, or waterproofing professional may be able to evaluate systems separately without immediately removing tile. The appropriate method depends on the installation.
Another surface bead of caulk is not a reliable response to continuing exterior leakage. It may conceal the visible exit without identifying the entry point or establishing whether the enclosure and underlying assembly are functioning as intended.
When to Stop the DIY Repair and Request an Inspection
Stop treating the issue as routine joint maintenance when one or more of these red flags appears:
- The same crack returns after a carefully prepared repair.
- Several joints fail or form a connected pattern.
- Grout crumbles across a broad area.
- A tile is loose, cracked, or responds markedly differently from adjacent tiles.
- The shower wall or floor visibly moves.
- The joint is widening.
- Mold behind removed sealant extends beyond an accessible surface.
- Water persists beneath tile or repeatedly emerges from a joint.
- Dampness or staining reaches nearby walls, ceilings, floors, trim, or door frames.
- Water actively exits near a curb or threshold.
- Safe removal would risk the membrane, pan, drain, tub, curb, or enclosure.
- A newly remodeled shower begins failing soon after completion.
- The installer has already repeated the same unsuccessful repair.
A recent installation deserves careful documentation and installer review. “Normal movement” is not a complete explanation unless the installer identifies the joint, existing material, likely mechanism, and proposed corrective detail.
At the same time, cracked, dark, or damp grout alone does not justify removing a shower floor or opening walls. Destructive work should follow evidence and an assembly-specific inspection.
Information to request from the installer
Ask for the manufacturer and product name of the:
- grout;
- sealant;
- setting material;
- backer or substrate system;
- waterproofing membrane or pan;
- drain;
- curb or threshold components;
- niche components;
- enclosure profiles and sealants.
Request the instructions applicable when the shower was installed, along with photographs, receipts, warranties, and any available flood-test documentation.
Useful questions include:
- How was the substrate prepared and checked for stability?
- How were corners and other changes of plane treated?
- Was the failed material grout, silicone, acrylic-containing caulk, or another sealant?
- Which waterproofing system was used, and how was it connected to the drain?
- Is flood-test documentation available?
- How was the curb or threshold constructed and waterproofed?
- How were the drain and perimeter details completed?
- What was removed and replaced during previous repairs?
- Is the proposed replacement approved for this joint, substrate, and exposure?
- How will the cause of the previous failure be evaluated before the repair is repeated?
- Could removal damage a surface-applied membrane or proprietary component?
- If water is outside the shower, how will the enclosure, plumbing, and tiled assembly be evaluated separately?
Seek a tile or waterproofing professional when evidence points to the substrate, membrane, pan, curb, drain, or broader assembly. Consult an appropriate plumbing professional for suspected supply, valve, drain, or waste-line leakage. Use an enclosure professional when the pattern implicates doors, glass, sweeps, channels, or perimeter seals.
Specifications, manufacturer instructions, standards, and local requirements vary. Project-specific conclusions require current documentation and an on-site assessment. Mortar Desk publishes general reference information rather than individual contracting or engineering advice, as described in its site limitations.
Use this action hierarchy:
- Monitor a stable, isolated hairline issue with no other symptoms.
- Repair an appropriate localized joint after identifying its location and material.
- Investigate recurring, widespread, or tile-related failure.
- Promptly assess active exterior leakage or moisture reaching adjacent finishes.
The location-first rule remains the safest starting point: use grout for an appropriate, stable same-plane tile joint and compatible flexible wet-area sealant for an appropriate movement joint. Do not repeat a cosmetic repair when failure recurs or appears with loose tile, persistent moisture, mold, or exterior water. Protect the waterproofing during removal, follow the selected product and shower-system instructions, and obtain an on-site assessment when the evidence points beyond routine joint maintenance.
Can I put silicone directly over cracked shower grout?
Generally, do not apply a thin silicone bead directly over cracked grout. The silicone may bond to dusty, loose, or already failing material, while rigid grout remains in the moving joint beneath it. This can reduce useful bonding area and leave the original condition unresolved.
Remove failed material carefully, prepare appropriate bonding surfaces, and follow the sealant and shower-system instructions. Stop if removal could damage a membrane or proprietary component.
Should shower corners be grouted or caulked?
Shower corners and other changes of plane generally use a compatible flexible wet-area sealant rather than rigid grout. Joints between tiles on the same stable plane are generally grouted.
“Caulk” is not a complete specification. Confirm that the selected sealant is approved for the expected exposure and compatible with the tile, stone, pan, tub, membrane, enclosure, and other adjoining components. A color-matched or sanded appearance does not establish shower suitability.
Does a hairline grout crack mean the shower pan is leaking?
No. A hairline grout crack does not by itself prove that the shower pan or waterproofing membrane has failed. Tile and grout are surface finishes; the underlying assembly is intended to manage water beyond that finish.
Document and monitor an isolated crack if adjacent tiles appear stable and no other symptoms exist. Investigate further if the crack grows, returns after repair, accompanies loose or cracked tile, or occurs with persistent subsurface moisture or exterior water.
Can grout sealer stop shower grout from cracking?
No. Grout sealer may reduce absorption or staining when recommended by the grout manufacturer, but it does not make a rigid joint flexible. It cannot prevent cracking caused by differential movement, unstable tile, substrate deflection, or structural stress.
The material or assembly problem must be addressed rather than merely sealing the visible symptom.
How long should the shower remain unused after regrouting or resealing?
Keep the shower unused for the complete cure period specified by the exact grout or sealant manufacturer. There is no reliable universal waiting time.
Product chemistry, temperature, humidity, joint configuration, and surface conditions can affect curing. Do not rely on a generic timetable or assume that sealant is ready for water because its surface feels dry.