 MortarDesk
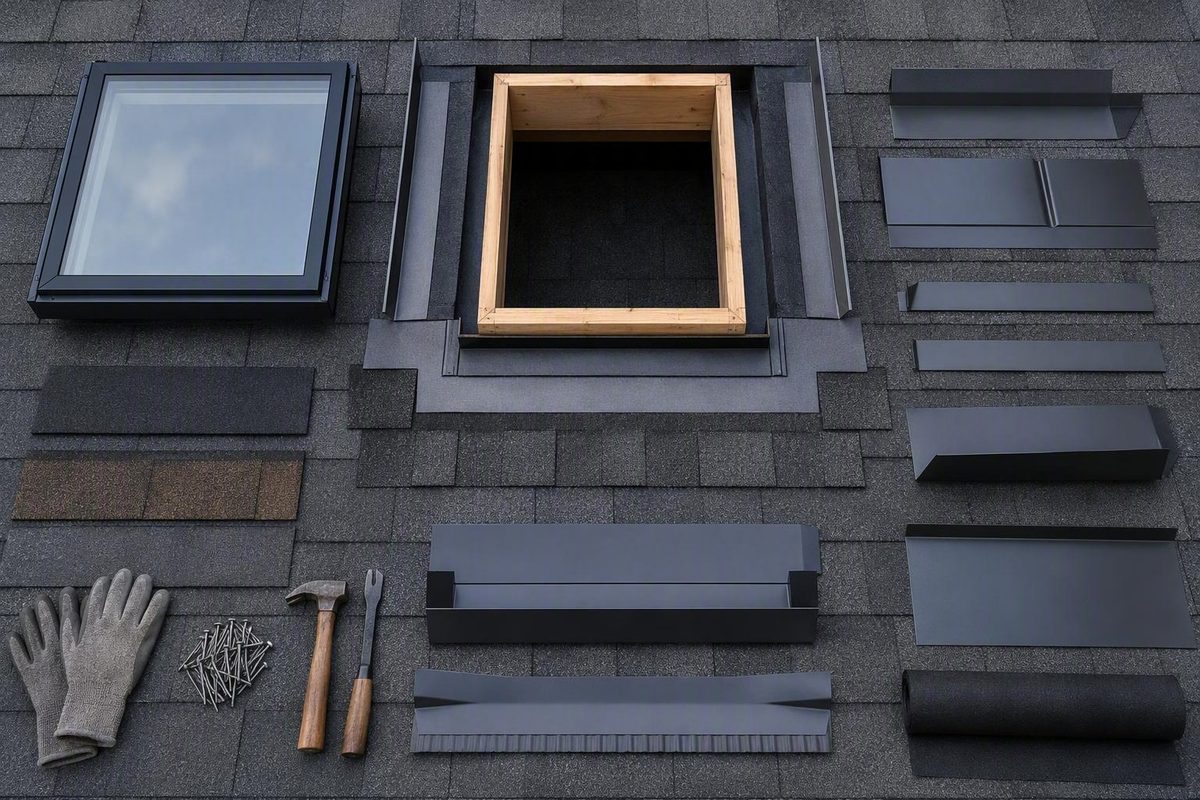
Skylight flashing is best understood as a layered drainage assembly, not as a bead of caulk around a window. The system must match the skylight, mounting method, roof covering, roof profile, and pitch. It must then be integrated with the roofing and underlayment in an order that returns runoff to the roof surface.
The underlying principle is consistent: upper water-shedding layers overlap lower ones so gravity carries water toward the eave. Dimensions, membranes, fasteners, sealants, pitch limits, and warranty conditions are not universal. Those details must come from the current instructions for the skylight, flashing kit, and roofing system, together with requirements applicable to the project location.
This is therefore a compatibility and drainage-principles guide, with an overview of the sequence commonly documented for asphalt-shingle roofs. It is not a complete installation manual for every skylight or roof covering.
What skylight flashing does—and what it cannot do
Skylight flashing is the specialized assembly at the junction between a skylight and the surrounding roof covering. Its purpose is to intercept water approaching the opening, move that water around both sides, and release it onto the roofing below. Depending on the product and roof, the assembly may include formed metal, individual step-flashing pieces, underlayment, counterflashing, gaskets, cladding, and selected sealants.
The primary mechanism is gravity drainage. Components at the bottom remain outside the water-shedding layers above them. Each higher component overlaps the component below, so runoff follows a continuous downhill route rather than meeting an exposed edge or reverse lap.
On a typical steep-slope arrangement, the conceptual water path looks like this:
                    UPSLOPE
                       ↓
             ┌─────────────────┐
             │  HEAD / TOP     │
             │    FLASHING     │
             └──────┬───┬──────┘
                    │   │
        runoff  →   │   │   ←  runoff
              SIDE │   │ SIDE
            FLASHING   FLASHING
                    │   │
             ┌──────┴───┴──────┐
             │ SILL / BOTTOM   │
             │    FLASHING     │
             └─────────────────┘
                       ↓
          water returns to roof covering
                    DOWNSLOPE
The sequence is straightforward:
- Water reaches the head or top flashing.
- The head flashing directs it away from the upper skylight junction.
- Side or step flashing carries it past the opening.
- Sill flashing releases it over the roofing below.
This is a mechanically water-shedding arrangement. Surface sealant can have legitimate, product-specific roles at selected corners, joints, fasteners, or transitions, but it is not a substitute for correctly lapped metal, roofing, and underlayment. In its description of an asphalt-shingle system, VELUX identifies sill flashing at the bottom, step flashing interwoven with shingles at the sides, and saddle flashing at the top, with drainage intended not to depend primarily on sealants that can deteriorate (VELUX’s skylight-flashing overview).
Flashing also has a defined limit. It manages the roof-to-skylight junction; it cannot correct:
- Cracked or failed glazing
- A defective frame, sash, gasket, or cladding component
- Interior condensation
- Damaged roofing farther upslope
- Water entering from a nearby wall, valley, vent, or other penetration
- A deteriorated curb or roof deck concealed beneath the roofing
- Structural movement or decay around the opening
Improperly integrated flashing can permit moisture entry associated with corrosion, mold, rot, and structural deterioration. An interior stain near a skylight does not, however, prove that its flashing failed.
The important distinction is between a reason to inspect and a confirmed cause. A stain, corroded edge, or deteriorated sealant identifies a vulnerable area. It does not establish the correct repair until the wider water path has been assessed.
Anatomy of a skylight flashing system
Terminology varies among manufacturers, installers, and retailers. One company may call the lower piece “sill flashing,” while another calls it an “apron.” The upper component may be described as “head,” “saddle,” “back,” or “top” flashing.
| Component | Alternate terms | Typical position | Primary function |
|---|---|---|---|
| Sill flashing | Apron, lower, bottom, front flashing | Downslope side of the skylight | Releases water over the roof covering below the opening |
| Side flashing | Step flashing, side pieces | Both sides of the skylight | Carries runoff past the opening; documented shingle systems may use individual pieces interwoven with roofing courses |
| Head flashing | Saddle, back, upper, top flashing | Upslope side | Intercepts runoff from above and overlaps the side flashing |
| Counterflashing | Cap or cover flashing in some systems | Over primary flashing or around a raised curb | Protects the junction between base flashing and the curb or frame |
| Adhesive underlayment | Self-adhering membrane, flashing membrane | Beneath or behind exposed flashing | Provides secondary protection if water reaches beneath the outer drainage layers |
| Cladding or cover pieces | Exterior covers, frame cladding | Over designated areas of the frame or flashing | Protects specified frame and flashing transitions within a particular system |
Sill flashing is the lower discharge piece. The exact relationship among the sill, roofing, frame, and underlayment depends on the product.
Side flashing carries water down both sides. In many asphalt-shingle systems, it consists of multiple step-flashing pieces rather than one uninterrupted strip. Each piece is coordinated with a roofing course, creating a repeated shingle-and-metal weave. General skylight guidance describes sill flashing first, side flashing installed from the bottom upward, and head flashing last over the side components (Millard Lumber’s illustrated skylight guide).
Head or saddle flashing sits on the upslope side. It intercepts runoff approaching from above, prevents that water from entering behind the skylight, and directs it toward the sides. Its lower edges normally overlap or otherwise integrate with the upper side components, but the shape and construction vary by system.
Counterflashing is a covering layer used in some curb-mounted, framed, or custom assemblies. Primary or base flashing manages water near roof level; counterflashing protects the upper junction where that flashing meets a raised curb or another vertical surface. Not every proprietary system uses this term or exposes the same curb detail.
Adhesive underlayment is a secondary protective layer beneath or behind the exposed drainage components. It can help protect transitions around the opening if water gets beneath the roofing or outer flashing. It does not replace the sill, side, and head components that collect and discharge runoff.
Actual kit contents must be checked line by line. Retail catalogs distinguish among products that include adhesive underlayment or hardware and products that include no additional items (Home Depot’s skylight flashing-kit categories). A carton described as a “flashing kit” might contain formed metal and membrane, metal only, supplemental step pieces, or components intended for one specific roof profile. The skylight itself may be sold separately, and required fasteners, sealants, or accessories may not be included.
Aluminum and galvanized steel are common flashing materials, and copper is another documented option. Material selection should follow the specified system rather than a generic preference. Compatibility can depend on the roof covering, adjacent materials, exposure, and manufacturer requirements.
Start with the mount: deck-mounted versus curb-mounted skylights
Before comparing kit prices or roof-material labels, determine how the skylight attaches to the roof.
A deck-mounted skylight is fastened directly to, or close to, the roof deck. It generally produces a lower exterior profile. Its frame, flange, deck seal, and flashing geometry are designed around that close connection to the roof plane.
A curb-mounted skylight sits over a raised frame called a curb. The curb is attached to the roof, and the skylight fits over or onto it. This creates several distinct junctions: roof to curb, flashing to curb, and curb to skylight.
These mounting methods require different flashing designs. A deck-mount kit must integrate with the deck-mounted frame and its designated flange, seal, or cladding. A curb-mount kit must integrate with the raised curb and the curb-mounted unit. The labels are functional compatibility requirements, not interchangeable retail terms.
Appearance can provide preliminary clues:
- A clearly raised, box-like base suggests a curb-mounted unit.
- A lower-profile frame close to the roof plane may suggest a deck mount.
- A visible curb does not establish its dimensions, condition, or compatibility.
- An interior view may not reveal the mounting method.
Do not make a purchase from appearance alone when an identification plate, etched designation, invoice, or installation document can be checked. Replacement work, added trim, surrounding roofing, and previous repairs can obscure the original construction.
Roof type and slope may affect which mounting choices are available, but one manufacturer’s product rules should not be converted into universal rules. VELUX, for example, describes deck-mounted units as lower profile and curb-mounted units as sitting on a raised frame while discussing roof type and slope within its own product system (VELUX’s roof-type and mounting overview). Other manufacturers and custom assemblies may classify or restrict their products differently.
Record the mounting method before opening retailer filters or requesting proposals. “Metal-roof skylight flashing” or “shingle flashing kit” is not a complete specification without the deck-mounted, curb-mounted, or other applicable configuration.
The compatibility checklist to complete before buying
A kit can look correctly sized and still be incompatible. Complete this decision path before ordering:
-
Identify the skylight manufacturer. Begin with the brand, not approximate dimensions.
-
Record the model and size designation. Look for an identification plate, etched code, purchase record, carton label, warranty document, or installation manual. Label locations and code formats vary by brand.
-
Confirm the mounting type. Establish whether the unit is deck mounted, curb mounted, a roof window, or another documented configuration.
-
Identify the roof covering and profile. Record both material and geometry. “Metal” is incomplete without identifying standing-seam, corrugated, or another profile. “Tile” does not describe its thickness or shape.
-
Measure or verify roof pitch. Use the method required by the product documentation, then confirm that both the skylight and flashing kit are approved for that slope.
-
Find the approved kit designation. Match the current manufacturer documentation to the skylight model, size code, mount, roof covering, profile, and pitch.
-
Compare the contents. Confirm which flashing pieces, membranes, gaskets, fasteners, hardware, and accessories are included and which must be obtained separately.
Nominal opening dimensions do not establish compatibility. The kit must match the actual product designation, not merely the hole in the roof.
Cross-brand compatibility must not be assumed. Commercial catalogs sort flashing products by manufacturer, skylight model or size, mounting method, and roof material, while also separating step flashing, counterflashing, tile, and metal-roof products (SolarTown’s flashing-kit catalog). A kit that can be physically bent around a similarly sized frame is not necessarily approved to connect to it.
Roof profile matters in addition to the material name:
- Low-profile asphalt shingles create relatively flat, repeated courses.
- High-profile tile creates deeper and less regular transitions.
- Slate and shake vary in thickness, exposure, and fastening arrangement.
- Standing-seam metal has raised seams at defined intervals.
- Corrugated metal has repeated ridges and valleys across each panel.
- Low-slope membranes use different curb and drainage principles from steep-slope shingles.
Pitch eligibility is also product-specific. Do not infer a universal minimum or maximum from one product listing, roof type, or manufacturer. Verify the current technical documentation for the exact skylight and kit rather than relying on an archived retailer description.
Use this worksheet while shopping or reviewing a proposal:
| Compatibility field | Project entry |
|---|---|
| Skylight brand | |
| Model | |
| Manufacturer size code | |
| Mounting type | Deck / curb / other: |
| Roof material | |
| Roof profile | |
| Verified pitch | |
| Approved flashing-kit number | |
| Included underlayment | |
| Included hardware | |
| Installation-manual revision or date | |
| Required accessories | |
| Warranty conditions checked | |
| Supplier return conditions checked |
Stop condition: If the skylight cannot be positively identified, or if no compatible current kit is documented, do not improvise from a similarly sized product. Obtain product-specific confirmation from the manufacturer, an authorized supplier, or a qualified installer before buying or fabricating a substitute.
How flashing choices change with the roof covering
The gravity-drainage principle remains consistent across roof types, but the components and installation details do not. The following table is a compatibility-screening overview, not a set of installation instructions.
| Roof covering | Profile consideration | Commonly listed kit style | Evidence-supported installation principle | Details still requiring manufacturer instructions |
|---|---|---|---|---|
| Asphalt shingles and similar low-profile roofing | Relatively flat, coursed surface | Low-profile step-flashing kit | Side pieces may be interwoven with successive shingle courses | Approved pitch, clearances, laps, fasteners, underlayment, sealant points |
| Tile and other high-profile roofing | Deep or irregular profile around the opening | High-profile tile kit | Flashing must accommodate the raised profile; some tile work includes secondary flashing | Tile cutting, support, secondary flashing, channels, head details, clearances |
| Slate | Thickness, brittleness, exposure, specialized fastening | Slate-compatible or low-profile category where expressly approved | Water must be returned over lower courses without compromising the slate | Kit approval, slate removal, laps, fastening, replacement pieces |
| Wood shake or shingles | Variable thickness and exposure | Shake-compatible kit where listed | Components must integrate with the coursed covering | Exposure, spacing, fasteners, membrane details, applicable local requirements |
| Standing-seam metal | Raised seams and panel movement | Dedicated metal-roof kit | Flashing must be matched to seam and panel geometry | Seam treatment, panel modification, movement, closures, curb or frame details |
| Corrugated metal | Repeated ridges and valleys | Profile-compatible metal kit | Components must conform to or bridge the corrugation as designed | Closures, ridge transitions, fastening, sealant locations, panel detailing |
| Low-slope or membrane roof | Slower drainage and membrane-specific transitions | Purpose-designed curb or low-slope system | The skylight and curb must be intended for that roof condition | Curb design, membrane termination, reinforcement, welding or adhesive details, drainage |
For asphalt shingles and similar low-profile coverings, retailer catalogs list low-profile step-flashing systems. In the documented shingle sequence, side pieces are installed progressively with individual roofing courses. This is the clearest example of the familiar “woven” arrangement.
High-profile tile is not simply a thicker version of asphalt shingles. Catalogs separate tile kits from low-profile products, and some tile assemblies use additional secondary flashing beneath the exposed tile-level components. Shingle overlap dimensions and shingle-by-shingle instructions should not be transferred to tile.
Slate and shake also appear as commercial compatibility categories, but that does not make their detailing interchangeable with asphalt. Thickness, exposure, brittleness, course arrangement, and fastening must be addressed by the instructions for the specific skylight and roofing system.
Metal roofing requires an equally precise description. Standing-seam and corrugated profiles are different conditions even though both are called metal roofs. Dedicated metal-roof kits are commercially available, but the supplied evidence does not support one universal installation procedure for either profile.
Low-slope and nominally flat roofs should not receive a steep-slope shingle method by extrapolation. The skylight, curb, membrane transition, and drainage design must all be intended for that roof condition.
Within every roof-material category, continue checking:
- Mounting type
- Skylight brand, model, and size
- Roof pitch
- Roof profile and thickness
- Nearby valleys, ridges, walls, and other obstructions
- Underlayment or membrane requirements
- Manufacturer and roof-system compatibility
A generic roll of flashing metal is material, not necessarily a complete skylight system. Extra step pieces do not replace a missing sill or head component. An apparently similar kit is not model-approved merely because it can be bent around the frame.
The typical flashing order on an asphalt-shingle roof
This section applies only to asphalt-shingle assemblies represented in the cited guidance. It explains the drainage sequence; it does not replace the current manual supplied for the skylight and flashing kit.
Begin with a sound, correctly framed opening or curb and a compatible skylight. Structural layout, header sizing, truss or rafter modification, and rough-opening construction are outside the scope of a generic flashing guide. Structural requirements must be established before weatherproofing begins.
The recurring sequence is:
- Prepare the opening and surrounding roofing.
- Apply compatible self-adhering underlayment from the bottom upward.
- Install the sill or lower flashing.
- Install side step flashing from bottom to top as shingles are installed.
- Install the head or saddle flashing last.
- Complete the specified roofing, cladding, gasket, and cover details.
1. Prepare the opening
The deck or curb should be correctly dimensioned and free of deterioration that would prevent secure installation. The skylight must be seated and fastened as required for that model. Existing shingles may need to be removed far enough around the opening to expose the work area without unnecessarily damaging courses that will remain.
Preparation is not cosmetic.
2. Apply underlayment from the bottom upward
Compatible self-adhering underlayment is commonly applied around the opening so each higher section overlaps the section below. The lower membrane is placed first, followed by the sides and upper area. This preserves the same gravity-drainage logic beneath the exposed flashing.
Do not copy a membrane width or corner treatment from a generic illustration. Product instructions may specify where the membrane bonds to the deck, frame, flange, or curb; how corners are wrapped; and whether separate strips or preformed pieces are required.
3. Install the sill or lower flashing
The sill flashing is normally the first exposed metal component. It is positioned to collect water from the sides and release it over the roofing below. Tucking its discharge edge behind the downslope roofing would obstruct the intended route.
The sill may be one formed piece or part of a multi-component assembly. Its fastening points and relationship to the lower shingle courses are product-specific.
4. Weave side step flashing with the shingle courses
Side step-flashing pieces proceed from bottom to top. A roofing course is installed, followed by the corresponding flashing piece, then the next course and piece as required. Each higher piece overlaps the piece below.
The result is not simply an exposed metal channel attached to the roof. It is a layered weave in which shingles and flashing repeatedly direct water outward and downward. A documented shingle-roof procedure similarly describes bottom-up underlayment, lower flashing, side step flashing woven with successive courses, and head flashing at the top (Family Handyman’s shingle-roof flashing sequence).
5. Install the head or saddle flashing
The upper flashing is installed after the side components so it overlaps their upper ends and diverts upslope runoff around the skylight. Placing the head piece beneath the side flashing can create a reverse lap that directs water into the assembly.
The roofing above must then be integrated as the manufacturer specifies. Requirements for exposed metal, shingle clearance, and the way roofing approaches the upper component vary.
6. Complete designated cladding and sealing details
Frame cladding, counterflashing, covers, gaskets, fasteners, and approved sealant applications are completed in the specified order. Correctly overlapped metal reduces dependence on sealant between adjacent drainage pieces, but that principle is not an instruction to omit every sealant. Some products require it at selected corners, fasteners, joints, or transitions.
The current manual must supply the exact:
- Membrane type and width
- Lap dimensions
- Amount of exposed metal
- Roofing clearances
- Nail or screw locations
- Fastener type and length
- Locations where fasteners must not be placed
- Approved sealant and application points
- Cladding and gasket sequence
- Treatment of corners and transitions
Sequence matters because common errors alter the water path. Examples include:
- A lower component tucked behind roofing it should drain over
- Reverse laps in the membrane or metal
- Head flashing placed beneath side flashing
- Side pieces installed from the top downward
- Fasteners placed in active drainage paths
- Fasteners driven where product instructions prohibit them
- Cracked, lifted, or poorly replaced shingles around the opening
- Roofing or debris blocking side or sill discharge paths
- Surface sealant used to conceal an incomplete or incompatible assembly
A neatly caulked perimeter can still contain reverse laps. Conversely, visible metal is not automatically defective if that exposure is part of the specified drainage design.
Inspection, leak clues, and repair-versus-replacement limits
Inspect the skylight junction when you observe:
- Corrosion or coating failure
- Separated, lifted, or deformed metal
- Missing side, sill, head, or cover pieces
- Cracked, loose, or deteriorated sealant
- Damaged, displaced, or poorly cut adjacent roofing
- Debris blocking upper, side, or lower drainage paths
- Nearby interior staining, damp trim, or damaged finishes
General flashing guidance identifies corrosion, separation, missing components, deteriorated sealant, and nearby interior staining as warning signs that justify attention (Total Roofing’s overview of flashing-failure signs). These observations identify a vulnerable location; they do not independently prove where moisture entered.
An assessment should also consider:
- Condensation on the glazing or frame
- Cracked glazing or failed glazing seals
- Frame, sash, gasket, or cladding defects
- Damaged shingles or panels upslope
- Water traveling from a nearby valley, ridge, wall, vent, or fastener
- Concealed curb deterioration
- Soft or damaged roof decking
- Previous repairs that redirected rather than eliminated the water path
For planning purposes, possible responses can be grouped into three broad categories. These are not a validated diagnostic protocol; the appropriate scope depends on product-specific inspection and concealed conditions.
Localized correction: A limited repair may be considered when damage is demonstrably confined and the correction is approved for the product. Examples could include replacing a designated cover, removing a drainage obstruction, or renewing sealant at a manufacturer-specified joint. A limited repair should not be selected merely because it is less disruptive.
Complete reflashing: Reflashing may be considered when the skylight remains suitable but the existing drainage assembly is incompatible, incomplete, damaged, or layered incorrectly. This can require removal of surrounding roofing so that the underlayment and complete flashing sequence can be examined and rebuilt.
Broader skylight or roof work: Replacement may need to be evaluated where inspection finds extensive corrosion, a deteriorated frame, curb damage, concealed roof deterioration, obsolete compatibility, or broader failure of the surrounding roof. These conditions cannot be resolved by surface sealant alone.
Published guidance conflicts on reusing old flashing. Family Handyman says sound pieces may be reused if removed carefully, while one commercial roofing article recommends installing new flashing when a skylight is installed or replaced. Neither source establishes an unconditional rule for every manufacturer or product.
A conservative reuse screen asks whether all of the following can be confirmed:
- The components are free of corrosion, cracks, tears, and deformation.
- Their shapes match the retained or replacement skylight.
- They remain compatible with the mounting type and roof covering.
- Existing holes do not compromise required fastening or lap locations.
- Removal did not bend hems, corners, or drainage channels.
- The complete assembly can be reconstructed in the correct order.
- Current manufacturer instructions permit reuse.
- Reuse does not conflict with applicable warranty conditions.
If any of these points cannot be confirmed, new model-compatible flashing is the more cautious purchasing choice.
Surface caulk cannot rebuild a reverse lap, replace missing head or sill flashing, restore torn underlayment, correct a damaged curb, or make an incompatible kit fit. Where the entry point is uncertain or concealed deterioration is possible, a qualified roofer or skylight installer should inspect the full junction rather than treating only the visible stain.
Price, warranty, safety, and the final purchase check
Flashing-kit prices vary with brand, skylight size, mounting method, roof material, roof profile, and included components. Retail listings in the evidence reviewed showed substantial variation, with specialized metal-roof products priced considerably higher than some low-profile shingle kits. Because retailer prices, stock, delivery terms, ratings, and product selections change, these listings should be treated as temporary shopping examples rather than market averages.
The kit price is also not equivalent to the price of a complete skylight project. When comparing a retail kit with a contractor proposal, check whether the proposal includes possible scope items such as:
- Roof access and staging
- Skylight removal and resetting or replacement
- Removal and replacement of surrounding roofing
- Curb or roof-deck repair
- Underlayment and required accessories
- Interior trim or finish restoration
- Disposal
- Work around nearby walls, valleys, ridges, or other roof features
- Investigation of an uncertain moisture source
These are possible scope components, not predictions that every project will require them. A kit-only retail price and a complete reflashing or replacement proposal do not represent the same work.
Warranty conditions require direct review. VELUX states that eligibility for its limited installation warranty depends on qualifying skylights, approved flashing, and proper installation; the complete current warranty must be consulted rather than relying on a retailer summary or product-page logo (VELUX’s flashing and limited-warranty explanation). Other skylight and roof-covering manufacturers may impose different conditions.
Before ordering, verify:
- [ ] Skylight brand, model, and size code
- [ ] Deck-, curb-, or other mounting designation
- [ ] Approved flashing-kit number
- [ ] Roof-covering and profile eligibility
- [ ] Product-specific pitch eligibility
- [ ] Current installation manual
- [ ] Complete kit contents
- [ ] Required adhesive underlayment or membrane
- [ ] Required gaskets, covers, and accessories
- [ ] Approved fasteners and sealants
- [ ] Compatibility with the surrounding roofing system
- [ ] Supplier return conditions
- [ ] Skylight and roof warranty terms
- [ ] Any requirement for authorized or professional installation
- [ ] Applicable local code and inspection requirements
Roof openings involve structural planning, alignment, weather exposure, and the handling of bulky components. Contractor guidance recommends clear weather, adequate help for skylight handling, and appropriate experience or professional guidance before cutting into a roof (C.D. Roofing’s shingle-roof installation overview). If the work requires structural alteration, heavy lifting, or unfamiliar roof-system detailing, use an experienced roofer or skylight installer rather than opening the roof without a complete plan.
Clear weather and another person’s assistance do not, by themselves, make a roof suitable for DIY work. Pause before starting if safe access, temporary weather protection, structural requirements, product compatibility, or the ability to finish the opening before conditions change has not been established.
Frequently asked questions
Can I use a flashing kit from a different skylight manufacturer?
Do not assume that you can. Flashing kits are commonly designated by skylight brand, model or size code, mounting type, roof covering, and profile. Similar outside dimensions do not establish that the frame, corners, cladding, flanges, or fastening locations match.
Use a different-brand, aftermarket, or fabricated system only when compatibility is explicitly documented for the exact skylight and roof assembly. Check the effect on both skylight and roofing warranties. If compatibility cannot be confirmed, select the approved kit or obtain product-specific guidance rather than modifying a similarly sized product.
Does skylight flashing need adhesive underlayment?
Many documented systems use self-adhering underlayment as a secondary protective layer, and some commercial kits include it. Other kits do not include it, and some roof systems may specify a different membrane or transition.
The current instructions should determine whether underlayment is required, which product is compatible, where it is placed, and how it overlaps the frame, curb, deck, and roofing. Underlayment does not replace sill, side, and head flashing.
Should skylight flashing be sealed with roofing cement or caulk?
Not as a substitute for correct flashing. Roofing cement or caulk cannot correct reverse laps, bridge a missing component, rebuild damaged underlayment, or make an incompatible kit suitable.
Some assemblies permit or require sealant at selected joints, corners, fasteners, or transitions. Other guidance warns against placing roofing cement between adjacent metal components intended to drain through mechanical overlaps. Follow the current manual’s specified sealant and application points rather than sealing every visible seam or adopting a universal no-sealant rule.
Can existing flashing be reused when replacing a skylight?
Possibly, but only under narrow conditions. Existing components must remain undamaged, correctly shaped, compatible with the replacement skylight and roof, and capable of being reinstalled without compromised holes or laps. Current manufacturer instructions and warranty terms must also permit reuse.
Because published guidance disagrees about whether sound flashing may be reused or should normally be replaced, inspect the complete assembly rather than deciding from age or appearance alone. If the new skylight differs in model, size, mount, frame geometry, or approved kit designation, do not assume that the old metal remains suitable.
Is skylight flashing different for metal and shingle roofs?
Yes. Asphalt-shingle systems commonly use side step flashing woven with successive roofing courses. Standing-seam and corrugated metal are themselves different conditions.
A kit labeled for shingles should not be adapted to metal merely by adding sealant or sheet metal. Confirm the skylight model and mount, exact metal profile, roof pitch, kit designation, included components, and current manufacturer instructions before purchase.
Choose skylight flashing as a matched drainage system, not as generic sheet metal or a cosmetic seal. Confirm the skylight identity, mounting method, roof covering and profile, pitch, kit designation, included components, and current instructions before ordering. The broad principle is simple—overlapping layers must return water to the roof—but dimensions and construction details remain product- and roof-specific.
Mortar Desk is an independent general-reference publisher, not a contractor, roof inspector, installer, or engineering adviser.
The publisher’s stated scope notes that specifications change and codes vary by locality. This article does not determine jurisdiction-specific permit, membrane, curb, wind, snow, or inspection requirements. Verify current product documents and the requirements used by the applicable authority or inspector. When identification is uncertain, damage is concealed, or the work involves structural alteration or an unfamiliar roof system, obtain manufacturer confirmation and qualified local help.