 MortarDesk
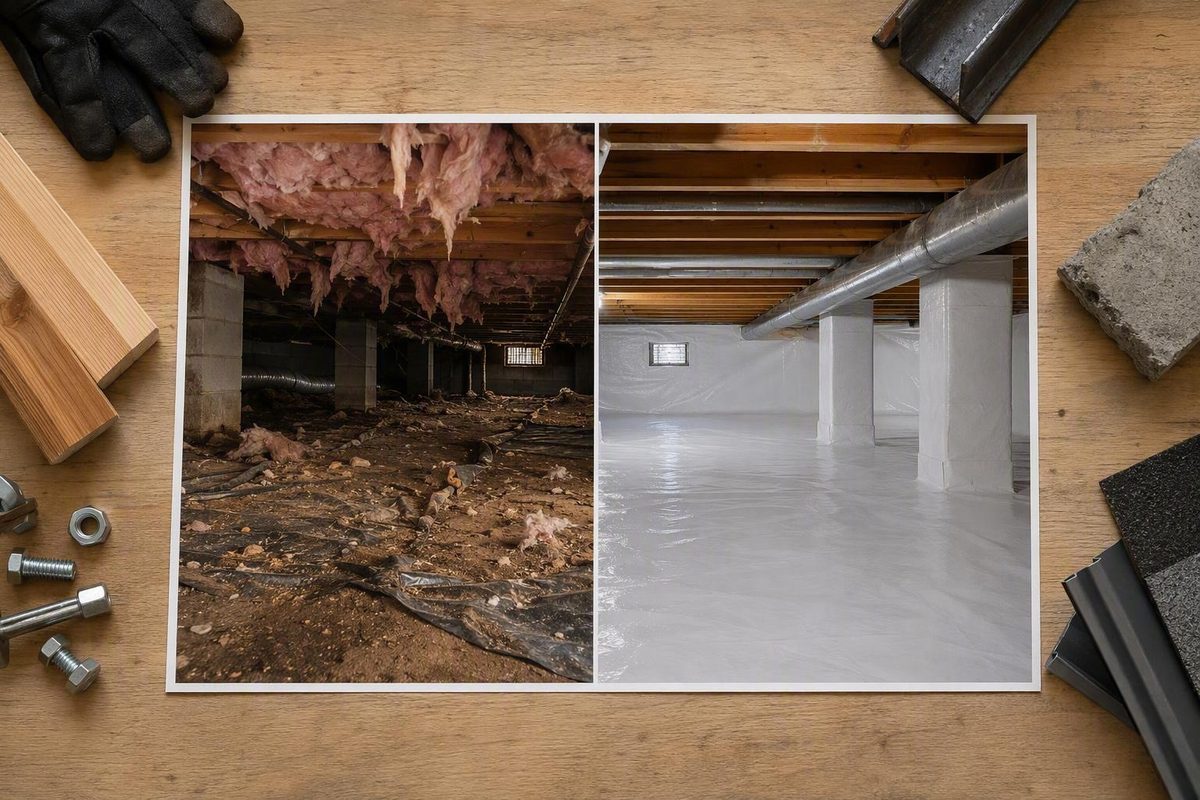
A familiar before-and-after crawl space encapsulation photo shows a striking contrast. Before work, there may be exposed soil, debris, fallen insulation, muddy patches, standing water, or remnants of an old liner. Afterward, the space may have a bright membrane, sealed edges, and neatly arranged drainage or drying equipment.
That visual change matters, but it does not prove that moisture is under control.
A credible comparison looks beyond the new liner. It asks whether the water sources were identified and corrected, damaged or contaminated materials were addressed, the enclosure matches the building’s conditions, equipment operates as intended, and humidity and wood conditions improve over time.
The meaningful transformation is not dirt floor versus white plastic. It is an uncontrolled crawl space versus a diagnosed, repaired, enclosed, monitored, and maintainable one.
What the before-and-after photos can—and cannot—show
Before-and-after photos can document visible conditions and installed components. They may show that debris or damaged insulation was removed, exposed soil was covered, seams were secured, walls and piers were detailed, or drainage and humidity-control equipment was installed.
Commercial galleries provide useful examples of these visible changes. For instance, the Basement Systems crawl-space gallery includes projects with liners and, in some cases, drainage, insulation, sump, or dehumidification components. It is promotional material, however, not an independent performance study; it supplies no long-term humidity readings or other measured follow-up.
Encapsulation is commonly described as more than placing a loose sheet of plastic over soil. Depending on the property and proposed design, the work may include:
- A membrane over exposed soil
- Secured and sealed seams
- Treatment up foundation walls or around piers
- Detailing at vents, openings, and utility penetrations
- A plan for remaining airborne moisture
- Drainage or pumping where water history justifies it
- Insulation selected for the intended enclosure design
Not every house needs the same combination. A relatively dry, accessible space with limited ground vapor may call for a different scope than a low crawl space with recurring groundwater, cold ducts, or a flooding history.
Photos can establish:
- Cleanliness and visible debris removal
- Approximate liner coverage
- Visible seams and perimeter details
- Treatment around piers or supports
- Placement of drainage or humidity-control equipment
- Whether service routes appear accessible
- Obvious tears, displaced edges, or exposed soil
Photos cannot establish:
- Sustained humidity control
- Dry framing throughout the space
- Removal of existing mold contamination
- Acceptable wood-moisture conditions
- Improved indoor air quality
- Energy savings
- Correct equipment operation
- Long-term liner durability
- Radon or combustion safety
- Performance after storms or seasonal humidity
Commercial accounts also describe encapsulation as potentially involving walls, piers, air leakage, drainage, damaged wood, mold, and pests. These descriptions can help a homeowner understand possible scope items, but they do not prove an outcome for a particular property. A commercial overview from Patriot Pest Management, for example, separates enclosure work from underlying water, structural, fungal, and pest problems.
When comparing photographs, look for:
- A similar camera position. Different angles can hide uncovered areas, water, equipment, or incomplete perimeter details.
- Dates. The record should distinguish the initial inspection, installation, and follow-up.
- The original defect. Was the problem linked to exposed soil, outdoor humidity, plumbing leakage, drainage failure, condensation, flooding, or several sources?
- The complete scope. Cleanup, drainage, remediation, repairs, enclosure work, equipment, electrical work, and insulation should not all be reduced to the word “encapsulation.”
- Installed equipment. If a sump or dehumidifier was included, its drain or discharge route should also be documented.
- Follow-up evidence. Useful records include humidity trends, wood-moisture readings, equipment status, post-storm observations, and repeat photos.
- Wide and close views. Neat seam close-ups are useful only when accompanied by wider views of the perimeter and full enclosure.
Without dates, matching viewpoints, repair details, and measurements, the defensible conclusion is narrow: the crawl space looked cleaner when the after photograph was taken. The image starts the verification process; it does not finish it.
Before encapsulation: document the actual moisture problem
Do not clean away all the evidence before recording the original condition. Organize the baseline inspection into visible, sensory, and measurable observations.
Visible observations may include:
- Exposed, damp, or muddy soil
- Standing water or water trails
- Condensation on masonry, ducts, pipes, fasteners, or equipment
- Wet, stained, sagging, or fallen insulation
- Darkened or stained framing
- Soft, cracked, displaced, or visibly damaged wood
- A torn, deteriorated, or displaced liner
- Efflorescence or staining on masonry
- Debris or stored material in contact with the ground
- Fungal-looking patches
- Insect tubes, droppings, nesting material, or other pest evidence
- Rust or corrosion
- Foundation cracking or movement
Photographs alone cannot reliably identify a mold species, rot, termite damage, or structural failure. Record suspicious conditions without assigning a diagnosis that requires testing or qualified inspection.
Sensory and upstairs clues may include:
- A musty or earthy odor
- Floors that feel unusually cold or damp
- Recurring indoor humidity
- Odors that intensify after rain
- Seasonal discomfort in rooms above the crawl space
These clues can justify investigation, but they do not identify a cause by themselves. Musty odors may relate to damp material, microbial contamination, debris, drainage, or another source. Cold floors can reflect insulation, air leakage, HVAC design, climate, or several interacting conditions.
Possible moisture routes described in the commercial evidence include evaporation from exposed soil, humid outdoor air entering through vents or gaps, plumbing leaks, poor grading, foundation drainage failure, flooding, and condensation on cold pipes or ducts. More than one route may be active.
Do not automatically label moisture on a pipe as a plumbing leak. Water distributed over the outside of a cold pipe may be condensation; an active leak is more likely to involve a dripping joint, crack, flow path, or localized pooling. If the source is unclear, record what is visible and seek diagnosis rather than building the scope around an assumption.
Before cleanup, consider recording:
- The visible depth, extent, and apparent direction of water
- Whether the observation followed rain, snowmelt, plumbing use, or dry weather
- Odor location and intensity
- Insulation and stored-material condition
- Wood staining, softness, sagging, or movement
- Visible interior and exterior drainage routes
- Sump, drain, fan, or dehumidifier status
- Pest evidence or signs of earlier treatment
- Accessible electrical, plumbing, gas, and HVAC conditions
- Temperature and relative humidity at clearly named locations
A hygrometer measures relative humidity in the air; a wood-moisture meter measures moisture within framing. The two readings are complementary. Air conditions may change relatively quickly, while damp wood may take longer to dry.
For recordkeeping, choose named locations that can be found again and note where each sensor was placed. These are practical comparison methods, not a validated universal sampling protocol. Follow the instrument instructions and any project-specific guidance provided by a qualified professional.
Interpret readings in context. Temperature, rainfall, season, ventilation history, and measurement timing can all affect relative humidity. One favorable reading on a dry installation day does not characterize summer conditions or performance after a severe storm.
What must be repaired before the crawl space is sealed
Commercial guidance consistently frames encapsulation as one part of a broader moisture-control project rather than a substitute for diagnosis and repair. A cautious project sequence is:
- Identify the apparent moisture source or sources.
- Correct active water entry.
- Address debris, wet material, pests, or suspected contamination.
- Repair damaged building systems or framing as required.
- Install the selected enclosure.
- Allow and manage drying.
- Record initial conditions and monitor performance.
This is a planning framework, not a universal specification. The correct sequence and responsible trades depend on the property, local requirements, and the defects found.
A liner does not repair a leaking supply pipe, failed drain, groundwater entry, poor grading, failed foundation drainage, flood exposure, existing contamination, termite damage, or weakened framing. Sealing too early may leave active water collecting below or behind the membrane and may make damaged materials harder to inspect.
Preliminary work may therefore include:
- Exterior grading or drainage correction
- Gutter, downspout, or discharge improvements
- Interior drainage channels or drains
- Sump installation or replacement
- Plumbing repair
- Removal of debris and wet insulation
- Mold assessment, cleanup, or remediation
- Pest treatment
- Wood or foundation repair
- Electrical correction
- HVAC or appliance modification
One commercial flooding example shows why “new plastic” may be an incomplete description. After an existing sump reportedly failed to keep a crawl space dry, the installed package included drainage channels, drainage matting, a sump arrangement, a liner, and dehumidification. That branded case is not a universal design, but it illustrates how recurring bulk water may call for collection, pumping, separation, and drying rather than a floor sheet alone.
A clean, light-colored liner may make future leaks and pest evidence easier to notice. That benefit depends on preserving access to the crawl space, equipment, valves, wiring, framing, and any inspection areas required for the property.
Postpone enclosure work and investigate further when you find:
- Unexplained standing water
- An active plumbing or drainage leak
- Extensive fungal-looking growth
- Wet materials that have not been assessed
- Soft, sagging, cracked, or displaced framing
- Suspected active termites or other pests
- Foundation movement or significant cracking
- Unresolved radon questions
- Fuel-burning equipment whose compatibility with the proposed enclosure is unknown
- Exposed or damaged electrical work
Significant suspected mold, structural movement, electrical hazards, pests, and fuel-burning equipment call for appropriately qualified local assessment. The evidence supplied for this article does not establish nationally applicable remediation, licensing, or code rules.
After encapsulation: the components of a complete system
The intended result is a clean, inspectable enclosure designed around the property’s documented water and humidity conditions—not simply a tidy floor. Its components vary with climate, foundation design, flood exposure, HVAC and appliance configuration, inspection findings, and local requirements.
Ground liner. The membrane should cover exposed soil in accordance with the selected design. Review seams, tears, gaps, displaced edges, and uncovered earth. Transitions at walls, piers, drains, and equipment pads deserve particular attention because they are more complex than open floor areas.
Walls and piers. Broader encapsulation commonly extends the membrane up foundation walls and around piers. The appropriate termination depends on the foundation and insulation design, flood considerations, and necessary inspection access. Look for deliberate transitions rather than loosely draped material.
Vents, rim areas, gaps, and penetrations. Vents and openings can act as air paths, as can plumbing, wiring, duct, and structural penetrations. Their stated treatment helps distinguish a larger enclosure project from a membrane applied only to the ground.
Liner selection. Material and reinforcement should be selected for the expected traffic, substrate, soil conditions, service access, flood history, and installation design. The supplied commercial sources do not establish one correct thickness for every project. Ask what material will be used, where it will be installed, how seams will be joined, and how damage will be repaired.
Drainage. A history of water entry may justify drainage matting, channels, drains, or a sump. The proposal should explain what water will be collected, how it will reach the collection point, where it will discharge, and how the discharge route fits the property.
Humidity control. A dehumidifier may be included where measured conditions, climate, or enclosure design call for active drying. It should have accessible controls, power, a managed condensate route, and a maintenance plan. Its presence does not correct active flooding or plumbing leakage.
Insulation. Encapsulation does not automatically determine the insulation strategy. Wall insulation, floor insulation, duct treatment, or a combination may be proposed depending on climate, HVAC configuration, the intended enclosure, and applicable local requirements. Wet or damaged insulation should not simply disappear behind new work.
A contractor’s encapsulation overview describes projects as potentially including floor, wall, pier, seam, vent, rim, drainage, dehumidification, and insulation work while emphasizing correction of active water and damaged materials first. It is useful as a commercial scope example, not proof that every component or claimed benefit applies to every house.
Use this completion-photo checklist:
- Wide views showing floor coverage
- Wall termination and fastening
- Inside and outside corners
- Pier and column treatment
- Seam locations and closures
- Plumbing, wiring, duct, and drain penetrations
- Former vents and other openings
- The stated drainage path
- Sump basin, power supply, alarm, and discharge, if included
- Dehumidifier controls, filter access, and drain, if included
- Access to valves, cleanouts, junction boxes, and HVAC equipment
- Walk or service paths
- Any pest-inspection clearance specified for the property
- Any intentionally uncovered area and the reason for it
Different houses can legitimately receive different combinations. The key question is whether each included component responds to a documented condition—and whether important omissions have been explained.
Floor vapor barrier versus full encapsulation
A basic ground vapor barrier is a membrane intended primarily to reduce vapor movement from the soil. It may cover most of the dirt while leaving walls, vents, rim areas, piers, and penetrations untreated.
Full encapsulation treats more of the crawl-space enclosure. Commercial sources commonly describe it as addressing the floor, perimeter walls, piers, seams, openings, and penetrations, together with a plan for remaining humidity. Drainage, insulation, sump equipment, or dehumidification may be added where conditions support them.
The visual difference is generally straightforward:
| Feature | Floor vapor barrier | Full encapsulation |
|---|---|---|
| Ground | Covered | Covered |
| Seams | May be loose, overlapped, or fastened | Intended to form a more continuous layer |
| Walls | Often exposed | Commonly incorporated into the enclosure |
| Piers | May remain untreated | Commonly detailed around or up |
| Vents and gaps | May remain open | Addressed according to the enclosure design |
| Penetrations | Limited treatment | Deliberately sealed or detailed |
| Humidity strategy | May rely on existing conditions | Explicitly considered |
| Drainage and equipment | Separate additions if needed | Integrated where water history justifies them |
Commercial comparison guides describe a basic barrier as a possible option for relatively limited ground-moisture conditions and broader encapsulation as a possible response to persistent humidity or multiple moisture routes. The evidence does not establish a nationally applicable threshold for choosing between them. Polyguard’s commercial comparison of vapor barriers and encapsulation also notes that outdoor humidity, condensation, plumbing leaks, and flooding may require measures beyond ground coverage.
Decision factors include:
- Standing-water or flooding history
- Climate and seasonal humidity
- Relative-humidity trends
- Exposed masonry walls
- Pipe or duct condensation
- Ductwork or HVAC equipment in the space
- Height and accessibility
- Soil roughness and expected liner traffic
- Existing barrier condition
- Exterior and interior drainage
- Fuel-burning appliances
- Pest activity and inspection needs
- Locally applicable building, mechanical, energy, flood, and pest requirements
Do not accept the word “encapsulation” as a complete scope. Ask whether the quote includes walls, piers, seams, vents, rim areas, penetrations, drainage, drying, initial measurements, and follow-up. If most are omitted, the proposal may describe a floor vapor barrier even if it uses a broader label.
How to verify the after result with measurements
A practical record can compare conditions at four points:
- Baseline: Before cleanup and enclosure work
- Initial follow-up: After installation and startup of included equipment
- Seasonal follow-up: During a humid, wet, or otherwise challenging period
- Event follow-up: After a major storm, plumbing incident, outage, or equipment failure
This is a homeowner recordkeeping framework, not a formal commissioning standard. Use consistent instruments and named locations where practical, and follow instrument instructions or project-specific professional guidance.
Commercial sources offer differing humidity targets. Some recommend keeping crawl-space relative humidity below 60%, while others suggest approximately 30%–50% or no more than about 55%. The evidence supplied here does not establish one universal target for every climate, building, season, or sensor position.
Temperature matters because relative humidity depends partly on the air’s current temperature. Rainfall, outdoor humidity, earlier ventilation, recent enclosure work, and sensor placement can also affect the result. A sensor near a dehumidifier outlet may not represent a remote corner.
Where damp framing is a concern, air readings may be paired with wood-moisture readings from representative locations. One commercially interested retailer places increased decay concern at approximately 19%–20% wood moisture content, while also describing its humidity ranges as guidelines and warning that readings vary with season and conditions in its humidity and wood-moisture guidance. Treat that figure as a commercial risk guideline, not a universal code threshold or an automatic diagnosis.
Also record non-numeric evidence:
- Recurring musty odor
- Condensation on masonry, pipes, ducts, or equipment
- Damp or discolored framing
- Wet insulation
- Water on or beneath the liner
- New staining
- Open seams or liner movement
- Pest evidence
- Corrosion
- Changes after rain or seasonal humidity
Equipment should be observed in operation according to its instructions and service requirements. Useful questions include:
- Is the dehumidifier powered and responding?
- Is condensate reaching the intended drain?
- Is its filter accessible for service?
- Is the sump operational according to the installer’s or manufacturer’s procedure?
- Is the discharge route visibly open and secure?
- Are accessible drain inlets clear?
- Are included alarms reporting normally?
- Is equipment running continuously, unexpectedly, or not at all?
- Does the maintenance plan address loss of power or equipment failure?
Take repeat photographs from comparable positions at completion, after several months, during or after a humid season, and after major storms. Include both wide views and close-ups of earlier problem areas.
Visual cleanliness is immediate. Drying damp framing, evaluating odor changes, and establishing seasonal performance take longer. The supplied evidence does not provide a universal drying timetable because starting moisture, weather, material thickness, air movement, water correction, and equipment capacity vary.
A simple monitoring log can look like this:
| Date and time | Recent weather | Sensor location | Temperature | Relative humidity | Wood moisture/location | Odor or condensation | Visible water | Sump status | Dehumidifier status | Liner condition |
|---|---|---|---|---|---|---|---|---|---|---|
| Baseline | ||||||||||
| Completion | ||||||||||
| Monthly/seasonal | ||||||||||
| Post-storm |
Consistency is more useful than isolated readings taken with different instruments under unrelated conditions.
Failure signs and safety checks that clean photos may hide
An encapsulated space can still have unresolved or recurring problems. Warning signs include:
- Pooled or moving water beneath the liner
- Wall condensation
- Persistent or worsening musty odors
- Recurring elevated humidity
- Wet framing
- Fungal-looking growth behind the barrier
- Torn, loose, or open seams
- Liner detachment at walls or piers
- A sump or drain that is not functioning
- A dehumidifier that has stopped draining or running
- New staining after storms
- Areas that cannot be inspected
A membrane can conceal moisture if active water continues entering or drying equipment fails. Occupants may no longer see exposed water even while damp conditions persist below the liner or behind wall coverings.
Radon: Sealing may change how the building interacts with soil gas. The supplied evidence for this article consists of commercial guidance rather than direct authoritative radon material, so it does not support a universal testing procedure or action threshold. Ask the relevant state or local radon authority or a qualified radon professional whether testing is appropriate before or after the proposed work.
Combustion safety: Commercial crawl-space guidance warns that atmospherically vented fuel-burning equipment may be incompatible with some sealing plans. Because this is a safety issue and the supplied evidence does not include an official code or fuel-gas source, do not close vents or alter air paths around such equipment based on a general article. Have the proposed design evaluated by an appropriately qualified local professional.
HVAC compatibility: Commercial guidance also notes that equipment drawing air from the crawl space or relying on its former ventilation arrangement may need project-specific evaluation. The answer depends on the actual equipment and enclosure design.
Termite access: Wall liners and insulation can obscure areas used for pest inspection. The required access, if any, varies with jurisdiction, construction, treatment system, and local pest conditions. Ask the relevant local authority and pest professional what must remain visible.
For permits, floodplain conditions, combustion air, equipment clearances, pest-inspection details, and trade licensing, consult the authority having jurisdiction rather than applying a contractor example nationwide. Mortar Desk’s reference policy likewise notes that codes are local and that gas, structural, and main electrical work should be handled by licensed trades working to local requirements.
Seek qualified assessment promptly for:
- Unexplained water under the liner
- Fuel odors, soot, combustion odors, or appliance-drafting concerns
- A concerning radon result
- Exposed or damaged electrical components
- Structural movement, sagging, or soft framing
- Extensive suspected mold
- Active termites or other wood-destroying insects
Do not disturb suspected contamination, alter structural members, or modify combustion or electrical systems merely to improve the finished appearance.
Cost, installation time, maintenance, and choosing a scope
Cost and schedule figures in the supplied evidence come from commercial providers, not independent market data. One restoration contractor reports $3–$10 per square foot, or $3,000–$15,000 total, and approximately three to five installation days after cleaning, preparation, and repairs. The same source says site conditions materially affect both estimates in its commercial cost and scheduling overview.
A quote may vary based on:
- Crawl-space area and height
- Access opening and working clearance
- Debris removal
- Wet or damaged insulation
- Ground preparation
- Liner material and reinforcement
- Wall, pier, corner, and penetration details
- Drainage channels or matting
- Sump equipment and discharge routing
- Dehumidification
- Insulation
- Mold assessment or remediation
- Electrical work
- Pest treatment
- Plumbing repair
- Foundation or framing repair
- Local permit, inspection, and disposal requirements
The installation period should not be confused with the full project duration. Drainage excavation, structural repair, remediation, electrical work, plumbing correction, pest treatment, or drying may extend the schedule beyond liner installation.
Request an itemized scope separating:
- Inspection and diagnosis
- Cleanup and disposal
- Bulk-water correction
- Drainage and discharge work
- Mold or pest work
- Structural or foundation repair
- Ground preparation
- Liner materials and installation
- Wall and pier detailing
- Vent, rim, and penetration treatment
- Insulation
- Sump and dehumidification equipment
- Electrical work
- Initial equipment checks and readings
- Follow-up visits
- Maintenance and warranty conditions
Do not treat projected energy savings as guaranteed payback. Energy use depends on climate, ducts, HVAC operation, insulation, air sealing elsewhere, thermostat settings, and utility prices. Some commercial savings claims refer to wider whole-home air-sealing work rather than encapsulation alone.
Ownership continues after installation. Inspect the liner and perimeter, review humidity trends, maintain dehumidification and drainage equipment, check visible discharge routes, and revisit the space after severe weather. One product supplier recommends inspection at least twice yearly and after major storms, while other commercial guidance suggests yearly checks. Treat these as vendor planning suggestions, not code requirements.
Increase attention when the crawl space has a flooding history, difficult access, critical equipment, or powered systems whose failure could allow moisture to accumulate unnoticed.
DIY work may be more manageable in a small, accessible, relatively dry crawl space without active water, suspected contamination, structural damage, pests, electrical complications, or fuel-burning equipment. Qualified help becomes more important when the project involves:
- Standing water or recurring flooding
- Extensive condensation or high humidity
- Suspected mold
- Pest activity
- Poor clearance or difficult access
- Uneven, sharp, or obstructed ground
- Damaged framing or foundation movement
- New electrical work
- Sump or drainage design
- Fuel-burning appliances
- Radon concerns
Before choosing a quote, ask:
- What documented defect does each line item address?
- What is excluded?
- Who handles plumbing, electrical, structural, pest, or remediation work?
- Where will collected water discharge?
- How will sump or dehumidifier failure be noticed?
- Where will dehumidifier condensate go?
- How will initial humidity be recorded?
- Which locations will receive baseline and follow-up readings?
- What access remains for HVAC, plumbing, electrical, and pest inspections?
- What maintenance is required?
- Which maintenance failures could affect the warranty?
- Who repairs torn seams or failed wall attachments?
- Is seasonal or post-storm follow-up included?
Frequently asked questions
What should a crawl space look like after encapsulation?
It should look clean, continuous, accessible, and consistent with the stated scope. Exposed soil should be isolated as designed, seams and edges should be secured, and walls, piers, vents, gaps, and penetrations should match the proposal. Included drainage and humidity-control equipment should remain accessible, with defined drain or discharge routes.
The more meaningful evidence is what happens afterward: stable or improving moisture readings, no unexplained water, accessible framing, operating equipment, and satisfactory observations through wet or humid conditions.
Will encapsulation fix standing water, mold, termites, or rotted wood?
No. Encapsulation can form part of a moisture-control plan, but it does not itself repair a leak, redirect groundwater, remove existing contamination, eliminate an infestation, or restore weakened framing.
Standing water requires source diagnosis and may call for grading, drainage, pumping, or plumbing work. Suspected mold, active pests, and damaged framing require separate assessment and appropriate correction before or alongside enclosure work.
What humidity should an encapsulated crawl space maintain?
The supplied commercial sources do not agree on one figure. Their guidance ranges from keeping relative humidity below 60% to narrower suggestions of approximately 30%–50% or no more than about 55%. These are commercially sourced planning ranges, not universal pass-fail thresholds.
Review trends rather than one reading. Consider temperature, weather, sensor location, condensation, odors, visible water, framing condition, and equipment operation together.
Does every encapsulated crawl space need a dehumidifier or sump pump?
No. A sump handles collected bulk water; a dehumidifier removes moisture from the air. They perform different functions, and neither is automatically required in every crawl space.
A project may need both, one, or neither. The choice should follow the property’s water history, drainage design, climate, humidity observations, and intended enclosure.
How much does crawl space encapsulation cost, and how long does installation take?
One commercial contractor estimates professional work at $3–$10 per square foot or $3,000–$15,000 total, with approximately three to five installation days after preparation and repairs. Those figures are vendor-supplied context, not a universal price or schedule.
Access, cleanup, liner details, drainage, equipment, insulation, remediation, electrical work, pest treatment, and structural repairs can materially change the total. Compare itemized scopes rather than headline prices.
Ultimately, the meaningful before-and-after change is not exposed dirt versus a white liner. It is uncontrolled moisture versus a system whose water sources have been investigated, necessary repairs completed, enclosure details documented, included equipment checked, and performance followed over time.
Preserve the before records. Obtain an itemized scope. Verify where water will go, how humidity will be managed, and what access must remain. Then collect repeat readings and photographs across seasons and after storms.
Mortar Desk publishes general reference information rather than property-specific contracting or engineering advice. Structural, mold, pest, radon, combustion, gas, and major electrical concerns should be handled by appropriately qualified local professionals.