 MortarDesk
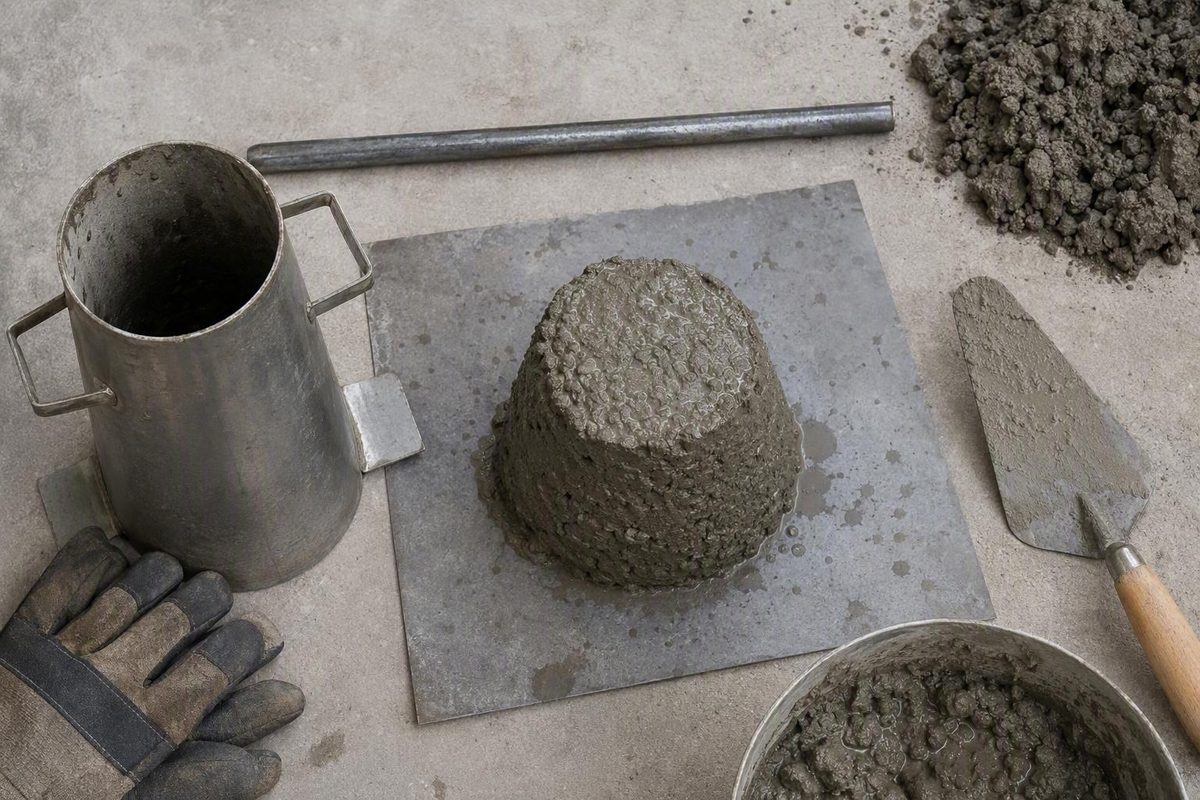
A slump cone test is a quick way to observe how fresh concrete behaves before placement. It can help crews compare consistency between samples or deliveries, but its simplicity is deceptive: sampling, timing, apparatus condition, filling, rodding, mold removal, measurement, and the specimen’s final shape all affect whether the result is meaningful.
The result must be interpreted against the approved mix design, project specification, and governing test method.
This guide is a practical overview, not a substitute for the current standard edition or project requirements.
Safety note: Before handling fresh concrete, consult the product safety data sheet and applicable site safety procedures for required skin and eye protection, hygiene measures, and exposure response. This article explains the test method but does not replace workplace safety instructions or product-specific safety guidance.
What a slump cone is and what the test measures
A slump cone—also called an Abrams cone—is an open-ended mold shaped like a conical frustum. It is wider at the bottom, narrower at the top, and used to hold a prepared sample of fresh concrete before the concrete sets.
During a conventional slump test, the operator fills and consolidates concrete inside the cone, removes the mold vertically, and observes how far the unsupported specimen subsides. That measured vertical drop is the concrete’s slump.
The result is commonly discussed in terms of two related concepts:
- Workability is the practical ease with which fresh concrete can be handled, placed, consolidated, and finished.
- Consistency more narrowly describes relative fluidity and how uniformly a mixture behaves from one sample or load to another.
The test is commonly performed in the field before placement, although similar apparatus can be used in a laboratory. Its main value is as an empirical comparison made under a defined procedure.
Slump is not a direct measurement of compressive strength, durability, water content, water-to-cementitious-materials ratio, or overall concrete quality.
Conversely, slump can change because of temperature, elapsed time, pumping, or admixture action. A supplier’s technical guide similarly cautions that field slump does not have a consistently clear relationship with strength or water-to-cementitious-materials ratio (Gilson’s concrete slump guide).
A slump result can contribute to a conformity assessment only when a valid result is compared with the approved mix design and project requirements. The number cannot make the acceptance decision by itself.
Some commercial glossaries also discuss smaller molds for mortar or stucco. That does not establish that the conventional concrete procedure or its governing standard applies unchanged to those materials. This article addresses fresh concrete only.
Standard cone dimensions and the rest of the apparatus
Two nominal dimensional systems commonly appear in product literature:
| Dimension | Inch-system cone | Common metric cone |
|---|---|---|
| Mold height | 12 in | 300 mm |
| Bottom inside diameter | 8 in | 200 mm |
| Top inside diameter | 4 in | 100 mm |
These are often called the 12/8/4-inch and 300/200/100-mm systems. They describe closely comparable molds, but they are not exact conversions. Twelve inches is approximately 305 mm, 8 inches approximately 203 mm, and 4 inches approximately 102 mm. Some products therefore use 305/203/102 mm, while dedicated metric models use 300/200/100 mm. Gilson, for example, lists separate inch and metric molds using those respective nominal dimensions (Gilson’s steel slump-cone specifications).
Do not assume that rounded metric dimensions are exact equivalents or that every cone with a generic “slump cone” label suits a particular project. Verify the required dimensional system, inside diameters, mold height, tolerances, construction, and supporting documentation.
A commonly described rounded tamping rod is approximately 24 inches or 610 mm long and 5/8 inch or 16 mm in diameter. These dimensions are summarized in commercial technical guidance rather than established here as a substitute for the current governing method (Humboldt’s concrete slump testing guide).
The core working apparatus normally includes:
- Slump cone
- Flat, rigid, non-absorbent base
- Rounded tamping rod
- Scoop or other suitable means of placing concrete
- Prescribed measuring device
The cone may be secured by clamps on the base or held using attached foot tabs. The base must be large enough to support the specimen after the mold is removed.
Possible convenience accessories include:
- filling funnel;
- sample pan;
- trowel;
- brush;
- mallet;
- carrying case; and
- cleaning tools.
A funnel can reduce spillage during filling, while a pan may provide a convenient working arrangement. An accessory’s presence in a commercial kit does not establish that it is required—or permitted at every stage—by the applicable method.
A useful apparatus diagram should identify:
- top inside diameter;
- bottom inside diameter;
- vertical mold height;
- handles;
- foot tabs or base clamps;
- flat, non-absorbent base; and
- straight upward direction of mold removal.
The distinction between inside and outside diameter matters. An outside measurement includes wall thickness and does not confirm the mold’s internal dimensions.
How a conventional concrete slump test is performed
The following sequence is an overview. Exact sampling, timing, layer placement, rod penetration, lifting, measurement, reporting precision, and retest requirements must come from the current method and project specification.
1. Obtain and identify a representative sample
The test portion should represent the concrete being evaluated rather than simply the easiest material to collect. Record the sample or load identity and conduct the test promptly under the specified sampling and testing procedures.
A segregated, contaminated, delayed, or otherwise unrepresentative sample can produce a precise-looking number that does not describe the concrete being placed.
2. Inspect and prepare the apparatus
Confirm that the cone is clean, sound, and free from hardened residue or distortion. Check the rod, base, and measuring device.
Place the base on a surface that is:
- flat;
- level;
- rigid;
- non-absorbent;
- free from vibration; and
- large enough to contain the slumped specimen.
Dampen and secure the apparatus as required by the applicable method. Do not leave surface conditions that could alter the sample.
3. Fill the cone in three equal-volume layers
The conventional procedure is commonly summarized as filling the cone in three layers of equal volume, not three layers of equal depth. Because the cone widens toward the bottom, the resulting layer depths differ.
Gilson’s supplier guide gives approximate filled depths of 2-5/8 inches after the first layer and 6-1/8 inches after the second layer. Those figures are drafting guidance only; exact execution must follow the current governing method (Gilson’s summarized filling and rodding procedure).
Place the concrete carefully so that paste, coarse aggregate, or other portions of the sample are not selectively lost.
4. Rod each layer 25 times
Each layer is commonly consolidated with 25 strokes distributed evenly across its cross-section. Avoid concentrating the strokes in the center or repeatedly following one path.
For the second and third layers, the rod passes through the current layer and slightly into the layer below. Commercial summaries describe approximately 1 inch or 25 mm of penetration, but the governing method controls the required technique.
The objective is consistent consolidation—not aggressive stirring, unnecessary striking of the base, or selective movement of coarse aggregate.
5. Strike the top off
After consolidating the final layer, maintain enough material above the rim to strike the surface off flush with the mold. Clear displaced concrete from around the base without disturbing the filled cone.
Material left around the mold can catch the specimen or obstruct the vertical lift.
6. Lift the cone vertically
Raise the mold in one smooth, straight, vertical movement. Do not tilt, twist, rock, drag, or jerk it.
Commercial procedural summaries describe completing the lift in 5 ± 2 seconds, but that value should be checked against the current method required for the work. Lateral movement can create shear or collapse caused by the operator rather than by the concrete’s natural behavior.
7. Observe the shape and measure the slump
After the mold is removed, observe how the specimen subsides. Slump is the prescribed vertical difference between the mold’s original height and the reference point specified by the applicable method.
Do not resolve those details from a generic illustration or product blog; use the measurement point and precision stated in the governing standard edition.
Record both the measured value and the observed shape. A number without the shape can conceal a result that is invalid or difficult to interpret.
Compact field checklist
- [ ] Confirm sample or load identity
- [ ] Obtain a representative sample and test it promptly
- [ ] Inspect the cone, rod, base, and measuring device
- [ ] Use a flat, level, rigid, non-absorbent, vibration-free base
- [ ] Clean and dampen the apparatus as required
- [ ] Secure the cone
- [ ] Fill in three equal-volume layers
- [ ] Apply 25 evenly distributed strokes per layer
- [ ] Rod upper layers slightly into the preceding layer
- [ ] Strike the top off flush
- [ ] Clear displaced material around the base
- [ ] Lift vertically without tilting or twisting
- [ ] Measure under the applicable standard edition
- [ ] Record both slump value and specimen shape
- [ ] Document timing and procedural anomalies
How to interpret true, shear, collapse, and zero slump
The specimen’s shape after mold removal is part of the result. It helps determine whether a conventional vertical measurement can be meaningfully interpreted.
| Observed shape | What can safely be inferred | What cannot be inferred | Standards-based next step |
|---|---|---|---|
| True slump | The specimen subsided relatively evenly while generally retaining its form. | It does not prove strength, durability, correct water content, or batch acceptance. | Measure and report as required, then compare with project criteria. |
| Shear slump | Part of the specimen slipped or sheared laterally, making an ordinary value questionable. | It does not automatically prove defective concrete. | Document the shape and follow the prescribed retest or other procedure. |
| Collapse slump | The specimen lost its form, so an ordinary vertical measurement may be unreliable or impossible. | It does not necessarily prove excess water, low strength, or a defective batch. | Determine whether a repeat or a flow-based method is required. |
| Zero slump | Little or no visible subsidence occurred, indicating very stiff behavior in this test. | The test cannot discriminate effectively among stiff mixtures that remain upright. | Confirm whether conventional slump is suitable and use the specified alternative if necessary. |
True slump
A true slump settles relatively uniformly while retaining the specimen’s general form. This is the shape conventionally associated with an interpretable vertical-slump result.
“True” does not mean “acceptable.” Acceptance still depends on the specified range, permitted tolerance, test validity, and any retest provisions.
Shear slump
A shear slump occurs when part of the specimen slips sideways or separates along an inclined plane. It may reflect material behavior, disturbance during mold removal, or another cause that cannot be diagnosed from the shape alone.
Because lateral displacement undermines a simple vertical comparison, the operator should follow the prescribed procedure rather than turning an obviously sheared specimen into an unqualified true-slump value.
Collapse slump
A collapse slump loses most or all of the conical form. In an ordinary mixture, that indicates behavior too fluid for a meaningful conventional vertical measurement. In deliberately high-workability or self-consolidating concrete, spreading may be expected and evaluated by another method.
Collapse is therefore a limitation of the conventional measurement, not a universal rejection rule.
Zero slump
A zero-slump specimen remains close to its molded height. It behaves very stiffly, but the test provides little discrimination between different mixtures that both show almost no movement.
A zero result does not by itself prove that the concrete is unusable. Some specialized mixtures are intentionally stiff and require a different assessment.
The essential distinction is between test validity and concrete acceptance. An abnormal shape may make the result unsuitable for ordinary interpretation, but it does not independently establish whether a load must be accepted, adjusted, or rejected.
Standards map: conventional slump versus slump flow
Product pages often list several standards together because similar equipment may be used in multiple procedures. That does not make the standards or results interchangeable.
The following table summarizes how the supplied commercial and explanatory sources describe the designations. It does not establish current official scope or requirements; verify every designation against the edition adopted for the project.
| Designation | General subject commonly attributed to it | Conventional slump or alternative? | Verification note |
|---|---|---|---|
| ASTM C143/C143M | Slump of hydraulic-cement concrete | Conventional slump | Confirm current edition and project procedure. |
| AASHTO T119 | Slump of hydraulic-cement concrete | Conventional slump | Confirm the edition specified for the work. |
| ASTM C1611/C1611M | Slump flow of self-consolidating concrete | Alternative spread-based method | Do not treat the result as conventional vertical slump. |
| ASTM C1621/C1621M | Passing ability of self-consolidating concrete | Separate assessment | Addresses behavior different from vertical subsidence. |
| BS EN 12350-2 | Slump testing of fresh concrete | Conventional slump | Confirm the adopted edition and jurisdictional requirements. |
| BS EN 12350-5 | Flow-table testing of fresh concrete | Alternative flow method | Do not represent it as interchangeable with conventional slump. |
| ASTM C192/C192M | Making and curing concrete test specimens in a laboratory | Different scope | Appearance on an equipment page does not make it a slump method. |
| ASTM C1712 | A separate concrete test subject | Different scope | Verify why it is listed and whether it is relevant to the purchase. |
Supplier guidance identifies ASTM C143/C143M and AASHTO T119 with conventional hydraulic-cement-concrete slump testing, while ASTM C1611 concerns slump flow and ASTM C1621 concerns passing ability for self-consolidating concrete (Humboldt’s overview of slump equipment and methods).
Commercial concrete guidance likewise associates BS EN 12350-2 with conventional slump and BS EN 12350-5 with flow-table testing, but the seller’s summary should not replace the adopted standards themselves (comparison of slump and flow-table testing).
Seller pages sometimes place ASTM C143, C1611, C192, C1712, and AASHTO T119 in a single “meets standards” list. That may mean the seller considers the physical equipment relevant to several uses; it does not mean the procedures measure the same property. Treat such statements as seller claims unless the required supporting documentation establishes conformity.
Before testing or purchasing, verify:
- the designation required by the project;
- the adopted edition;
- jurisdictional modifications;
- required dimensional system;
- permitted apparatus construction;
- sampling and aggregate-size provisions;
- measurement and reporting rules; and
- retest and acceptance criteria.
When a standard slump cone result is not enough
Conventional slump is useful when the specimen retains a shape from which vertical subsidence can be meaningfully measured. It becomes less informative—or unsuitable—when that premise no longer applies.
Potential problem cases include:
- very stiff or zero-slump mixtures;
- highly fluid mixtures;
- self-consolidating concrete;
- concrete containing aggregate beyond the method’s stated applicability;
- unusual aggregate combinations;
- specialized admixture systems; and
- mixtures for which another fresh-concrete characteristic matters more than vertical subsidence.
Highly flowable and self-consolidating concrete
For highly flowable concrete, forcing a collapsed specimen into a conventional vertical-slump interpretation provides little useful information. A slump-flow procedure instead evaluates horizontal spread after the cone is lifted.
ASTM C1611 is commonly cited for slump flow of self-consolidating concrete. Passing ability, segregation resistance, or other behavior may require additional specified assessments; supplier guidance identifies ASTM C1621 in connection with passing ability.
Slump flow should not be described as merely a larger slump number. It measures a different outcome.
Aggregate size
One detailed supplier guide describes ASTM C143 and AASHTO T119 as applying to hydraulic-cement concrete with a maximum aggregate size of 1-1/2 inches or 37.5 mm. Because this is a secondary summary, confirm the actual applicability and required sampling treatment in the governing documents.
When larger aggregate is present, do not create a more convenient test portion by informally selecting material. Follow the prescribed sampling procedure.
No universal cutoff
Online sources propose different values for changing from conventional slump to another method. Figures such as 175, 180, 200, or 260 mm appear in different standards summaries and research contexts. None should be treated as a universal threshold for every mixture.
Test selection should begin with the project specification and governing method. Mixture behavior also matters: does the specimen retain a measurable form, slip laterally, collapse as expected, or barely move?
Both slump and slump flow are empirical, single-point tests. They are not complete independent measurements of fundamental behavior such as yield stress and plastic viscosity.
A 1998 laboratory study reported good correlation between flow-table and slump-flow results for the limited high-binder, high-workability mixtures examined. The mixtures had binder contents above 400 kg/m³ and used a particular 20 mm gravel, so the findings should not be generalized to all concrete (Domone’s study of slump flow for high-workability concrete).
A practical selection sequence is:
- Read the governing specification.
- Identify the mixture type: ordinary, very stiff, highly flowable, self-consolidating, or specialized.
- Check aggregate-size applicability.
- Consider expected specimen behavior.
- Observe whether the result is true, shear, collapse, or zero slump.
- Apply the specified next step: measurement, repeat testing, another method, or an authorized decision.
The cone may look similar across several procedures, but the measured outcome—vertical drop, horizontal spread, or another characteristic—determines what the result means.
Errors that can distort a slump result
Different results can arise because the concrete changed, the samples differed, or the technique was inconsistent. A controlled procedure reduces avoidable variability but cannot eliminate genuine changes in fresh concrete.
Sampling and timing errors
Common problems include:
- collecting an unrepresentative portion of the discharge;
- losing paste or coarse aggregate;
- allowing the sample to segregate;
- failing to handle a composite sample as prescribed;
- delaying the test;
- exposing the sample to sun, wind, rain, or contamination; and
- confusing sample or load identities.
A commercial technical guide summarizes timing requirements as beginning specified fresh-concrete tests within five minutes of sampling and completing the slump procedure within 2.5 minutes. These figures must be verified against the current sampling and test methods rather than treated as freestanding instructions.
Surface and base errors
An uneven, sloping, absorbent, vibrating, unstable, or undersized base can alter the specimen’s behavior. The base must remain level and stable during filling, rodding, strike-off, lifting, and measurement.
Testing on dry ground, rough timber, a rocking board, or a surface affected by nearby machinery can compromise the result.
Filling and consolidation errors
Potential sources of variation include:
- unequal-volume layers;
- uneven placement around the cone;
- too few or too many strokes;
- strokes concentrated in one area;
- insufficient or excessive penetration between layers;
- spilled material;
- loss of paste or coarse particles;
- concrete falling below the rim during final rodding; and
- incomplete or sloping strike-off.
The stroke count is only one part of the procedure. Distribution, penetration, and consistency also matter.
Mold-removal errors
Tilting, twisting, dragging, jerking, or catching the mold on the concrete can disturb the specimen. The resulting shear or collapse may then reflect the lift rather than the concrete.
Hands, feet, clamps, tools, and displaced concrete must not obstruct the mold’s vertical path.
Material and delivery variables
A change in slump is not automatically an operator error. Actual differences can arise from:
- elapsed time;
- concrete temperature;
- aggregate moisture or grading;
- admixture type and timing;
- pumping;
- mixing and agitation;
- transportation conditions; and
- differences among sampled portions of a load.
These variables are also why one slump result should not be used to reverse-engineer water content or predict strength.
A useful field record should include:
- sample or load identity;
- sampling location;
- sampling and test times;
- method used;
- measured slump;
- observed shape;
- required concrete or ambient conditions; and
- any delay, spill, vibration, damaged apparatus, or unusual behavior.
That is a practical traceability list, not a complete standardized reporting requirement.
Buying and inspecting a slump cone or test set
The first purchasing decision is whether you need a standalone cone or a coordinated set.
Standalone cone versus complete set
A standalone cone may suit a laboratory or crew that already owns a suitable base, rod, scoop, and measuring device. It can also replace a damaged mold.
A basic set generally groups essential components. A deluxe set may add a scoop, funnel, and brush, while a pan-based set provides a different working configuration. Humboldt, for example, markets standard, deluxe, and pan-based arrangements with different listed contents (Humboldt’s slump-test set comparison).
Do not rely on the product photo or the word “set.” Confirm the itemized contents. Commercial listings show that cones, bases, rods, funnels, scoops, pans, mallets, and measuring devices may be separate products.
Material and construction
The available evidence does not establish that one material is categorically more accurate, durable, or suitable than another.
Instead, verify whether the particular product’s construction is accepted under the method required for the work. Practical procurement questions include:
- Will the mold retain its dimensions in the intended environment?
- Can it be cleaned without distortion?
- Are handles and foot tabs secure?
- Is it compatible with the selected base?
- What documentation supports the seller’s compliance claim?
Some sellers attribute seamless spun-metal construction, plating, welded handles, and foot tabs to particular models. These are product claims, not independent guarantees. Forney, for example, describes those features for its own spun-metal cone and lists several standards it says the product meets (Forney’s slump-cone description).
Procurement checklist
Before ordering, verify:
- [ ] Inch or metric nominal system
- [ ] Top inside diameter
- [ ] Bottom inside diameter
- [ ] Mold height
- [ ] Applicable tolerances
- [ ] Construction accepted for the required method
- [ ] Stable handles
- [ ] Sound foot tabs or compatible clamps
- [ ] Base included or sold separately
- [ ] Rounded tamping rod included or sold separately
- [ ] Scoop included or sold separately
- [ ] Measuring device included or sold separately
- [ ] Funnel, pan, brush, trowel, mallet, and case status
- [ ] Standard claimed by the seller
- [ ] Edition associated with that claim
- [ ] Required conformity or traceability documentation
- [ ] Replacement parts and compatible accessories
- [ ] Storage, shipping, and return conditions
A product-page statement that equipment “meets” a standard is not the same as independent certification. Obtain whatever certificate, dimensional report, declaration, or traceability record the project or quality system requires.
Condition inspection
Inspect a new or existing cone for:
- dents;
- corrosion;
- hardened concrete residue;
- distorted openings;
- out-of-round sections;
- bent walls;
- loose or cracked handles;
- unstable foot tabs;
- damaged clamps; and
- a base that rocks, slopes, absorbs water, or has become distorted.
Residue should not accumulate until it alters the internal surface or dimensions. Avoid cleaning methods that dent, gouge, or deform the mold.
One supplier guide recommends replacing cones when dents, corrosion, or residue buildup affect their condition. The actual inspection, dimensional-verification, and replacement process should come from the applicable quality procedure. Do not assume from general product literature that a particular cone either requires or does not require formal calibration.
The practical recap is straightforward: verify the cone’s nominal dimensional system and included equipment; use a representative sample on a stable, non-absorbent base; follow the prescribed filling, rodding, strike-off, and vertical-lift sequence; record the measured subsidence and observed shape; and recognize when the mixture requires slump flow or another test.
Slump is a useful consistency check—not a strength test or universal acceptance decision. Mortar Desk provides general building-material reference information rather than contracting or engineering advice. Exact apparatus, safety, procedure, reporting, and acceptance requirements must be checked against the current standard edition, product safety information, and project specification.
Frequently asked questions
Does a higher slump mean weaker concrete?
Not necessarily. A higher slump means greater subsidence in the specified test, but it does not identify the cause.
Consistency can be affected by aggregate characteristics, temperature, elapsed time, pumping, mixture proportions, and admixtures. Two concretes with the same slump can differ in composition and performance, while concretes with different slump values may each satisfy their respective designs.
Do not infer compressive strength from slump alone or alter mixture ingredients solely in response to one result. Compare a valid test with the approved mix design and project criteria.
Can a plastic slump cone be used instead of a steel cone?
Potentially, but only if the particular cone’s dimensions, condition, construction, and documentation satisfy the method and project requirements.
Commercial suppliers list both steel and plastic molds. That market availability does not establish that every plastic product is suitable or interchangeable with every steel product. Material alone also does not establish accuracy: either type can become unsuitable if distorted or damaged.
What should happen after a shear or collapse slump?
First, document the observed shape rather than reporting it as an ordinary true slump without qualification.
A shear result commonly calls the validity of the vertical measurement into question. A collapse may require a repeat, or it may indicate that the mixture is intended for a spread-based method such as slump flow.
Neither shape creates a universal rejection rule. Retesting, alternative testing, acceptance, and rejection must follow the governing method and approved project specification.
Are the base, tamping rod, funnel, and scoop included with a slump cone?
Not automatically. Many listings are for the cone alone, while bases, rods, funnels, scoops, pans, brushes, and measuring devices may be sold separately.
Read the included-items list rather than relying on the product image. Even when a set bundles several components, confirm that each item is suitable for the method required for the work.
Is a slump cone used for self-consolidating concrete?
The cone can form part of a slump-flow procedure for self-consolidating concrete, but the procedure and result differ from conventional slump.
Conventional slump measures vertical subsidence where the specimen retains a measurable form. Slump flow measures horizontal spread after the mold is lifted. Passing ability and other characteristics may require additional specified tests.
Use the procedure named in the governing specification rather than treating an expected collapse as an ordinary vertical-slump result.