 MortarDesk
What “stucco on frame” means
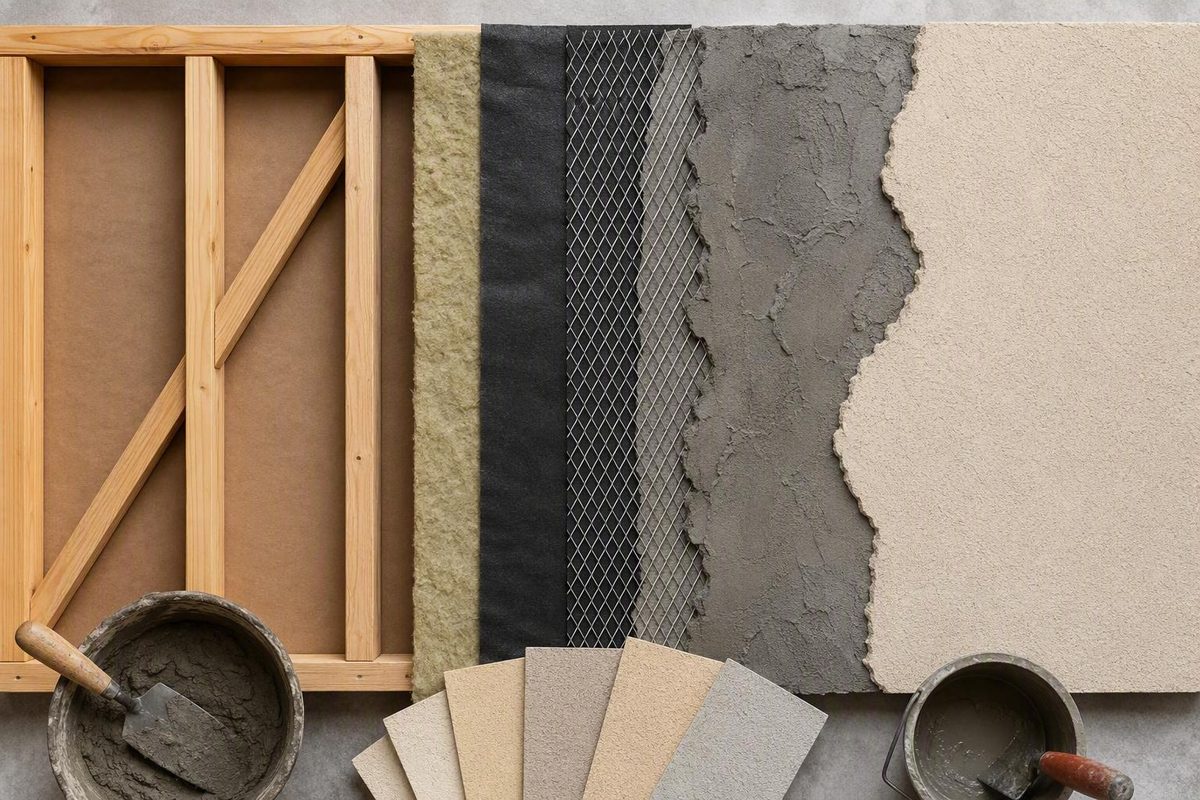
In construction, stucco on frame generally means cement-plaster cladding supported by a wood- or steel-framed wall. It describes more than the visible texture. A complete assembly may include framing, structural sheathing, water-management layers, metal lath, plaster coats, flashing, drainage outlets, movement accessories, sealed transitions and finish materials.
It does not normally mean applying wet stucco directly to bare studs. Framing creates the structural wall, but plaster needs an approved supporting and water-management assembly between it and moisture-sensitive construction.
The main component groups are:
- Structural frame: Wood or steel studs, plates, tracks and other members carrying the designed loads.
- Sheathing: Plywood, oriented strand board (OSB), gypsum-based sheathing or another approved panel, depending on the wall design.
- Water management: Weather-resistive barriers, drainage planes, flashing and outlets that direct incidental water outward.
- Plaster support: Metal lath and fasteners, plus accessories such as casing beads, control joints and screeds.
- Plaster coats: The cement-plaster base and finish layers.
- Openings and transitions: Windows, doors, roof intersections, utility penetrations, trim and junctions with other claddings.
- Visible finish: The final texture, color, coating or paint.
The phrase can also be an estimating category, whose scope is controlled by the estimate rather than a wall-section drawing. One documented category includes stucco, netting, cedar trim, two coats of paint, flashing, scaffolding where needed and installation labor, while excluding framing, exterior doors and windows. Those excluded items must be entered separately in that estimating system. A price labeled “stucco on frame” therefore does not necessarily include the frame—or every component needed for a complete wall. The construction cost-estimating documentation defines that particular scope explicitly.
In descriptions of historic architecture, the words may carry another meaning. “Stucco and applied half timber over wood frame” can describe Tudor Revival façades in which boards create a half-timbered appearance over stucco. The applied timber may be decorative trim, so its presence does not independently prove that the concealed building uses traditional structural timber framing. Open Durham’s architectural category illustrates this historic usage.
This article treats stucco on frame primarily as a wall assembly. It is a general material and specification reference—not a universal wall design, installation tutorial, inspection certification or repair prescription. The adopted code, approved plans, project specifications, current evaluation reports and product instructions determine what belongs on an individual building.
The wall from studs to finish: a representative wood-frame assembly
A representative wood-framed, three-coat stucco wall can be read from the weather-exposed surface inward as follows:
OUTSIDE
│
├── Finish coat
├── Brown coat
├── Scratch coat
├── Self-furring metal lath
├── Approved drainage or bond-break layer
├── Approved weather-resistive barrier
├── Structural sheathing, where specified
├── Wood studs and other framing
│
INSIDE
The assembly can also be separated by function:
STRUCTURE             WATER MANAGEMENT        PLASTER SUPPORT       FINISH
Wood framing          WRB                     Metal lath            Scratch coat
Structural sheathing  Drainage path           Fasteners             Brown coat
                      Flashing                 Screeds and beads     Finish coat
                      Weep outlet              Movement joints
These diagrams are representative, not prescriptive. Approved assemblies may use different substrates, barrier arrangements, accessories or plaster dimensions. A wall-field drawing also does not resolve the details at windows, doors, roofs, foundations and penetrations.
Framing carries the loads for which the building was designed. Stucco is exterior cladding, not a substitute for the required structural system.
Sheathing may brace the frame, provide continuous backing and support other wall functions. Plywood or OSB may be used beneath stucco when the approved design permits it, but the panel type alone is not a complete specification. Thickness, span rating, orientation, edge support or blocking, panel spacing and fastening must agree with the structural design and wall-system requirements. Regional guidance from Johnson County, Kansas, recognizes plywood and OSB as possible substrates while emphasizing the need for a drainage plane behind the cladding. The Johnson County stucco guideline explains this relationship among sheathing, barriers and drainage.
Weather-resistive and drainage layers manage water that gets past the exposed surface. One layer may serve as the principal weather-resistive barrier, while another provides a bond break or assists drainage. The exact configuration depends on the substrate, adopted code and approved system. These layers must connect to flashing and a lower outlet rather than ending as isolated sheets behind the plaster.
Self-furring metal lath forms the mechanically supported base into which plaster is embedded. It still needs the correct orientation, laps, fastening and accessories.
The scratch coat is the first plaster layer. Its scored surface creates a key for the next coat.
Irregular framing, sheathing or lath should not be accepted on the assumption that the brown coat can correct every defect.
The finish coat provides the final texture and appearance. It may be cementitious or another finish permitted by the selected system. Color and texture matter aesthetically, but they do not replace concealed drainage, flashing and attachment work.
As one concrete example, an International Masonry Institute wood-frame detail shows sheathing, two weather-resistive-barrier layers, self-furring lath, a 1/4-inch scratch coat, a 1/2-inch brown coat and a surface finish coat. The page does not state a finish-coat thickness. The IMI detail documents that particular sequence and those base-coat dimensions. It does not establish that every project needs the same products, layer count or dimensions.
A useful wall drawing should therefore distinguish:
- What is structural.
- What limits and drains water.
- What mechanically supports the plaster.
- Where drainage exits.
- How openings and transitions connect to the wall field.
- Which materials and thicknesses belong to the approved plaster system.
Without those distinctions, a diagram can appear complete while omitting the details most likely to control performance.
Three-coat, one-coat and substrate-dependent systems
A coat is a layer of stucco applied in one operation. The number in a system name refers to application layers, not merely to the number of products delivered to the site.
In conventional three-coat work:
- The scratch coat is applied to the lath and scored to create a keyed surface.
- The brown coat builds thickness and establishes the principal plane.
- The finish coat provides the final texture, color and exposed surface.
A commonly described conventional configuration is:
| Coat | Common reference thickness | Primary role |
|---|---|---|
| Scratch | 3/8 inch | Embedment and keyed base |
| Brown | 3/8 inch | Main plaster plane |
| Finish | About 1/8 inch | Final texture and appearance |
| Total | About 7/8 inch | Conventional reference build-up |
A trade-publication explanation describes this typical three-coat build-up and distinguishes it from direct-applied two-coat work and proprietary one-coat systems. It also associates conventional two- and three-coat plaster with ASTM C926 while identifying one-coat stucco as a proprietary system requiring a product-specific evaluation path. Building Enclosure compares these coat systems and their typical substrates.
The table is a useful reference, but 7/8 inch is not a universal requirement for every stucco-on-frame wall. The IMI wood-frame example discussed above instead shows a 1/4-inch scratch coat and a 1/2-inch brown coat, with the finish thickness unstated. Both examples contain 3/4 inch of base plaster before the finish, but they divide that base thickness differently.
That difference should not be “corrected” by choosing whichever figures are more familiar. It shows why coat dimensions must be tied to an identified assembly, project specification, applicable standard or evaluated product.
Conventional three-coat stucco is commonly specified through the applicable cement-plaster and lathing framework, including ASTM C926 and ASTM C1063 where adopted or referenced. The evidence available here consists of industry and regional summaries rather than the current ASTM text itself, so the applicable editions and exact provisions must be checked directly for the project. The specification must also address substrate preparation, barriers, lath, fasteners, flashing, joints, curing and finish.
Proprietary one-coat stucco follows a different route. It is not conventional three-coat work with the scratch and brown coats arbitrarily reduced or combined in the field. It is a coordinated, evaluated product assembly whose acceptable substrates, reinforcement, accessories, thickness and installation conditions are defined by its documentation.
Before accepting a one-coat proposal, identify and check:
- The exact manufacturer and system name.
- The current evaluation report and its status.
- Approved wood-frame, steel-frame, sheathed or open-frame substrates.
- Required sheathing or insulation board.
- Weather-resistive-barrier and drainage configuration.
- Lath or reinforcement type and orientation.
- Fastener type, spacing and required framing engagement.
- Base-coat and finish requirements.
- Accessories at openings, terminations and joints.
- Limitations related to wind, exposure and building height.
- Current manufacturer instructions and referenced details.
An evaluation report number on a package is not enough if the proposed wall differs from the approved configuration.
Two-coat conventional stucco is typically associated with direct application to a suitable masonry or concrete base. That substrate can provide direct plaster support without the framed-wall lath arrangement used in a typical three-coat assembly. Two-coat work should not be assumed to be the default for framed construction merely because it uses fewer applications.
Thickness must therefore be specified as part of a system. “Provide 1/2-inch stucco” leaves unanswered whether the dimension describes a proprietary evaluated system, conventional plaster, a base coat, a total thickness or estimating shorthand. An anecdote about a nominal 1/2-inch installation on one house cannot establish present-day compliance, durability or equivalent performance.
Wood studs and steel studs require separate details
Wood and steel framing can support stucco assemblies, but they should not be represented by one interchangeable detail. The finished cladding may look identical while the concealed fasteners, sheathing, corrosion considerations and attachment design differ.
A simplified wood-stud relationship looks like this:
OUTSIDE
│
├── Finish, brown and scratch coats
├── Self-furring lath
│      └── Approved fasteners engage wood framing
├── Approved WRB and drainage configuration
├── Permitted structural sheathing
└── Wood studs
INSIDE
Questions for the wood-frame detail include:
- Which sheathing is required?
- How are panel edges spaced and supported?
- What fastener length provides the required penetration into framing?
- Are staples, nails or screws permitted?
- How are preservative-treated lumber and wet-service conditions addressed?
- How do barriers and flashings connect at openings and the foundation?
- Where do lath and plaster stop at joints and dissimilar materials?
A simplified steel-stud relationship looks like this:
OUTSIDE
│
├── Finish, brown and scratch coats
├── Self-furring lath
│      └── Approved fasteners attach to steel framing
├── Approved WRB and drainage configuration
├── Approved exterior sheathing
└── Steel studs and tracks
INSIDE
An International Masonry Institute steel-frame example shows steel studs and sheathing behind two weather-resistant-barrier layers, self-furring lath, a 1/4-inch scratch coat, a 1/2-inch brown coat and a finish coat. The IMI steel-stud detail documents that possible layer sequence.
That example is not a complete steel-frame specification. It does not settle stud gauge, sheathing selection, screw type, fastening pattern, corrosion protection, wind-load attachment, edge conditions, flashing, drainage or compatibility between metals.
Framing material changes the attachment problem. A fastener requirement expressed as penetration into wood cannot simply be transferred to cold-formed steel. Exposure conditions can also affect the required corrosion resistance.
Likewise, a wood-frame sheathing schedule should not be copied automatically onto steel framing.
Some evaluated systems may allow installation over open framing under defined conditions. That possibility is not general permission to remove sheathing from a detail that requires it.
Water management: the system behind the surface
Stucco should be treated as part of a water-managed wall, not as the wall’s only defense against rain. The exposed plaster sheds much of the water, but cracks, joints, penetrations and interfaces can admit incidental moisture. The concealed assembly needs a route that limits contact with vulnerable materials and directs water back outside.
A weather-resistive barrier limits water entry into the backing wall. A drainage path gives water that reaches the concealed side of the cladding a downward route. The functions are related but not interchangeable: a barrier without an effective outlet can leave water trapped, while a nominal drainage space will not work if flashing directs runoff behind it.
The organizing principle is shingle-style integration. Lower components are positioned so upper components discharge onto their exterior face:
Upper WRB course
        ↓ laps over
Window head flashing
        ↓ drains onto
Lower WRB course
        ↓ directs water toward
Foundation weep screed
        ↓
Exterior
Regional Johnson County guidance describes bottom-up, shingle-style barrier installation, integration with flashing and a foundation weep screed that allows water to leave the assembly. It also identifies kick-out flashing where a wall continues below a roof edge. The regional guideline documents these water-management principles. Its provisions are not a substitute for the current code, approved plans or system instructions elsewhere.
High-risk junctions include:
- Window and door heads, jambs and sills.
- Roof-to-wall intersections.
- The lower end of a sloped roof beside a continuing wall.
- Eaves, roof edges and gutter terminations.
- Utility pipes, vents, hose bibbs, lights and electrical boxes.
- Decorative bands and projecting trim.
- Transitions to brick, stone, siding or other materials.
- Decks, balconies and attachments.
- The wall-to-foundation termination.
A foundation weep screed provides a drainage exit at the bottom of a framed stucco wall. The barrier and drainage path must deliver water to the screed, and the outlet must remain unobstructed. Soil, paving, coatings or landscaping that cover the screed can interfere with drainage.
Manufacturer guidance summarizing lathing practice cites clearances of 4 inches above earth and 2 inches above paved surfaces at the wall bottom. These are reference figures to verify, not universal requirements. The adopted code, approved detail and selected system control. ClarkDietrich identifies those clearances while advising project-specific code and design verification.
Stucco extending to grade can impede drainage, conceal the foundation edge and make inspection for termite tubes more difficult. Those conditions warrant evaluation, but they do not prove concealed damage by appearance alone.
A kick-out flashing is used where the lower edge of a sloping roof meets a wall that continues below. Its purpose is to divert concentrated roof runoff away from the wall and toward the gutter. Without an effective kick-out, water can be directed onto or behind the stucco at a vulnerable intersection.
At windows, doors and dissimilar materials, casing beads can create clean plaster terminations. A designed gap containing backer rod and compatible sealant can accommodate movement and seal the exposed perimeter. That joint does not replace head flashing, sill drainage or correctly lapped concealed barriers. Sealant is a serviceable exposed component, not a substitute for integrated flashing.
The required barrier configuration varies with:
- The adopted IBC or IRC edition and local amendments.
- Wood-based, gypsum or other sheathing.
- Whether a separate bond break is required.
- The listed or evaluated system.
- Climate and exposure.
- Local flashing and drainage provisions.
- Manufacturer instructions.
Two layers appear in multiple framed-wall examples, but those examples do not establish a universal two-layer rule. The specification must name the actual arrangement. Phrases such as “building paper as required” or “standard housewrap” do not adequately describe layer count, material classification, laps, attachment, flashing integration or drainage termination.
Lath, fasteners, laps and movement accessories
Metal lath supplies the plaster-supporting base in a framed-wall assembly. It must be suitable for the substrate, plaster system, environmental exposure and applicable standard.
Secondary industry guidance identifies these categories:
- Expanded metal lath: Associated with ASTM C847.
- Woven wire lath: Associated with ASTM C1032.
- Welded wire lath: Associated with ASTM C933.
Those labels do not make every product within a category interchangeable. Weight, configuration, furring, corrosion protection and approved use still matter. The applicable current standard and product documentation must be checked directly; the article has not independently verified current ASTM text.
For framed construction, the cited guidance says lath fasteners should engage the framing members beneath the sheathing rather than rely on sheathing alone. Sheathing may be part of the structural and backing assembly, but it should not be presumed to provide the required lath-fastener capacity unless the approved design expressly permits that approach.
The same manufacturer guidance cites the following recurring figures, including mesh-engagement requirements. They are verification prompts, not a universal fastening specification:
| Detail | Recurring reference figure |
|---|---|
| Vertical fastener spacing | About 6 to 7 inches |
| Penetration into wood framing | At least 3/4 inch |
| Side lap | 1/2 inch |
| End lap | 1 inch |
| Mesh engagement | At least three diamond-mesh strands or two woven/welded-wire strands |
Fastener requirements can change with lath type, framing material, sheathing thickness, wind pressure, seismic exposure, building height, stud spacing and system approval.
The complete fastening specification should identify:
- Fastener material and corrosion resistance.
- Nail, staple or screw type.
- Shank or screw diameter where applicable.
- Length.
- Head or crown dimensions.
- Spacing in each direction.
- Required wood penetration or steel engagement.
- Minimum mesh engagement.
- Treatment of laps and unsupported edges.
- Attachment at accessories.
- Adjustments for wind, seismic or coastal conditions.
Lath also has directional and lap requirements. Corners, openings and curved surfaces need defined details rather than improvised scraps.
Control joints divide plaster areas so shrinkage and movement are more likely to occur at planned locations.
Casing beads terminate plaster at openings and dissimilar materials, establish an edge and help form a joint that can receive backer rod and sealant.
Separated transitions prevent stucco from being hard-bonded across materials or building elements expected to move differently. Window frames, door frames, floor lines, structural joints and changes in substrate may require separation or a specified accessory.
Generic joint-area limits should not be copied into every project. Secondary guidance differs on panel dimensions and joint spacing, and some published figures are based on older or regional code material. A proper layout must account for wall size and aspect ratio, openings, re-entrant corners, floor lines, framing movement, existing structural joints and the selected system.
Before concealed work is covered, quality control should verify:
- [ ] Correct framing and sheathing are present.
- [ ] Sheathing fasteners, orientation, edge support and gaps match the plans.
- [ ] Barrier and drainage products and layer counts match the specification.
- [ ] Barrier laps run in the correct drainage direction.
- [ ] Window, door and penetration flashing is installed and integrated.
- [ ] Roof-to-wall flashing and kick-outs are complete.
- [ ] The foundation weep screed connects to the drainage path and is unobstructed.
- [ ] Lath type, configuration and orientation match the specification.
- [ ] Lath is furred as required and not crushed against the backing.
- [ ] Fasteners engage framing with the required spacing and penetration.
- [ ] Side and end laps are correct and secured as required.
- [ ] Corners and openings have the specified reinforcement or accessories.
- [ ] Control joints and casing beads follow the approved layout.
- [ ] Metals, coatings, fasteners, sealants and flashings are compatible.
- [ ] Required inspections occur before plaster conceals the work.
- [ ] Photographs and records identify concealed conditions.
This inspection stage matters because many critical details become impossible to confirm visually once the scratch coat covers the lath and barriers.
Visible warning signs—and what an inspection cannot prove
A surface inspection can identify locations that deserve attention, but it cannot reconstruct the concealed wall with certainty. Observations should be organized around water pathways and interfaces rather than reduced to a search for cracks.
Roof runoff
Look for roof areas that discharge large volumes of water toward a wall, opening or cladding transition. Note overflowing gutters, uncontrolled downspouts, staining and repeated splash patterns. These conditions identify exposure; they do not prove that water entered the wall.
Roof-to-wall intersections
Check for visible step, counter or kick-out flashing where applicable. A missing or undersized-looking kick-out is a concern because concentrated runoff may be directed toward the stucco. Even where flashing is visible, a finished-wall inspection usually cannot establish how its concealed leg was integrated with the weather-resistive barrier.
Windows and doors
Observe cracks at corners, failed or separated perimeter sealant, staining below sills and gaps between frames and plaster. Check whether projecting trim appears to slope outward rather than toward the wall. Staining may identify an area for further evaluation, but it does not establish whether the cause is window leakage, flashing, sealant, condensation, runoff or another pathway.
Utility penetrations
Inspect pipes, vents, electrical boxes, fixtures, cables and hose bibbs for open gaps, damaged sealant or details that appear to direct water inward. A surface bead of sealant does not confirm proper concealed flashing.
Decorative bands and trim
Projecting bands should not form inward-sloping ledges that collect water against the wall. Check for cracks, separation and staining at upper edges and around openings. Decorative foam and other attached features may conceal transitions that cannot be evaluated from the exposed surface.
Wall bottoms
Locate the weep screed or other approved termination. Note blocked outlets, coatings bridging the screed, paving placed too high, mulch against the wall and stucco touching soil. These are drainage or inspection concerns, not automatic proof of decay.
Joints and sealant
Look for missing joints, cracked accessories, hard-bonded transitions and sealant that is split, debonded, excessively thin or compressed. Sealant condition is visible; hidden backing, joint dimensions and flashing integration generally are not.
Exterior staining
Record the stain’s color, shape and relationship to roof edges, windows, joints and wall bottoms. One inspector-authored checklist says wet, deteriorating OSB may produce a distinctive brown stain, but the author also acknowledges uncertainty about the checklist’s original provenance. Staining alone cannot prove the sheathing type, moisture content or degree of deterioration. The AllSpec checklist presents the observation as an inspection concern, not concealed-wall verification.
Related interior signs
Interior discoloration, damaged finishes, musty conditions or moisture-meter indications near suspect exterior junctions can support further investigation. They do not by themselves establish the entry route, duration, extent or condition of framing and sheathing.
A crack is not automatically proof of leakage or structural failure. Conversely, a wall without obvious cracks is not proof that concealed flashing and drainage are correct.
A finished-wall visual inspection generally cannot confirm:
- The type and number of weather-resistive layers.
- Barrier laps and flashing integration.
- Hidden window and door flashing.
- Lath type, orientation, furring and laps.
- Fastener type, spacing or framing engagement.
- Sheathing type, condition and panel gaps.
- Moisture content inside the assembly.
- The presence, cause or extent of decay or corrosion.
- Whether concealed work matches an evaluation report.
Where observations suggest concealed moisture or deterioration, the next step may involve qualified assessment using appropriate instruments, selective openings or other invasive investigation. The scope should answer specific questions rather than merely confirm an assumed diagnosis.
Repair should follow the same principle. The substrate, moisture condition, exposure and approved repair detail should be understood before selecting the scope.
What to verify before ordering, installing or accepting the work
A complete stucco-on-frame specification connects the structural wall, water management, plaster support and finish. Start by identifying the governing documents rather than choosing dimensions from a generic diagram.
The standards listed below are common reference points in secondary industry guidance. Because applicable editions, amendments and incorporated provisions change, their current requirements must be checked through authorized standards, adopted code documents, approved plans and the authority having jurisdiction. One published guide, for example, summarizes ASTM C926 and ASTM C1063 through material substantially based on the 2010 Florida codes; it should not be treated as current primary code text for another jurisdiction. That guide expressly describes itself as noncomprehensive and based on older regional provisions.
| Item | Governing document | Question to resolve |
|---|---|---|
| Adopted code | Locally adopted IBC or IRC and amendments | Which edition and local changes apply? |
| Structural wall | Approved plans and calculations | Is the framing wood or steel, and what loads govern? |
| Sheathing | Plans, specifications and panel instructions | What type, thickness, orientation, gaps, blocking and fastening are required? |
| Cement plaster | Project specification and ASTM C926 where applicable | Is this conventional two- or three-coat work, and what materials, thicknesses and curing apply? |
| Lathing | ASTM C1063 where applicable and approved plans | What lath, attachment, laps and accessories are required? |
| Lath product | ASTM C847, C1032 or C933 as applicable | Which lath category and product comply with the assembly? |
| Proprietary system | Current evaluation report | Which substrates, reinforcement, fasteners, thicknesses and limitations are approved? |
| Product installation | Current manufacturer instructions | What preparation, mixing, application and environmental limits apply? |
| Water management | Code, plans and wall details | What barrier configuration, drainage path and flashing sequence are required? |
| Openings | Approved window, door and flashing details | How do head, jamb and sill components connect to the drainage plane? |
| Roof intersections | Roofing and wall details | Where are kick-outs, counterflashing and termination clearances required? |
| Wall bottom | Code, plans and screed detail | How does water exit, and what clearance must remain? |
| Movement control | Plans, specifications and system instructions | Where do control joints, casing beads and structural separations occur? |
| Sealants | Joint detail and sealant instructions | Are substrates, primer, backer rod, geometry and materials compatible? |
| Inspection | Permit documents and local requirements | Which stages require approval before concealment? |
The proposal or submittal should identify—not imply—the following:
- Framing material, spacing and relevant design conditions.
- Sheathing material, thickness and fastening.
- Panel gaps, orientation and edge support where required.
- Weather-resistive-barrier products and layer arrangement.
- Bond-break or drainage components.
- Flashing materials and integration sequence.
- Foundation weep screed and other drainage outlets.
- Lath type, weight or configuration and applicable standard.
- Fastener material, length, spacing and required engagement.
- Conventional or proprietary plaster system.
- Scratch, brown, base and finish-coat thicknesses as applicable.
- Casing beads, corner accessories and control joints.
- Window, door, roof and penetration transitions.
- Sealant, backer rod and compatibility requirements.
- Ground, paving, roof and other clearances.
- Mixing, curing and weather protection.
- Required inspections and documentation before concealment.
Climate and exposure should remain unresolved until verified.
Estimating requires a separate scope check:
- [ ] Demolition and disposal.
- [ ] Framing repair or new framing.
- [ ] Structural sheathing.
- [ ] Weather-resistive barriers and drainage components.
- [ ] Window, door and penetration flashing.
- [ ] Metal lath and fasteners.
- [ ] Screeds, casing beads, corners and joints.
- [ ] Scratch, brown or proprietary base coats.
- [ ] Finish coat, coating or paint.
- [ ] Decorative trim.
- [ ] Sealant and backer rod.
- [ ] Scaffolding and access.
- [ ] Windows and doors.
- [ ] Testing or investigative openings.
- [ ] Repair of concealed deterioration.
- [ ] Permit, inspection and documentation costs.
- [ ] Protection, curing and weather-related mobilization.
Never assume a line item called “stucco on frame” includes all of these. As noted earlier, one documented estimating category includes several stucco-related materials, trim, paint, flashing, scaffolding and labor while expressly excluding framing, windows and doors. Another estimator, contractor or insurer may use the same label with different boundaries.
Recurring figures—such as 7/8-inch conventional plaster, 6- or 7-inch fastener spacing, 3/4-inch wood penetration, lath laps or wall-bottom clearances—are useful for recognizing missing information. They do not establish compliance on their own.
Frequently asked questions
Can stucco be applied directly to wood studs?
Not as ordinary wet plaster applied to bare studs. A framed-wall stucco system needs an approved plaster-support and water-management assembly, commonly including sheathing where specified, weather-resistive or drainage layers, metal lath fastened as required, accessories and plaster coats.
A particular evaluated system may permit installation over open framing, but only under the conditions in its current evaluation report and instructions. That does not authorize omission of structural sheathing, barriers or other components required by the building design or selected assembly.
Is stucco on frame always 7/8 inch thick?
No. Approximately 7/8 inch is a common conventional three-coat reference based on a 3/8-inch scratch coat, 3/8-inch brown coat and roughly 1/8-inch finish coat. Other documented details divide the base thickness differently, and proprietary systems may use different approved dimensions. The trade comparison presents 7/8 inch as a typical three-coat configuration, not a universal framed-wall dimension.
Specify the identified system and each required coat rather than assuming a total from the phrase “stucco on frame.”
Are two weather-resistive-barrier layers always required behind framed-wall stucco?
No universal rule can be inferred from the phrase alone. Two layers appear in multiple framed-wall details and regional guidance, particularly over wood-based sheathing, but adopted codes and evaluated systems may recognize specific alternatives.
Verify the applicable code edition, sheathing, bond-break requirement, product evaluation report and manufacturer instructions. Also confirm how the selected layers connect to flashing and the drainage outlet; layer count alone does not create a functioning drainage system.
Does stucco lath have to be fastened into the studs?
The cited framed-wall guidance calls for lath fasteners to engage framing members beneath the sheathing rather than relying only on sheathing. It cites 6- to 7-inch vertical spacing, at least 3/4-inch penetration into wood framing, 1/2-inch side laps and 1-inch end laps as recurring figures, but the project’s plans, current standards and system documentation must determine the actual schedule. ClarkDietrich’s guidance attributes these figures to its summarized lathing requirements.
Wood- and steel-stud attachment details are different. A wood-penetration requirement should not be translated directly into a steel-frame screw specification.
Can a visual inspection confirm that the concealed flashing and drainage layers were installed correctly?
No. A visual inspection can identify exposed warning signs such as staining, cracks, separated sealant, suspect roof-to-wall intersections, blocked drainage outlets and stucco touching soil. It generally cannot verify concealed flashing laps, barrier configuration, lath, fasteners or sheathing condition.
If observed conditions justify concern, qualified assessment may require moisture measurements, records review or selective invasive investigation before the cause and repair scope can be established.
The visible stucco is only the outer portion of the wall. A sound specification coordinates framing and sheathing, approved water-management layers, lath and attachment, plaster coats, flashing, drainage exits, joints, transitions and finish. Use these categories to identify omissions and ask better questions, then verify every material and dimension against the locally adopted code, approved plans, applicable standards, current evaluation reports and manufacturer instructions.
Mortar Desk publishes general building-material reference information rather than individual engineering, contracting or inspection advice. Specifications change, codes are local and the controlling editions must be confirmed for the project. Mortar Desk’s editorial boundary explains that figures should be checked against current standards and local requirements.