 MortarDesk
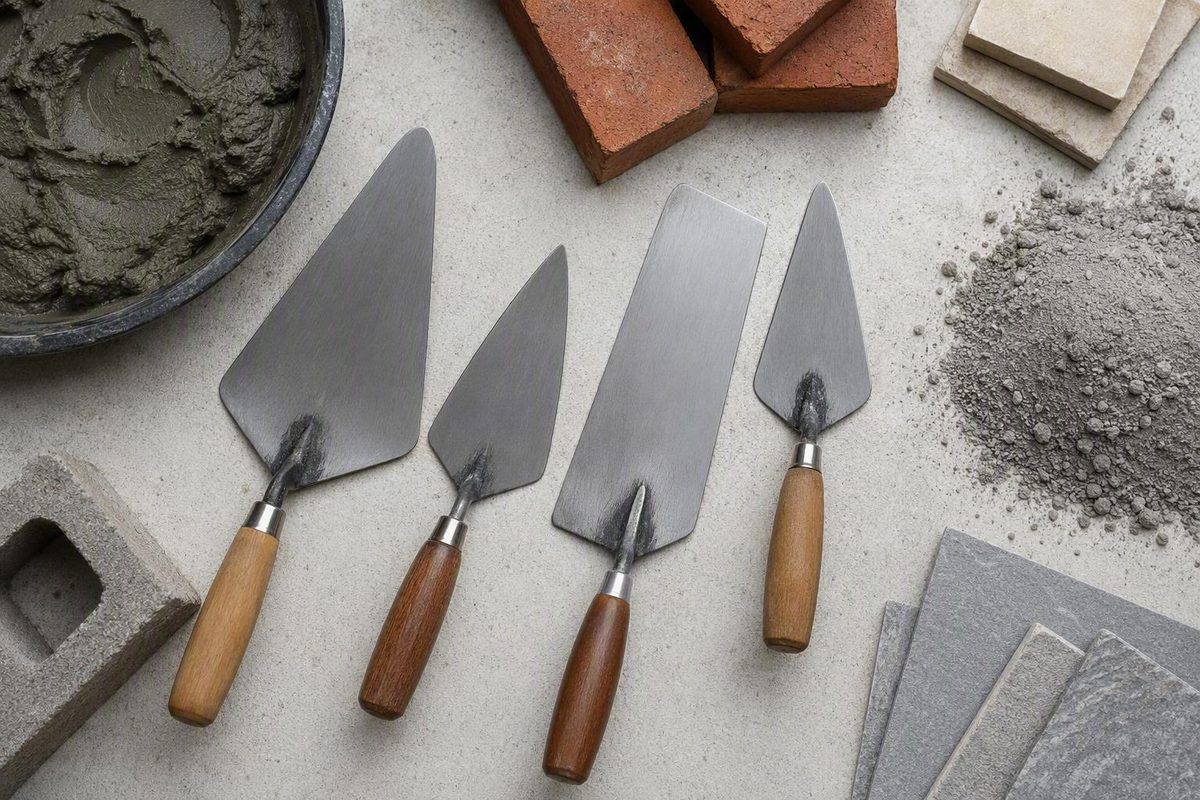
A masonry trowel should be chosen for the material-handling task, available space, blade profile, and useful mortar capacity—not because one pattern, steel, handle, or price tier is said to be universally best.
For laying brick or block, that usually means a broad, pointed brick trowel. Repairs may call for a margin, pointing, gauging, or tuck-pointing tool. Concrete finishing requires another blade form entirely. Once the basic type is correct, actual dimensions, balance, handle fit, and construction can refine the choice.
This guide explains those distinctions for tool identification and purchasing. It does not specify mortar, design masonry structures, or replace project-specific instructions. Mortar Desk publishes general building-material reference information; it is not a contractor or a source of individualized engineering advice.
What a masonry trowel is—and what it is not
The basic construction is straightforward. A metal blade is connected through a shank or tang to a handle. The important differences are in the blade’s outline, length, width, nose, heel, edge, and position relative to the handle. Those features determine whether a tool is convenient for carrying a bed of mortar, reaching a cavity, packing a joint, scraping a bucket, or smoothing a surface.
A brick trowel, also called a mason’s trowel, normally has a broad, pointed blade. Its jobs include picking up mortar, spreading a bed, buttering the end of a masonry unit, trimming excess material, and making small placement adjustments.
A concrete-finishing trowel does a different job. Instead of placing mortar around individual masonry units, it passes over a concrete surface after placement to smooth or finish it. Rectangular finishing blades and rounded pool-trowel blades therefore should not be treated as substitutes for a brick trowel. Common masonry-tool classifications likewise separate point-nosed brick trowels from concrete-finishing and round-edged pool trowels according to their intended tasks (overview of common masonry-trowel forms).
Other construction trowels are related but distinct:
- A plastering trowel usually has a long rectangular blade for spreading plaster over a wall or ceiling.
- A notched tile trowel has square, V-shaped, or U-shaped notches that form ridges in tile adhesive.
- A finishing trowel works across a surface rather than forming mortar beds around individual units.
- A gauging trowel handles small amounts of material and often has a rounded nose.
- A margin trowel is compact and flat-ended for confined access.
A tool may appear in more than one trade, but that does not mean every material or application follows the same placement, finishing, or curing procedure. Construction-tool guidance distinguishes brick, pointing, plastering, finishing, notched, margin, and gauging trowels by blade form and application (guide to construction trowel types).
This article is a selection reference rather than individualized construction advice. Structural design, mortar selection, substrate preparation, reinforcement, weather limits, and local code requirements are separate questions. Where those factors affect structural performance, follow the applicable manufacturer instructions, project documents, and qualified local guidance.
Masonry trowel types at a glance
Start with the action the tool must perform. “Small trowel” is not a complete specification: a small flat-ended blade, a small pointed blade, and a long narrow blade solve different access problems.
| Trowel type | Identifying blade shape | Primary task | Access or capacity characteristic |
|---|---|---|---|
| Brick or mason’s trowel | Broad, triangular or diamond-like blade with a pointed nose | Carrying and spreading mortar, buttering units, trimming excess | Relatively high mortar capacity; point assists placement |
| Bucket trowel | Broad blade with a squared or diagonally cut end | Removing mortar from a bucket or mortar box | Cut-off end can reach against container walls |
| Gauging trowel | Rounded nose, often with a tapered body | Mixing or applying small quantities, patching | Useful around obstructions and in confined areas |
| Margin trowel | Compact rectangular blade with a flat end | Scraping, patching, filling gaps, small transfers | Fits spaces where a broad pointed blade is awkward |
| Pointing trowel | Small pointed blade resembling a miniature brick trowel | Detail repairs, cavities, narrow areas, and joint shaping | Pointed access with less capacity than a brick trowel |
| Tuck-pointing or caulking trowel | Long, very narrow blade | Placing and packing repair mortar into restricted joints | Narrow width enters joints that reject broader blades |
| Concrete-finishing trowel | Broad rectangular finishing blade | Smoothing a concrete surface | Covers surface area rather than carrying a mortar bed |
| Pool trowel | Finishing blade with rounded corners and edges | Smoothing concrete, including curved work | Rounded edges are intended to reduce digging into wet material |
| Corner or step trowel | Blade bent to form an angle | Shaping particular inside or outside angles | Geometry fits a specific corner or step |
| Tile-setter or extra-wide trowel | Broad or extra-wide carrying blade | Holding and spreading more material on large units | More capacity, but requires adequate clearance and control |
Brick or mason’s trowel
The brick trowel is the principal laying tool. Its broad blade carries mortar from a board, then spreads it across the previous course or supporting surface. The pointed nose helps direct material, while the blade edge can slice away excess after the unit is placed.
A brick trowel can also butter the end of a brick or block before placement. It is versatile, but its broad blade is not ideal for every cavity or repair joint.
Bucket trowel
A bucket trowel is designed around access to a container. It can transfer mortar to a board or another tool, but its container-friendly shape does not make it the automatic choice for laying a course.
Gauging trowel
A gauging trowel has a rounded nose. It is associated with mixing or applying small quantities, replacing localized mortar, patching, and working around confined features.
Margin trowel
A margin trowel has a compact, rectangular, flat-ended blade. It can scrape a surface or container, move a small amount of mortar, push material into a crevice, or handle localized patching. The short blade is particularly useful where the handle and blade of a brick trowel cannot be positioned comfortably.
Pointing trowel
A pointing trowel looks like a reduced-size brick trowel. The pointed nose suits small cavities, individual-unit work, narrow areas, joint shaping, and detail repairs. It carries less material than a brick trowel but gives the user a pointed working end rather than the flat nose of a margin tool.
Tuck-pointing and caulking trowels
These tools have long, narrow blades for restricted joints. Mortar may be held on another surface or broader trowel and then transferred into the joint with the narrow tool. The narrow blade is intended for placement and packing rather than carrying a full bed of mortar.
Finishing and pool trowels
Finishing trowels operate over concrete surfaces. A standard version commonly has a broad rectangular blade. A pool trowel has rounded edges intended to reduce digging into wet concrete and to work more readily over curved surfaces. Retailer guidance distinguishes these concrete-smoothing tools from brick, margin, and tuck-pointing trowels on that basis (buyer’s guide to masonry and concrete trowels).
Corner, step, tile-setter, coke, insulator’s, and other specialty trowels extend the same task-first principle. Their geometry addresses a particular angle, obstruction, surface, or capacity requirement. They are not essentials for every masonry project merely because they appear in a masonry-tool catalog.
Brick trowel patterns: Narrow London, Wide London, and Philadelphia
Narrow London, Wide London, and Philadelphia are commonly listed brick-trowel patterns. They should not be treated as three types of pointing trowel. Pointing trowels are a smaller tool category, even though their pointed outline resembles a brick trowel.
The patterns mainly differ in blade outline and heel width:
-
Narrow London: the slimmer London variant, generally associated with standard brickwork, access, and controlled handling.
-
Philadelphia: generally has a broader, squarer heel and greater mortar-carrying area than a narrower London form, making it commonly associated with larger concrete block.
The distinction between Narrow London and Wide London matters. A statement that “London trowels are narrow” overlooks the Wide London pattern, while a statement that all London trowels have large rectangular blades overlooks the Narrow London form. Trade and manufacturer catalogs list Philadelphia, Wide London, and Narrow London as separate brick-trowel patterns (discussion of brick-trowel patterns).
A wider heel can provide more surface for carrying mortar. That may be useful with larger units if the workspace and user’s control allow it. These are general tendencies, not comparative performance findings.
No supplied evidence establishes that one pattern is inherently:
- faster;
- more accurate;
- less tiring;
- easier for every beginner;
- more durable; or
- better for every brick, block, or stone project.
Comfort and control depend on more than the outline. Blade length, overall weight, handle geometry, balance, amount of mortar loaded, working position, and the individual user all affect how a trowel feels.
Illustration brief: identifying the three patterns
The publication illustration should show verified product outlines side by side and be marked not to scale. Each outline should label:
- the pointed nose;
- the heel;
- overall blade length; and
- heel or maximum blade width.
The Narrow London illustration should show the typical slimmer outline. The Wide London should show a broader London-style heel relative to the Narrow London example from the same maker or product family. The Philadelphia should show its typically broad, squarer heel. The illustration should not impose a fixed capacity ranking between Wide London and Philadelphia because actual dimensions may overlap among manufacturers.
Pattern labels do not guarantee identical geometry.
For that reason, compare the actual outline and specifications rather than ordering from the pattern name alone. Note:
- overall blade length;
- maximum blade width;
- heel width and shape;
- taper from heel to nose;
- blade position relative to the handle;
- listed weight, if provided; and
- whether the loaded blade feels manageable.
A practical decision rule is to select by unit size, desired mortar capacity, available working space, and the blade you can control comfortably. A Philadelphia pattern is worth considering where greater capacity for blockwork is useful, while a Narrow London may suit standard brickwork and tighter handling. A Wide London is a separate variant whose dimensions should be checked rather than inferred. This Old House likewise associates the wider Philadelphia heel with larger blocks and the narrower London heel with standard brickwork (masonry-trowel selection guide).
Margin, pointing, and tuck-pointing trowels compared
Margin, pointing, and tuck-pointing trowels can all appear during masonry repair. They are nevertheless different tools.
| Feature | Margin trowel | Pointing trowel | Tuck-pointing or caulking trowel |
|---|---|---|---|
| Nose | Flat | Pointed | Narrow working end |
| Blade profile | Short rectangle | Miniature brick-trowel shape | Long, slim strip |
| Typical advantage | Flat-ended access and scraping | Pointed access and detail placement | Entry into restricted joints |
| Material capacity | Small | Small | Very small |
| Common tasks | Patching, scraping, filling crevices, small transfers | Cavities, isolated repairs, narrow areas, joint shaping | Placing and packing mortar into narrow repair joints |
Choose a margin trowel for flat-ended access
A margin trowel is useful when the work calls for a compact rectangular blade. It can collect a small amount of mortar, scrape residue, patch a localized area, fill a crevice, or smooth material where a long pointed blade is inconvenient.
This does not mean it is always the smallest tool or that it fits every joint; it means its basic access geometry is rectangular and flat-ended.
Choose a pointing trowel for pointed detail work
A pointing trowel preserves the pointed profile of a brick trowel at a smaller scale. It can direct mortar into a small cavity, work around an individual masonry unit, and shape or repair a localized joint.
The point is the defining difference from a margin trowel. If both tools are short enough to fit the workspace, the next question is whether the job benefits from a flat end for scraping and pushing or a point for directing material into a small area.
Choose a tuck-pointing tool for a restricted joint
A tuck-pointing or caulking trowel has a much narrower blade. It is designed to place or pack material into a joint where even a small pointing trowel is too broad. Its limited carrying area is intentional: access, rather than mortar capacity, is the priority.
The categories overlap in practice. A margin trowel may carry repair mortar to the area, a pointing trowel may work it into a cavity, and a tuck-pointing blade may pack it farther into a narrow joint. Owning one does not make the other profiles identical.
Retail listings make the scale difference tangible. Southwest Scaffold has listed a Kraft margin trowel measuring 5 by 2 inches and a Kraft caulking trowel with a 3/16-inch-wide blade intended for tuck-pointing, restoration, and repair (examples of margin and caulking trowel dimensions).
Those examples illustrate categories, not a required sizing formula. Joint conditions and product dimensions vary, and the evidence does not support prescribing a fixed ratio between joint width and blade width. Measure the available access, inspect the repair area, and follow the applicable repair-material and tool instructions.
Choosing blade size without relying on a universal rule
Brick-trowel size usually refers to blade length, but length alone does not describe capacity or handling. Two blades of the same nominal length can have different heel widths, tapers, curves, and overall areas.
It also needs enough clearance and sufficient control when loaded. The supplied evidence does not quantify how those differences affect fatigue, precision, speed, or finished quality, so they should not be converted into universal promises.
The supported market examples are broad rather than prescriptive. A trade article reports that some modern brick-trowel models are offered from approximately 9 to 13 inches, while cited historical specifications covered a narrower 10-to-11-inch span. That history does not set a required modern size; it shows that current offerings can extend beyond older classifications (reported historical and modern brick-trowel lengths).
Retailer examples also show that products within one named pattern do not come in only one length. Southwest Scaffold has listed Narrow London brick trowels from 9 to 11½ inches, reinforcing the need to check the actual product dimensions rather than relying on the pattern name (Narrow London product-size examples).
Fine Homebuilding author Cody Macfie describes a 10-inch mason’s trowel as suitable for brick, block, and stone in his general practice. That is a practitioner preference, not a universal beginner standard. Macfie also notes that tool selection does not follow hard-and-fast rules in every masonry setting (practitioner guide to choosing trowels).
When comparing sizes, consider the following.
Masonry-unit size
Larger units may make greater mortar capacity useful, but unit dimensions alone do not dictate a trowel length. Working position, access, mortar behavior, and technique also matter.
Mortar moved per pass
Consider whether you need to lay a substantial bed or perform isolated placement. More capacity is not automatically better if the loaded blade is difficult to position and control.
Working clearance
Check the actual space around corners, returns, openings, existing walls, fixtures, and repair areas. A long blade can become awkward even when its capacity is attractive.
Hand comfort and balance
Hold the trowel in its normal working orientation. Pay attention to where the blade’s weight sits relative to your grip. If possible, compare more than one length with the same pattern so that size—not an entirely different handle—is the main variable.
Control of the loaded blade
A dry display tool does not perfectly represent a loaded trowel. Even so, you can assess whether the wrist angle feels natural and whether the nose and heel can be positioned without excessive grip pressure.
Actual dimensions
Do not assume that “10-inch Philadelphia” or “Wide London” completely defines the tool. Compare blade length, heel width, maximum width, handle dimensions, and listed weight where available.
A smaller specialty tool is often a better solution than continually downsizing a brick trowel. Choose a margin, pointing, or tuck-pointing trowel when the real problem is a narrow joint, isolated repair, corner, crevice, or tiny mortar transfer. Keep the brick trowel sized for laying work rather than expecting it to perform every detail task.
Blade steel, handle options, and what product listings can really tell you
Current catalogs use several blade descriptions:
- carbon steel;
- high-carbon steel;
- forged steel;
- stainless steel; and
- blue steel in some finishing-trowel categories.
They also list handles made from or described as:
- wood;
- plastic;
- leather;
- comfort-grip materials; and
- ergonomic grip designs.
These labels establish that the constructions are available. They do not, by themselves, prove comparative corrosion resistance, flexibility, edge retention, mortar release, service life, or reduced fatigue.
“Forged,” for example, describes a manufacturing or construction characteristic, but a forged product’s higher retail price is not field-performance evidence. Likewise, “high-carbon” does not provide all the information needed to predict corrosion behavior, blade flex, heat treatment, or service life. A stainless label alone does not describe blade geometry, connection quality, or suitability for a specific application.
MasonryDirect’s catalog illustrates how many variables can appear within one product category: carbon steel, high-carbon steel, forged steel, and stainless steel blades are listed alongside wood, plastic, leather, and comfort-grip handles. The catalog documents available options but does not provide controlled comparative testing showing that one combination is best (catalog of blade and handle options).
Instead of inferring quality from a material label or price, inspect the complete specification:
- Blade dimensions: Confirm length, width, heel shape, and thickness if stated.
- Connection construction: Examine how the blade, shank or tang, ferrule, and handle meet.
- Care requirements: Check the manufacturer’s cleaning, drying, and storage instructions.
- Replacement parts: Determine whether handles or other components are replaceable.
- Warranty: Read the coverage and exclusions rather than assuming a price tier includes better support.
- Intended use: Confirm whether the maker classifies the tool for laying, pointing, bucket access, repair, or concrete finishing.
- Product weight: If listed, consider it together with balance rather than treating a lower number as automatically better.
Handle choice is an individual fit question. Material contributes to feel, but comfort also depends on grip diameter, contour, texture, balance, hand size, working angle, and duration. A leather handle is not universally more comfortable than wood or plastic, and an “ergonomic” label does not guarantee that a particular user will prefer it.
For an in-store comparison:
- hold the trowel as you would when collecting and spreading mortar;
- rotate it through the expected wrist positions;
- check whether the nose and heel feel controllable;
- inspect the blade-to-handle connection from several angles;
- compare actual blade outlines side by side;
- check for visible irregularities or damage; and
- read the manufacturer’s care and warranty information.
Use seller and manufacturer claims narrowly. A seller can document that a blade is listed as forged steel or that a handle is leather. Without comparative testing, that listing cannot establish that the tool lasts longer, releases mortar more readily, or causes less fatigue.
Basic brick-trowel workflow and supporting tools
A brick trowel’s basic workflow can be summarized as follows:
- Load the trowel. Collect a manageable amount of mortar from the mortar board.
- Place and spread the bed. Transfer the mortar to the supporting course or surface and spread it along the intended run.
- Butter the unit end. Apply mortar to the end of the brick or block where the laying method calls for it.
- Set the unit. Place it onto the bed.
- Make a light adjustment. Tap or settle it into position as appropriate.
- Remove excess. Slice away mortar squeezed from the joint.
A MARSHALLTOWN introductory guide describes the same broad sequence: scooping and spreading mortar, buttering the brick end, placing and tapping the brick, and scraping off excess (brick-trowel workflow and supporting tools).
The trowel handles mortar, but it does not independently keep masonry straight, level, plumb, or correctly spaced. Supporting tools perform those jobs:
- A level checks level and plumb.
- Mason’s line and line blocks provide a straight-course reference.
- A brick ruler helps mark or check course spacing.
- A mortar board holds mortar near the work.
- A jointer compresses and shapes the exposed mortar joint.
The distinction between trimming and tooling is important. A brick-trowel edge can slice off excess mortar after a unit is set. A jointer then forms the selected joint profile and works the exposed surface. The brick trowel should not be treated as a substitute for every jointing profile.
Joints are tooled while the mortar remains workable and before it sets. The supplied evidence does not establish a universal timing interval or readiness test, so follow the mortar manufacturer’s instructions, site conditions, and the applicable laying method rather than relying on a fixed number of minutes.
Fine Homebuilding author Cody Macfie describes practitioner techniques including a wrist motion and abrupt stop to position mortar on the blade, a slicing action to spread it, light tapping to settle a unit, and an upward slicing motion to remove excess without smearing. These are descriptions of one experienced method, not mandatory standards or guarantees of speed or quality.
Whatever motion is used, work with an amount of mortar that can be positioned deliberately. Alignment still depends on the level, line, layout, and broader masonry procedure rather than on the trowel alone.
Care, buying checklist, and price context
Remove mortar residue promptly. Fresh residue is generally easier to remove than hardened buildup, and frequent cleaning is documented practitioner guidance. Do not allow repeated layers to accumulate around the blade, shank, or handle connection.
At the end of use:
- remove remaining mortar residue;
- dry the tool;
- inspect the blade and edge;
- inspect the blade-to-handle connection; and
- store the tool according to the manufacturer’s instructions.
This Old House also recommends addressing nicked or dull edges as part of trowel care. Detailed sharpening or edge-repair procedures vary with the tool’s construction and condition, so follow the manufacturer’s maintenance guidance rather than applying one procedure to every blade (masonry-trowel use and maintenance guidance).
Final buying checklist
Before purchasing, verify:
- Task: laying, bucket access, patching, pointing, narrow-joint repair, or concrete finishing.
- Blade profile: pointed, flat-ended, rounded, narrow, cut-off, rectangular, or rounded-edge.
- Actual dimensions: blade length, width, heel width, and handle dimensions.
- Working clearance: enough space to load, rotate, and place the blade.
- Mortar capacity: sufficient for the task without making the loaded tool difficult to control.
- Handle fit: suitable grip diameter, shape, texture, and working angle.
- Balance: manageable in the normal working orientation.
- Listed blade material: considered with care requirements and construction, not as a stand-alone quality ranking.
- Connection: sound blade-to-shank and shank-to-handle assembly.
- Care instructions: compatible with how and where the tool will be stored.
- Warranty: actual terms, exclusions, and claim process.
- Replacement availability: handles or components, if relevant.
- Manufacturer classification: confirmation that the tool is intended for the proposed task.
Prices should be treated as dated snapshots. When accessed on August 15, 2026, MasonryDirect listed selected carbon-steel margin and pointing trowels around the mid-$20 range. Representative listings included carbon-steel pointing trowels at $24.48 and carbon-steel margin trowels from $24.71 to $25.28. The same collection listed selected leather-handled or forged Narrow London brick trowels at approximately $55 to $71 (illustrative MasonryDirect product listings and prices).
Those examples do not define a market-wide price range or quality hierarchy. Prices, availability, shipping times, promotions, specifications, and catalog contents change. A higher-priced forged or leather-handled listing is not proof of better durability, comfort, or field performance.
Use this compact decision tree:
- Laying brick or block? Start with a broad, pointed brick trowel.
- Patching in a confined area? Choose a flat-ended margin trowel.
- Making a small pointed repair? Choose a pointing trowel.
- Packing a restricted mortar joint? Choose a tuck-pointing or caulking tool.
- Removing mortar from a bucket or mortar box? Choose a bucket trowel.
- Mixing or applying a small amount around an obstruction? Consider a gauging trowel.
- Smoothing a concrete surface? Choose a concrete-finishing trowel, with a rounded pool pattern where that edge form suits the surface.
Frequently asked questions
What is the best general-purpose masonry trowel?
There is no universal best masonry trowel. For ordinary brick, block, or stone laying, a broad pointed brick trowel is the general-purpose starting category.
Choose the specific size and pattern by desired mortar capacity, working clearance, unit type, balance, and your ability to control the loaded blade. Keep a smaller repair tool separate if the project includes cavities or narrow joints.
Is a margin trowel the same as a pointing trowel?
No. A margin trowel normally has a compact rectangular blade with a flat end. A pointing trowel has a pointed blade resembling a miniature brick trowel.
Both can be useful for repairs and confined work, so their applications overlap. The flat-ended margin tool is convenient for scraping, patching, and pushing material into crevices; the pointed tool is convenient for cavities, individual-unit work, narrow areas, and detailed mortar placement.
Should I use a London or Philadelphia trowel for concrete block?
A broader Philadelphia-style heel is commonly associated with carrying more mortar and laying larger concrete block. A narrower London form is more commonly associated with standard brickwork and controlled access.
That is a selection tendency, not a rule. Wide London and Narrow London are distinct variants, and manufacturers do not necessarily use identical geometry. Compare actual heel width, blade length, overall capacity, working clearance, and how securely you can control the loaded tool.
What size masonry trowel should a beginner choose?
There is no evidence-based universal beginner size. Available lengths and blade shapes vary, while the same nominal length may have different heel widths and carrying areas.
A beginner should handle several actual tools if possible. Compare balance, grip, blade control, workspace, and the amount of mortar that must be moved. If detail access is the problem, add the appropriate margin, pointing, or tuck-pointing tool instead of forcing one undersized brick trowel to perform every task.
How often should mortar be cleaned from a masonry trowel?
Remove residue promptly during the work and at the end of use rather than allowing it to harden. Cody Macfie’s Fine Homebuilding guide recommends cleaning trowels several times during the day when possible because hardened mortar becomes more difficult to remove (practitioner maintenance guidance).
The appropriate frequency depends on the work period and how quickly material is accumulating. Finish by cleaning and drying the tool, inspecting its edge and handle connection, and storing it according to the manufacturer’s instructions.
Final selection rule
The task comes first. Use a broad pointed brick trowel for laying units, a margin trowel for flat-ended access in tight spaces, a pointing trowel for small pointed repairs, a narrow tuck-pointing tool for restricted joints, and a finishing trowel for concrete surfaces.
Pattern, size, steel label, handle, and price should refine that initial match—not replace it. Compare actual dimensions and current manufacturer instructions because pattern geometry, construction, specifications, and product availability vary.