 MortarDesk
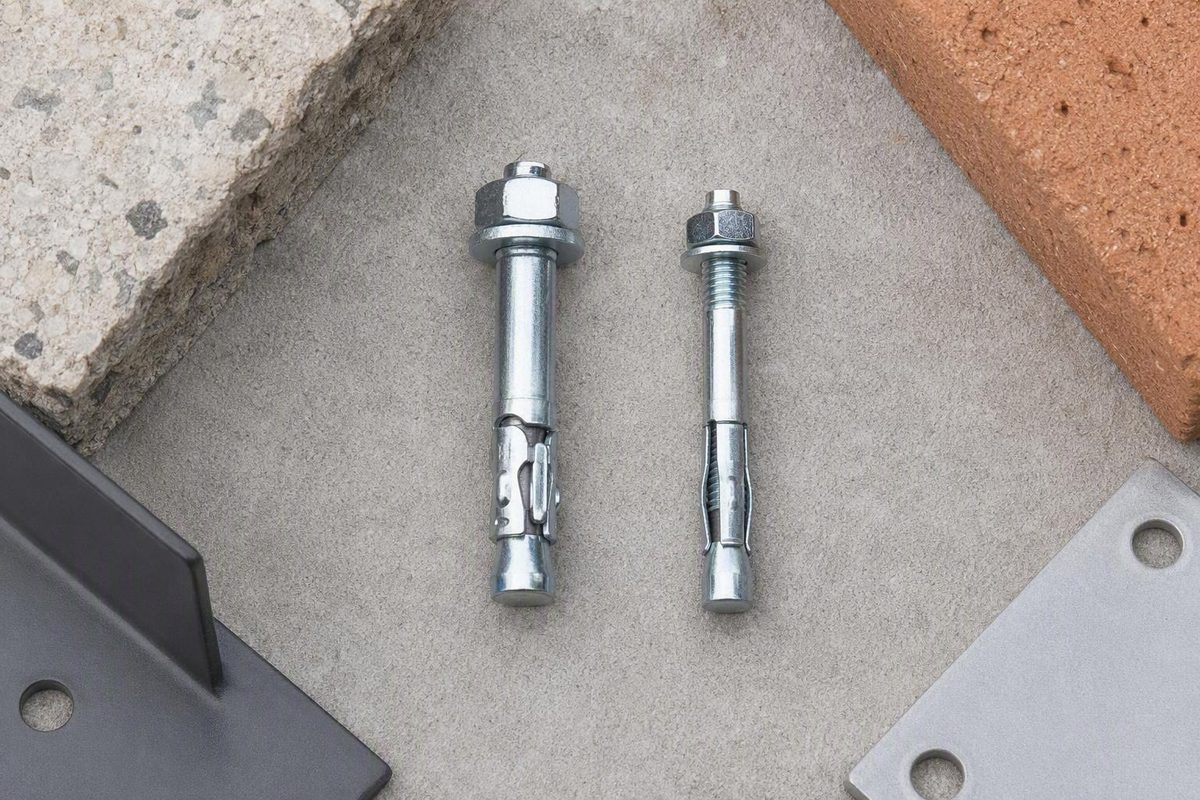
Quick answer: when to consider a wedge anchor or sleeve anchor
Consider a product-approved wedge anchor first for a higher-load connection in suitable solid concrete. Consider a product-approved sleeve anchor for moderate-duty fastening or when the base material is brick, block, or another masonry substrate expressly covered by the selected anchor’s documentation.
The choice is not simply “wedge for concrete, sleeve for masonry.” Sleeve-anchor products are also available for solid concrete. The practical distinction is that wedge anchors are commonly marketed for higher-capacity concrete fastening, while sleeve-anchor product lines cover a broader selection of concrete and masonry materials. These are category-level descriptions, not ratings for a particular connection (Marsh Fasteners’ comparison).
| Comparison point | Wedge anchor | Sleeve anchor |
|---|---|---|
| Expansion mechanism | A tapered stud engages an expansion clip near the embedded tip | An expander cone forces a surrounding sleeve outward |
| Commonly supported substrates | Primarily suitable solid concrete; exact concrete conditions are product-specific | Depending on the product: concrete, brick, solid block, hollow block, or other documented masonry |
| Typical market positioning | Higher-load, heavy-duty, or structural concrete fastening | Versatile, often moderate-duty concrete and masonry fastening |
| Installation sensitivity | Commonly described as requiring precise hole size, cleaning, embedment, and tightening | Sometimes described as more tolerant of minor variation, but still requires a correctly prepared hole |
| Removability | The nut and fixture may be removable, but the stud commonly remains in the concrete | The fixture may sometimes be released, but the sleeve or another component generally remains |
| Head or attachment options | Commonly a projecting threaded stud with a nut and washer | Product lines may offer hex, acorn, flat or countersunk, round or Phillips, and rod-coupler styles |
| Materials and finishes | Options may include zinc-plated steel, hot-dip galvanized steel, 304-series stainless, and 316 stainless | Options may include zinc-plated steel and stainless steel; availability varies by model |
The mechanism, head-style, installation, material, and removal distinctions in the table summarize the product categories described in specialist selection guidance. For example, sleeve-anchor lines may provide several head styles and materials, but those features and their availability cannot be assumed for every model (Eugene Fastener’s sleeve-anchor guide).
Descriptions such as moderate duty, heavy duty, and structural indicate broad market positioning only. There is no family-wide pound rating and no universal percentage by which a wedge anchor is stronger than a sleeve anchor. The technical data for the exact model and installation conditions controls.
Use this selection sequence:
- Identify the exact substrate.
- Establish the loads and substrate condition.
- Check connection geometry, including embedment, member thickness, edges, joints, and anchor spacing.
- Verify the product’s covered applications and installation instructions.
- Choose the anchor family and exact model that satisfy those conditions.
Starting with a fixture label such as “railing anchor,” “shelf anchor,” or “machine anchor” reverses the process. Fixtures with similar names can impose substantially different demands.
How the two expansion mechanisms differ
A wedge anchor is typically a threaded steel stud with a tapered embedded end and a small expansion clip near that end. The anchor is inserted clip-end first. Tightening the nut moves the tapered section into the clip, pressing the clip against the wall of the drilled concrete hole.
A sleeve anchor consists of a threaded bolt or stud surrounded by an expansion sleeve, with an expander cone at the embedded end. Tightening draws the cone into the sleeve, forcing the sleeve outward against the hole wall.
In plain language:
- A wedge anchor concentrates expansion near its embedded end.
- A sleeve anchor expands along more of its sleeve.
The small expansion clip on a wedge anchor does not make it a sleeve anchor. Both are mechanical expansion anchors, but their expansion components and overall geometries differ.
These geometries correlate with how the products are commonly sold: wedge anchors are principally associated with suitable solid concrete, while sleeve-anchor models are offered for a wider selection of masonry substrates. Geometry alone, however, does not establish capacity or approval. Distributed sleeve expansion does not prove that an anchor is suitable for weak or hollow masonry, just as tip-area expansion does not make every wedge anchor suitable for every concrete connection.
Capacity and suitability remain product-specific. They depend on the documented substrate, anchor dimensions, embedment, hole preparation, spacing, edge distance, load direction, and installation conditions.
Choose by base material before comparing strength
The anchor cannot be selected independently of the material surrounding it. Dense concrete, sound brick, solid block, hollow block, and mortar joints are not interchangeable versions of “masonry.”
Sound solid concrete
Both anchor families include products intended for solid concrete. A wedge anchor is commonly the starting point when higher capacity is sought, provided the exact model covers the concrete condition and proposed geometry.
A sleeve anchor may also be suitable for concrete, particularly when its available head style or through-fastening arrangement fits the fixture. Do not reject a sleeve anchor merely because the base material is concrete; compare the applicable product data.
Cracked or uncertain concrete
Concrete conditions must match the conditions stated in the product documentation. A retailer guide, for example, identifies uncracked-concrete recognition for one specific wedge-anchor product, illustrating why a condition stated for one model must not be transferred to another model or the entire anchor family (Supply On Time’s product comparison).
If the concrete condition is uncertain, do not rely on a generic wedge-versus-sleeve rule. Identify a fastening product whose current documentation covers the actual condition, or refer the connection for qualified review.
Brick
For brick, investigate sleeve-anchor models expressly documented for the relevant brick and installation position. Do not assume that approval for installation in the brick body also permits installation in the mortar joint.
The brick’s condition, the anchor’s location within the unit, embedment, and proximity to an edge all have to correspond to the product instructions.
Solid block
A solid masonry unit may accept a documented sleeve anchor, but solid block is not automatically equivalent to concrete. Confirm that the selected product covers the relevant block or masonry classification and that the proposed placement and embedment comply with its instructions.
Hollow block
Do not treat a hollow block wall as a uniform solid base.
A sleeve anchor’s wider potential substrate range does not mean every sleeve anchor is suitable for every hollow block. Use only a product whose documentation identifies the relevant masonry and permitted installation conditions. If no product documentation covers the proposed placement, do not force a wedge-or-sleeve choice.
Mortar joints
Mortar condition and quantity can vary. A trade-publication overview notes that sleeve anchors may be installed in mortar joints but also states that pullout performance depends on the amount and quality of the mortar (Concrete Decor’s masonry-anchor overview). Use a joint only when the exact product documentation permits that placement and the connection requirements are satisfied.
Thin, fragile, or deteriorated masonry
Expansion anchors apply outward pressure to the surrounding material. Where the masonry is visibly weak, cracked, thin, or deteriorated, avoid assuming that either anchor family is suitable. The appropriate response is to identify a fastening method documented for the actual condition or obtain qualified review—not to compensate with a larger expansion anchor or additional tightening.
A practical substrate decision tree is:
- Sound solid concrete: Compare documented wedge and sleeve anchors; begin with wedge-anchor products when higher capacity is sought.
- Cracked or potentially cracked concrete: Use only a model whose documentation covers that condition.
- Sound brick: Investigate a brick-approved sleeve anchor and verify placement within the unit.
- Solid block: Use a product documented for the relevant block or masonry classification.
- Hollow block: Identify the permitted installation location and conditions before selecting an anchor.
- Mortar joint: Use only where the exact product documentation expressly permits joint installation.
- Thin, damaged, fragile, or uncertain masonry: Do not select from generic category rules.
As a useful category rule, treat wedge anchors as solid-concrete fasteners. The properly qualified restriction is: do not install a wedge anchor in brick or block unless the exact product documentation explicitly permits that substrate.
Capacity depends on more than the anchor name
Wedge anchors commonly provide greater capacity than sleeve anchors in suitable solid concrete. That is a bounded category comparison, not a universal result. It does not establish that every wedge anchor exceeds every sleeve anchor or that the relationship remains constant across diameters, embedments, substrates, and loading conditions.
Avoid broad seller-reported pound ranges. Without the exact product, dimensions, embedment, base material, test conditions, installation geometry, and safety assumptions, a family-wide load range is not suitable for selecting an anchor.
Applicable capacity can depend on:
- Exact anchor model and material
- Nominal diameter
- Effective embedment
- Base-material type and strength
- Concrete condition covered by the product
- Masonry-unit construction and condition
- Base-member thickness
- Distance from unsupported edges
- Spacing between anchors
- Proximity to joints
- Hole diameter, depth, cleanliness, and shape
- Installation torque
- Load direction
- Repeated or operating forces
- Environmental exposure
That is why fixture names are poor selection tools. A lightly loaded shelf is not equivalent to a heavily loaded cantilevered shelf. A decorative rail is not necessarily subject to the same demands as a protective guard.
Rather than trying to predict a single failure mode from the anchor name, use product data that accounts for the anchor and surrounding substrate. Applicable documentation may distinguish limitations associated with the anchor, the base material, edges, spacing, and installation.
Compare published allowable loads only when all of the following correspond to the proposed connection:
- Product and material
- Anchor diameter
- Effective embedment
- Base material and condition
- Member thickness
- Edge distance
- Anchor spacing
- Load direction
- Installation procedure
- Stated reductions or safety assumptions
Product specificity matters. Sleeve-anchor load tables summarized in specialist guidance apply to the named Simpson Strong-Tie Sleeve-All line, use stated safety factors, and call for adjustments under certain edge and spacing conditions. They do not establish the capacity of every sleeve anchor or masonry installation.
Installation comparison: drilling, cleaning, embedment and torque
Both anchor types follow the same general installation pattern:
- Mark the proposed locations and confirm that the base and fixture arrangement are suitable.
- Check the product requirements for member thickness, embedment, edges, joints, and spacing.
- Use the specified masonry or carbide-tipped bit.
- Drill the required diameter and depth.
- Remove dust and debris using the stated cleaning method.
- Insert and seat the anchor as directed.
- Tighten it to the manufacturer’s specified installation torque or setting procedure.
- Check that the completed fastening is properly seated.
General seller installation guides call for a drill-bit diameter matching the nominal anchor diameter for both wedge and sleeve anchors. They also call for cleaning before insertion. These are useful category-level instructions, but the selected product’s current instructions govern its bit standard, hole dimensions, cleaning, embedment, and tightening procedure (Concrete Fasteners’ sleeve-anchor instructions).
Installing a wedge anchor
A typical wedge-anchor sequence is:
- Drill the specified hole in a covered concrete substrate.
- Clean the hole as directed.
- Fit or position the washer and nut as instructed.
- Insert the anchor clip-end first.
- Seat it with light hammering where the instructions call for that step.
- Tighten the nut to the specified torque, activating the embedded clip.
A commercial wedge-anchor guide describes same-diameter drilling, debris removal, light hammer seating, and final tightening to the manufacturer’s specified torque (Fastco’s wedge-anchor installation guide).
Installing a sleeve anchor
A typical sleeve-anchor sequence is:
- Drill and clean the specified hole.
- Assemble or position the anchor as directed.
- Insert it through the fixture where through-fastening is permitted.
- Seat the washer and head or nut against the fixture.
- Tighten the fastener so the cone expands the sleeve.
- Stop at the specified installation setting.
Head style and product construction may change the precise sequence. Do not assume every sleeve anchor installs identically.
Why depth and cleaning matter
The hole must accommodate the required embedment and any bottom clearance stated by the manufacturer. If the hole is too shallow, the anchor may not seat to the intended embedment or may bottom out before being set correctly.
Cleaning is part of hole preparation, not merely cosmetic work. The cited installation guides direct users to remove drilling debris before inserting either anchor family. Follow the stated brushing, vacuuming, or other procedure rather than clearing only the visible dust at the opening.
Commercial guides do not provide one consistent universal rule for additional drilling depth: supplied examples range from approximately one-quarter inch to one inch, depending on the guide and anchor type. Some seller instructions also use wrench-turn counts, while others direct installers to a specified torque. These conflicting instructions should not be combined into a new rule; use the exact hole depth and tightening method stated for the selected model.
Wedge anchors are sometimes described by commercial comparison guides as more sensitive to precise hole geometry, with sleeve anchors characterized as somewhat more tolerant of minor variation. That does not permit an oversized, oval, spalled, or dirty hole. If the completed hole does not comply with the product instructions, do not attempt to compensate by overtightening.
Common installation errors include:
- Using the wrong bit diameter or type
- Drilling an unsuitable hole with a worn bit
- Failing to reach the required depth
- Leaving debris in the hole
- Providing inadequate embedment
- Overtightening or undertightening
- Replacing specified torque with a generic wrench-turn count
- Overlooking fixture thickness
- Installing in a base member that does not meet the product conditions
- Ignoring required edge distance or anchor spacing
- Installing in a substrate not covered by the product documentation
Sizing the anchor and selecting its head, material and finish
Do not choose diameter on the assumption that bigger is always better. Select diameter and embedment from applicable product data and the connection requirements.
For a stud-style anchor, the required total length generally has to accommodate:
- Fixture thickness
- Required embedment
- Washer and nut or other specified hardware
- Any required thread projection
This is only a length framework. The selected product’s minimum embedment, available thread length, and installation limits still govern.
Before purchase, verify:
- Fixture-hole diameter
- Anchor diameter and total length
- Required effective embedment
- Fixture thickness
- Base-material thickness
- Available drilling depth
- Required thread projection
- Tool access
- Head and washer clearance
- Whether through-fastening is permitted
Sleeve-anchor product lines may include hex, acorn, flat or countersunk, round or Phillips, and rod-coupler arrangements.
It does not by itself establish capacity.
Documented material and finish families include:
- Zinc-plated carbon steel
- Hot-dip galvanized steel
- 304-series stainless steel
- 316 stainless steel
Availability varies by anchor model and size. Commercial material guidance commonly positions zinc-plated carbon steel for appropriate dry interiors, galvanized products for some exterior moisture exposure, and stainless products for wetter or more corrosive settings. It also distinguishes 316 stainless products for some chlorine or chemical exposures (For Construction Pros’ wedge-anchor material overview).
Treat that hierarchy as preliminary screening, not a service-life guarantee. An alloy or coating label does not establish suitability for a particular environment. Verify the exact product’s documented exposure limits and consider the anchor, nut, washer, fixture, and connected materials as a complete fastening assembly.
Do not adopt family-wide prescriptions for diameter, embedment, member thickness, spacing, edge distance, or torque. Each must come from the selected product’s current data.
Removal, reuse and common selection mistakes
Neither wedge nor sleeve anchors should be selected on the assumption that they will remove cleanly.
With a wedge anchor, removing the nut and fixture generally leaves the stud fixed in the concrete. The remaining stud may project from the surface unless the project has an acceptable method for dealing with it.
A sleeve anchor may sometimes allow the fixture to be released after its bolt or nut is loosened or removed, but the sleeve or another component commonly remains in the hole. This is partial disassembly, not clean anchor removal.
A previously expanded, loosened, or removed anchor should not be assumed reusable. Reuse is appropriate only where the manufacturer expressly permits it and provides an applicable procedure.
Frequent selection mistakes include:
- Choosing by fixture name alone
- Treating all concrete as equivalent
- Treating brick, block, stone, and mortar as interchangeable
- Relying on generic pound ratings
- Ignoring the concrete condition covered by the product
- Overlooking edges, joints, spacing, and member thickness
- Assuming every sleeve anchor works in hollow block
- Assuming every wedge anchor works whenever the base is concrete
- Selecting length without accounting for fixture thickness
- Combining incompatible components or finishes
- Substituting wrench turns for a specified torque
- Trying to correct an unsuitable hole through extra tightening
- Treating one product’s approval as an approval for its entire anchor family
A sleeve anchor’s wider potential substrate range does not make every model suitable for hollow block, fragile brick, stone, or mortar. Conversely, a wedge anchor’s higher-load market position in concrete does not establish suitability for every concrete condition or connection geometry.
If future disassembly is important, the substrate is uncertain, or neither family has documentation for the application, identify another fastening method approved for the exact conditions. The correct conclusion may be “neither,” rather than forcing a wedge-or-sleeve selection.
Final selection checklist and safety-critical cases
Before buying or installing an expansion anchor, verify:
- [ ] Exact base material
- [ ] Substrate condition covered by the product
- [ ] Solid, hollow, or otherwise documented masonry configuration
- [ ] Actual tension demand
- [ ] Actual shear demand
- [ ] Combined or operating loads, where relevant
- [ ] Exact anchor model and material
- [ ] Anchor diameter and total length
- [ ] Effective embedment
- [ ] Fixture thickness and hole diameter
- [ ] Base-member thickness
- [ ] Available drilling depth
- [ ] Edge distance
- [ ] Anchor spacing
- [ ] Proximity to joints and openings
- [ ] Required hole-cleaning procedure
- [ ] Installation torque or setting procedure
- [ ] Environmental exposure
- [ ] Compatibility of the fastening components
- [ ] Product approval or evaluation conditions relevant to the work
- [ ] Whether qualified design or installation review is prudent
When reading product literature, first confirm the exact model being purchased. Use its installation instructions for bit size, hole depth, cleaning, seating, and torque. Use its technical data or evaluation documentation to determine the covered substrate, concrete condition, dimensions, edge and spacing limitations, load assumptions, and other approval conditions.
Do not transfer a value from a table unless its anchor diameter, embedment, substrate, member thickness, edge distance, spacing, load direction, and installation assumptions correspond to the proposed work.
These bounded examples show the process:
- Machinery on an adequate solid-concrete slab: An approved wedge anchor may be the starting point, but the concrete condition, slab geometry, equipment forces, anchor layout, embedment, and installation still need verification.
- A moderate fixture on sound brick: A brick-approved sleeve anchor may be appropriate if the unit condition, anchor location, load, and geometry comply with its documentation.
- A railing on hollow block: Do not select by the word railing. First identify the masonry configuration and permitted anchor placement, then verify the applicable loads and product conditions.
- An exposed exterior connection: Select a complete fastening assembly documented for the environment rather than relying on anchor geometry or a stainless label alone.
Structural supports, guardrails and handrails, overhead fixtures, seismic connections, and machinery with significant operating forces have serious consequences if the connection is unsuitable. For such work, use a product documented for the exact substrate and conditions and seek project-specific review from the appropriate qualified professional or trade rather than relying on this category comparison.
Code recognition must also remain product-specific. A retailer reports recognition for one featured wedge-anchor product in uncracked concrete, but that claim cannot be generalized to all wedge anchors. For regulated work, verify the current original evaluation documentation and its stated conditions rather than relying solely on a retailer’s summary.
Choose the substrate before choosing the anchor. A wedge anchor is commonly the starting point for higher-load fastening in suitable solid concrete, while a sleeve anchor offers a broader range of product-approved concrete and masonry applications. That only narrows the options. Final selection still depends on the exact model, substrate condition, loads, embedment, member thickness, spacing, edge distance, installation, exposure, and documented approval.
Mortar Desk publishes general building-material reference information. As explained on the About Mortar Desk page, it is not a contractor and does not provide project-specific engineering advice. Specifications change and codes vary by locality and edition, so structural and other safety-critical work should be checked against current product documentation and the requirements applicable to the project.
Frequently asked questions
Can I use a wedge anchor in brick or concrete block?
Treat wedge anchors as solid-concrete fasteners unless the exact product documentation explicitly permits the particular brick or block substrate. Do not infer permission from the generic anchor name.
Brick and block vary in construction and condition. For those substrates, a documented sleeve anchor or another product specifically approved for the relevant masonry is generally the more appropriate category to investigate. Suitability still depends on the exact unit and installation location.
Can a sleeve anchor be used in solid concrete?
Yes. Sleeve-anchor products are available for solid concrete as well as brick and block.
Whether one is suitable for a particular concrete connection depends on its model, dimensions, embedment, documented concrete condition, member thickness, spacing, edge distance, load direction, and installation. Where higher capacity is sought, a wedge anchor may be the more common starting point, but the applicable product data—not the family name—must decide the comparison.
Is a wedge anchor always stronger than a sleeve anchor?
No. Wedge anchors are commonly positioned for greater capacity in suitable solid concrete, but there is no universal strength ratio and no family name establishes an allowable load.
Compare product data only under corresponding substrate, embedment, edge, spacing, loading, and installation conditions. Without matched data, do not make cross-family performance assumptions based on diameter or appearance.
Do wedge and sleeve anchors use a drill bit matching the anchor diameter?
General commercial installation guides commonly specify a masonry or carbide-tipped bit matching the nominal anchor diameter for both families.
The selected manufacturer’s instructions still govern. Verify the required bit type and diameter, hole depth, cleaning method, embedment, and tightening procedure for the exact model. A generic same-diameter rule does not override product-specific instructions.
Can wedge or sleeve anchors be removed and reused?
Neither family should be expected to remove cleanly. A wedge-anchor stud commonly remains in the concrete after the nut and fixture are removed. With a sleeve anchor, the fixture may sometimes be released, but the sleeve or another component usually remains embedded.
Do not reuse an anchor simply because it appears undamaged. Reuse it only if the manufacturer expressly permits reuse and supplies an applicable procedure.