 MortarDesk
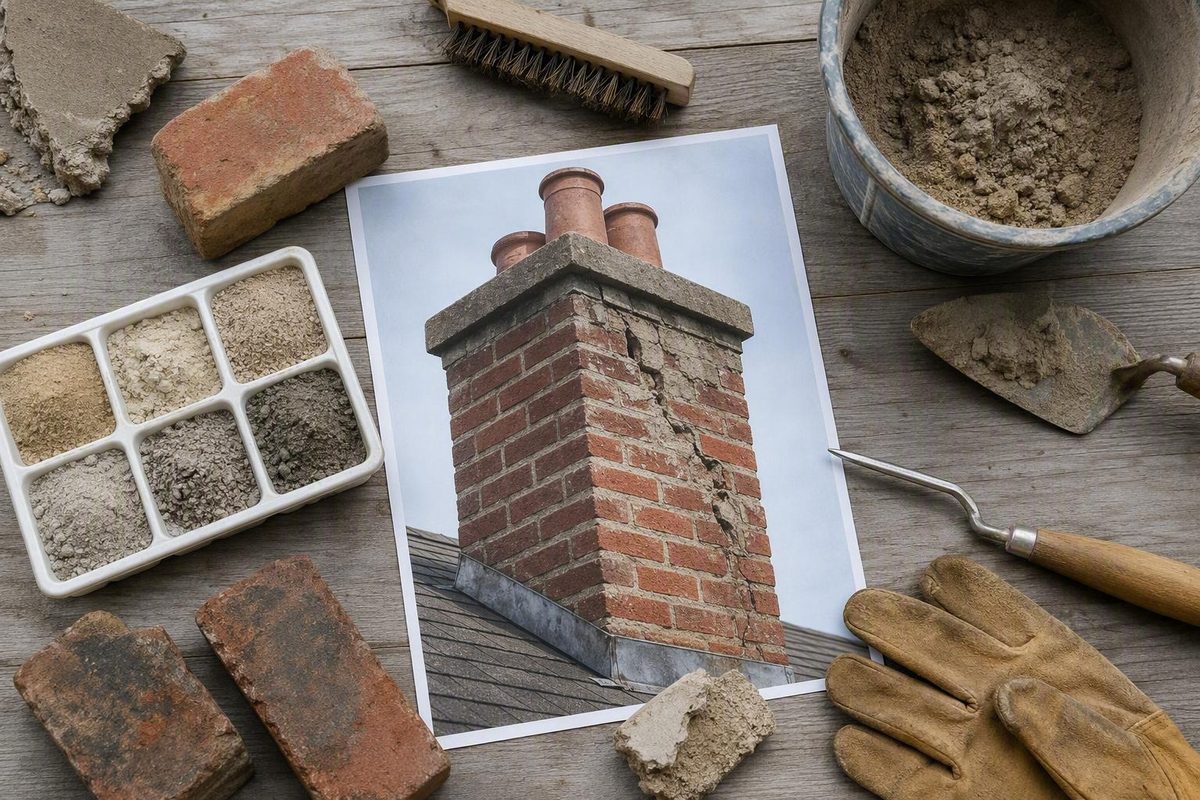
Chimney mortar repair should begin with diagnosis, not a fresh layer of mortar. Before deciding to repoint, determine whether the damage is confined to stable exterior joints, whether the bricks remain serviceable, and where moisture is entering. Then choose replacement mortar compatible with the existing masonry instead of automatically buying the strongest available mix.
That condition-first approach also defines the limits of DIY work. A stable chimney with localized joint erosion may be a reasonable repointing candidate. A chimney that leans, sheds masonry, admits smoke, contains damaged flue material, or cannot be reached safely needs professional assessment rather than an exterior patch.
What failed chimney mortar looks like
Begin with a visual survey from safe locations. Do not climb onto a roof merely to complete an inspection. Binoculars, ground-level photographs, and views from accessible windows may reveal enough to show that a closer professional inspection is needed.
Use this initial checklist:
- Cracks running through or along mortar joints
- Joints recessed noticeably behind the brick faces
- Powdery mortar that brushes away easily
- Missing mortar or open gaps
- Mortar separating from one or both brick edges
- Previous patches cracking around their perimeter
- Damp or discolored areas below the crown
- White deposits on brick or mortar
- Loose bricks or displaced courses
- Flaking, peeling, or broken brick faces
Cracked, recessed, powdery, or missing mortar indicates that the joints need closer examination. The central question is whether deterioration is limited to the mortar or also affects the bricks and overall chimney.
Loose bricks are not a surface blemish. Neither are crumbling units or widespread spalling—the loss of a brick’s outer face. These conditions can be associated with prolonged moisture exposure, incompatible previous repairs, instability, or several problems at once. The appropriate work may involve brick replacement, sectional rebuilding, or a broader structural repair rather than repointing alone.
Look for evidence inside and around the building as well. Moisture problems may be accompanied by white deposits, rust on the cap, flashing, damper, or firebox, water in the firebox, musty odors, and stains on nearby walls or ceilings. These are among the common warning signs identified in This Old House’s chimney-repair overview.
Efflorescence is mineral residue associated with water moving through masonry and evaporating, but it does not conclusively identify how or where the water entered. A ceiling stain beside a chimney likewise does not prove that an exterior mortar joint is leaking. Possible routes include a cracked crown, a missing or damaged cap, failed flashing, the roof-to-chimney intersection, or damaged masonry.
Treat the following as inspection triggers rather than routine repointing symptoms:
- The chimney leans or appears to have shifted.
- A gap is opening between the chimney and the building.
- Bricks, mortar, or other material are falling.
- Smoke enters an occupied room.
- Brick or flue-tile fragments appear in the firebox.
- The fireplace or connected appliance has persistent draft trouble.
- Cracks are widening or pass through bricks as well as joints.
Smoke backup may be associated with blockage, flue damage, poor draft, or a structural problem. Tile or brick debris in the firebox requires source identification, while a leaning or separating chimney may be associated with foundation failure, masonry decay, or long-term water damage. These warning signs are described in this chimney repair guide.
They can help distinguish likely maintenance from a serious warning sign, but concealed conditions require an appropriate inspection.
Why chimney joints deteriorate—and why the water source matters
Mortar joints bind masonry units, distribute loads, and limit direct water entry between bricks. Once joints become open or deeply eroded, more water can enter and the edges of the bricks become more exposed.
Water is a common contributor to chimney deterioration. Brick and mortar are porous, and water entering masonry can contribute to progressive cracking and spalling during freeze-thaw cycles. Weathering may act alongside age, wind, direct rain, heat, combustion exhaust, and defects in original construction or mortar mixing. Appearance alone rarely proves which factor initiated the damage.
Even technically competent repointing may fail again if water continues entering from above or at the roof. Diagnosis should cover the crown, cap, flashing, roof intersection, exposed masonry, and possible condensation before failed joints are assumed to be the only leak path.
| Symptom | Systems or components to investigate |
|---|---|
| Exterior joint erosion or open joints | Mortar compatibility, weather exposure, crown runoff, cap, exposed masonry |
| Efflorescence | Crown, cap, flashing, roof interface, porous masonry, joints, drainage and drying conditions |
| Nearby wall or ceiling stains | Step or counterflashing, roof covering, roof-to-chimney intersection, crown, masonry |
| Rust on the damper, firebox, cap, or flashing | Water entry from above, flashing defects, crown or cap failure, condensation |
| Water or puddling in the firebox | Cap, crown, flue opening, masonry, flashing, wind-driven rain |
| Musty odor | Persistent moisture, debris, poor drying, water entry, or airflow problems |
| Smoke backup | Flue blockage, draft defect, damaged liner, appliance connection, chimney configuration |
| Brick or tile debris in the firebox | Flue-liner deterioration, interior masonry damage, or falling exterior masonry requiring source identification |
This table is a starting point, not a remote diagnosis. More than one defect can be present. Eroded joints may need repointing while failed flashing independently causes an interior stain.
Exterior joint repair does not repair:
- A failed or cracked flue liner
- A blocked vent
- A draft defect
- An unsafe or defective appliance connection
- A damaged crown
- Failed flashing
- Foundation movement
- A chimney separating from the building
The exterior masonry and internal venting system perform different functions. A chimney can look acceptable outside while its liner or vent path remains defective. Conversely, deteriorated exterior joints do not prove that the liner has failed.
A damaged flue or blocked vent may allow smoke, heat, or combustion gases to enter the home. The relationship between flue damage, debris, smoke, heat, and gases is outlined in the chimney warning-sign guidance.
Repoint, rebuild, or repair another chimney component?
Repointing means removing deteriorated mortar from masonry joints and replacing it with compatible new mortar. It is more than filling visible cracks or spreading mortar over the face of an existing joint.
Repointing may be appropriate when:
- Deterioration is mainly confined to the joints.
- The bricks remain sound and firmly seated.
- The chimney is plumb and shows no visible instability.
- No widening separation from the building is present.
- The joints can be prepared back to clean, sound material.
- Moisture sources have been investigated and included in the repair plan.
- Compatible replacement mortar can be selected with reasonable confidence.
The scope can range from several isolated joints to an entire face or chimney section. A few sound bricks do not make spot repair appropriate if joint deterioration is widespread, recurring, or distributed across several elevations. Piecemeal patches may otherwise leave extensive marginal mortar in place.
| Observed condition | Likely next step |
|---|---|
| Hairline change with firm mortar, sound bricks, no moisture evidence, and no visible movement | Document and monitor; investigate if it changes |
| Several localized failed joints with stable, sound brick | Localized repointing may be suitable after checking moisture sources |
| Broad joint erosion across a face or section, with bricks still sound | Consider sectional repointing and a full masonry assessment |
| One or more damaged bricks surrounded by stable masonry | Brick replacement plus compatible joint repair |
| Repeated staining, efflorescence, or wet areas near the top | Investigate the crown, cap, runoff, and exposed masonry |
| Interior stains around the roof intersection | Investigate flashing, roof covering, and roof-to-chimney details |
| Smoke backup, persistent draft trouble, or firebox debris | Obtain a chimney and flue inspection; do not treat it solely as an exterior-joint problem |
| Leaning, separation, movement, loose courses, or extensive deterioration | Obtain structural and masonry evaluation; partial or complete rebuilding may be necessary |
| Earlier repointing repeatedly breaks away | Investigate water entry, instability, preparation, repair depth, and mortar incompatibility before repairing again |
Loose or crumbling bricks, widespread spalling, significant leaning, visible movement, separation from the building, extensive water damage, and repeated repair failure warrant professional evaluation. Contractor guidance presents repointing as a possible remedy when deterioration is limited and the bricks remain sound, while significant leaning or widespread deterioration may require partial or complete rebuilding (Bethel Custom Brick).
There is no supported universal percentage of damaged joints at which a chimney must be rebuilt. The decision depends on the location and depth of deterioration, brick condition, instability, water exposure, access, previous repairs, and the construction supporting or contained within the masonry. A small displaced area may be more consequential than a larger number of shallow defects elsewhere.
Keep the exterior masonry assessment distinct from the flue and venting assessment. A mason may evaluate brick, mortar, instability, and rebuilding needs. A chimney professional may be needed to assess the liner, blockage, draft, and appliance connection. Suspected structural movement may require separate structural expertise.
Repointing versus true tuckpointing
The terms repointing and tuckpointing are often used interchangeably in consumer discussions and trade quotations. The proposed scope therefore matters more than the label.
In precise usage:
- Repointing removes deteriorated joint mortar and replaces it with compatible material.
- True tuckpointing is a decorative two-color treatment. A base mortar colored to resemble the brick is paired with a narrow contrasting line to create the appearance of fine, regular joints.
The traditional two-color distinction is explained in this comparison of tuckpointing and repointing. A contractor using the word “tuckpointing,” however, may actually be proposing conventional repointing.
Decorative tuckpointing cannot substitute for removing failed underlying mortar. If the material behind the visible surface is loose, powdery, or debonded, a thin cosmetic application leaves that deterioration in place.
When reviewing a quotation, ask:
- How will failed mortar be identified and removed?
- Will removal continue until clean, sound joint material is reached, or is only a surface coating proposed?
- How will the replacement mortar be matched to the existing brick and original mortar?
- Will the existing joint width and profile be preserved?
- Are cracked, spalled, or loose bricks included?
- Who will investigate the crown, cap, flashing, and roof intersection?
- Does the price include suitable access, roof protection, dust control, curing protection, and cleanup?
- Are flue and venting concerns excluded, separately inspected, or included within the provider’s qualifications?
Neither repointing nor decorative tuckpointing corrects a failed liner, defective flashing, damaged crown, blocked flue, or structural instability unless that separate work is diagnosed and expressly included.
How to choose compatible chimney mortar
The strongest available mortar is not automatically the correct mortar.
Replacement mortar should be compatible with the existing brick or stone and the surviving original mortar. Selection should consider:
- Original mortar composition and condition
- Brick or stone hardness and absorption
- Chimney age
- Structural demand
- Height and weather exposure
- Rain, wind, and freeze-thaw conditions
- Joint width and profile
- Previous repair materials
- Historic-preservation considerations
- Product instructions
- Requirements applicable to the project location
Type N and Type S are frequently discussed for chimney repairs. Contractor-authored guidance characterizes Type S as stronger and more rigid, while Type N is described as more moderate in strength and easier to work. These are broad comparisons, not a project specification.
The available guidance also conflicts. One restoration contractor lists Type S for chimneys and fireplaces and associates softer Type O and Type K mortars with some historic masonry (Building Restoration Corporation). Another contractor associates Type N with many above-grade chimneys that do not require heavy load-bearing capacity (JMS Masonry). Neither general list resolves the needs of a particular chimney.
Two compatibility risks pull in opposite directions:
- Mortar that is too hard or rigid may transfer damaging stresses to softer brick.
- Mortar that is too weak for the actual exposure or demand may crack, erode, or fail prematurely.
Use the following matrix as an assessment framework, not a universal specification:
| Existing condition | Assessment route |
|---|---|
| Newer, hard, consistent masonry with documented original mortar | Verify the original specification, structural demand, exposure, and compatible products |
| Softer or visibly weathered brick | Do not default to a high-strength mortar; assess the brick and surviving original mortar first |
| Existing mortar type is uncertain | Obtain a masonry assessment and consider representative sampling before selecting by appearance |
| Severe wind, rain, salt, or freeze-thaw exposure | Evaluate required durability and masonry compatibility while correcting water-management defects |
| Historic construction or lime-rich original joints | Seek preservation expertise or mortar analysis; a lime-rich Type O, Type K, or custom match may be considered |
| Several generations of hard patches and soft original mortar | Identify which material is original and whether previous repairs have damaged adjacent brick |
| Structural or load concerns | Resolve the structural question before selecting repair mortar |
Where mismatch could damage older or soft masonry, a mason or preservation specialist can determine whether sampling or laboratory analysis is justified.
Do not select chimney mortar solely by:
- Color
- The word “chimney” on a generic bag
- A compressive-strength figure
- The assumption that stronger means more durable
- An uncited site-mixed recipe
- A photograph of the joint
- A rule assigning one mortar type to every chimney
A universal three-parts-sand-to-one-part-cement recipe is not supported for every chimney. Binder type, aggregate, exposure, age, brick hardness, and original construction vary too widely. Use a product- or project-specific specification instead of improvising a generic ratio.
DIY suitability, tools, and stop-work conditions
Make the go/no-go decision before buying mortar or moving tools to the work area.
Exterior chimney repointing differs from repairing a wall at ground level. It may involve work at height, loose material, falling debris, dust, and powered cutting tools. General chimney-repair guidance recommends professional help when access is unsafe or the project involves structural deterioration, extensive water damage, liner work, complex flashing, or persistent draft trouble (This Old House).
DIY work is more plausible when the chimney is stable, the bricks are sound, deterioration is localized, mortar compatibility is understood, and suitable access can be established.
Basic joint-work equipment may include:
- Hammer and narrow masonry or cold chisels
- Masonry brushes
- Mixing container
- Mortar board or hawk
- Pointing trowel
- Jointing tool suited to the existing profile
- Sprayer for controlled dampening
- Tarp or other protection for the roof and surfaces below
- Suitable cleanup and dust-control equipment
Eye, hearing, respiratory, and hand protection appear in the supplied repair guidance. The appropriate dust controls, respiratory protection, and access arrangements depend on the task and site; they should not be improvised from a generic tool list.
A grinder with a masonry wheel and HEPA dust collection is sometimes used for mortar removal, but it is not automatically the preferred method.
Stop work and arrange an appropriate assessment if:
- Safe access cannot be established.
- Bricks or chimney sections are loose.
- The chimney leans, shifts, or separates from the building.
- Spalling or crumbling masonry is widespread.
- Water damage is extensive or its source remains unresolved.
- Mortar or brick compatibility is uncertain.
- Brick or flue-tile debris appears in the firebox.
- Smoke enters a room or draft problems persist.
- The work involves a liner, appliance vent, or combustion-gas path.
- Flashing work is complex or requires substantial roofing work.
- Structural or foundation problems are suspected.
Verify licensing, permit, inspection, and code requirements with the authorities responsible for the project location. Mortar Desk is a building-material reference publisher, not a contractor or provider of engineering advice, and recommends routing gas and structural work to appropriately qualified trades working to local requirements (About Mortar Desk).
The chimney repointing sequence
The following is a general workflow for stable exterior brick joints. It is not a procedure for repairing flue-liner joints, rebuilding an unstable chimney, correcting structural movement, or modifying an appliance vent.
-
Document the existing masonry. Photograph representative areas before removal. Record the joint width, profile, color, texture, aggregate appearance, and differences between original work and later patches. The aim is to preserve the established geometry and appearance where appropriate, not impose a new joint style.
-
Define the repair boundaries. Mark loose, cracked, deeply eroded, or debonded mortar. Examine adjacent joints rather than assuming that the visible crack represents the complete failure. Put damaged bricks into a separate replacement plan.
-
Protect the work area. Protect the roof, gutters, windows, and lower surfaces from debris and mortar staining. Establish dust controls and keep people away from the area below. Reassess access as work proceeds around the chimney.
-
Remove deteriorated mortar. Work back until the remaining joint is clean and uniformly sound enough for the replacement material. Preserve brick edges, joint width, and joint geometry. Do not lever against fragile units or cut unnecessarily into sound masonry.
Published DIY instructions mention removal depths of approximately one-half to one inch, but this range is not a universal specification (wikiHow). Other chimney guidance mentions about one inch while limiting removal in relation to brick depth. The practical objective is adequate clean joint depth and bonding surface without avoidable damage to the masonry.
-
Clean the joints thoroughly. Remove chips, loose aggregate, and dust. Choose cleaning and collection methods that do not damage the brick or spread dust into occupied areas.
-
Dampen dry masonry in a controlled manner. Light dampening can prevent dry brick and old mortar from drawing water too quickly from fresh material. Do not leave standing water or indiscriminately saturate the wall. Existing moisture, weather, masonry absorption, and product instructions should govern preparation.
-
Prepare the compatible mortar. Follow the selected product or project specification. Do not improvise binder proportions, aggregate, water content, additives, or mixing cycles from a generic online recipe. Mix only as much as can be placed within the product’s workable period.
-
Pack the joint in successive lifts. Press mortar firmly into the prepared joint and against its surfaces. Build the fill as needed instead of smearing a thin layer over deteriorated material. A cosmetic cap leaves failed material underneath and provides little repair depth.
-
Tool at the appropriate stage. Allow the mortar to begin firming while it remains workable, then compact and shape it to the intended profile. Match adjacent sound joints where appropriate. Product instructions, weather, and mortar behavior should control timing rather than a universal clock time.
-
Clean without damaging the brick faces. Remove excess mortar carefully. Use cleaning methods compatible with the brick and mortar at the appropriate stage.
Before accepting the work, check that:
- Joints are continuously and firmly filled.
- No obvious voids or thin surface caps remain.
- Brick edges are intact.
- Joint widths and profiles remain consistent with the masonry.
- Brick faces are reasonably clean and unstained.
- Damaged bricks have not been concealed with mortar.
- Crown, cap, flashing, or roof work identified during diagnosis has not been omitted.
- Fresh joints are protected from damaging weather and premature drying.
Removal, cleaning, controlled dampening, filling in lifts, and tooling after the mortar begins to firm are all reflected in published chimney repointing guidance. Exact tools, depth, mix, and timing must still suit the masonry and selected product.
Curing, return to service, and preventing repeat failure
Relevant variables include:
- Mortar formulation
- Masonry absorption
- Air and surface temperature
- Humidity
- Wind
- Direct sun
- Rain
- Freezing risk
- Joint depth and exposure
- Covering or enclosure methods
The available evidence does not support one universal misting schedule. Excess water can be harmful, while rapid drying can also interfere with the intended cure. Follow the mortar manufacturer’s placement and curing instructions, supplemented by project-specific guidance where necessary.
A general DIY article advises waiting 24 hours before lighting a fire, but that figure should not be used as a universal return-to-service rule. It is not a specification for every mortar, climate, liner, chimney, or connected appliance.
Return to service may depend on more than the exterior mortar. Follow the selected product instructions and verify any requirements established for the chimney, appliance, inspection, or project location. Do not use the connected fireplace or appliance while liner condition, draft, combustion-gas containment, or structural stability remains unresolved.
After repair, inspect the chimney periodically from safe locations and investigate new cracks, stains, rust, efflorescence, or movement promptly. No single inspection interval is supported for every chimney because exposure, construction, use, and local requirements differ.
Most importantly, correct the cause of deterioration. Crown, cap, flashing, roof-interface, or drainage defects can undermine otherwise competent repointing.
Frequently asked questions
Can I put new mortar over cracked chimney mortar?
Not as a durable default. New mortar should not simply be smeared over loose, cracked, powdery, or debonded material. Remove failed material until a clean, sound joint is available, then clean, appropriately dampen, and pack the joint with compatible mortar.
A thin surface layer offers limited repair depth and leaves the underlying deterioration in place. It may also conceal a problem caused by water entry or instability. If the crack is associated with displacement, repointing should wait until that condition has been assessed.
Is Type N or Type S better for chimney mortar repair?
Neither is universally better. The supplied contractor guidance describes Type S as stronger and more rigid and Type N as more moderate and workable, but the sources disagree about which should be used for chimneys.
The appropriate choice depends on the existing brick, original mortar, exposure, age, and structural requirements. Soft or historic masonry may require a mortar softer than common modern mixes, while other conditions may require a different specification. Do not decide from compressive strength or bag labeling alone.
How deep should old chimney mortar be removed?
Remove deteriorated mortar until clean, uniformly sound material is reached and enough joint surface is available for a properly packed repair. Preserve the brick edges and joint geometry instead of pursuing one measurement indiscriminately.
Published directions mention approximately one-half to one inch, while other guidance limits removal in relation to brick depth. These figures provide context, not a universal specification. Joint width, brick condition, deterioration depth, removal method, and original construction should inform the decision.
Does repointing stop every chimney leak?
No. Repointing can close failed exterior joints, but water may enter at the crown, cap, flashing, roof intersection, damaged brick, or another opening. Moisture symptoms can also involve condensation.
Trace the likely water path before assuming the joints are solely responsible. Where several defects coexist, successful repair may require repointing together with crown, flashing, roofing, or other work. Exterior mortar repair does not correct a failed flue liner or venting defect.
When is chimney mortar damage too serious for DIY repair?
Stop before DIY repair when the chimney leans, shifts, separates from the building, sheds material, contains loose bricks, or has widespread spalling or extensive water damage. The same applies when previous repairs repeatedly fail, suitable access cannot be established, or the existing mortar cannot be matched with reasonable confidence.
Smoke entry, persistent draft trouble, or tile and brick fragments in the firebox require chimney-system assessment rather than exterior patching. Liner work, complex flashing, appliance-venting concerns, and suspected structural movement should be routed to appropriately qualified providers.
The final checklist is condition-first: confirm that damage is confined to stable exterior joints, trace the moisture source, choose mortar for compatibility rather than maximum strength, plan suitable access and dust control, and protect the cure according to the selected product. If the chimney leans, moves, sheds brick or flue material, admits smoke, or contains uncertain historic masonry, stop and obtain the appropriate masonry, chimney, preservation, or structural assessment before proceeding.